
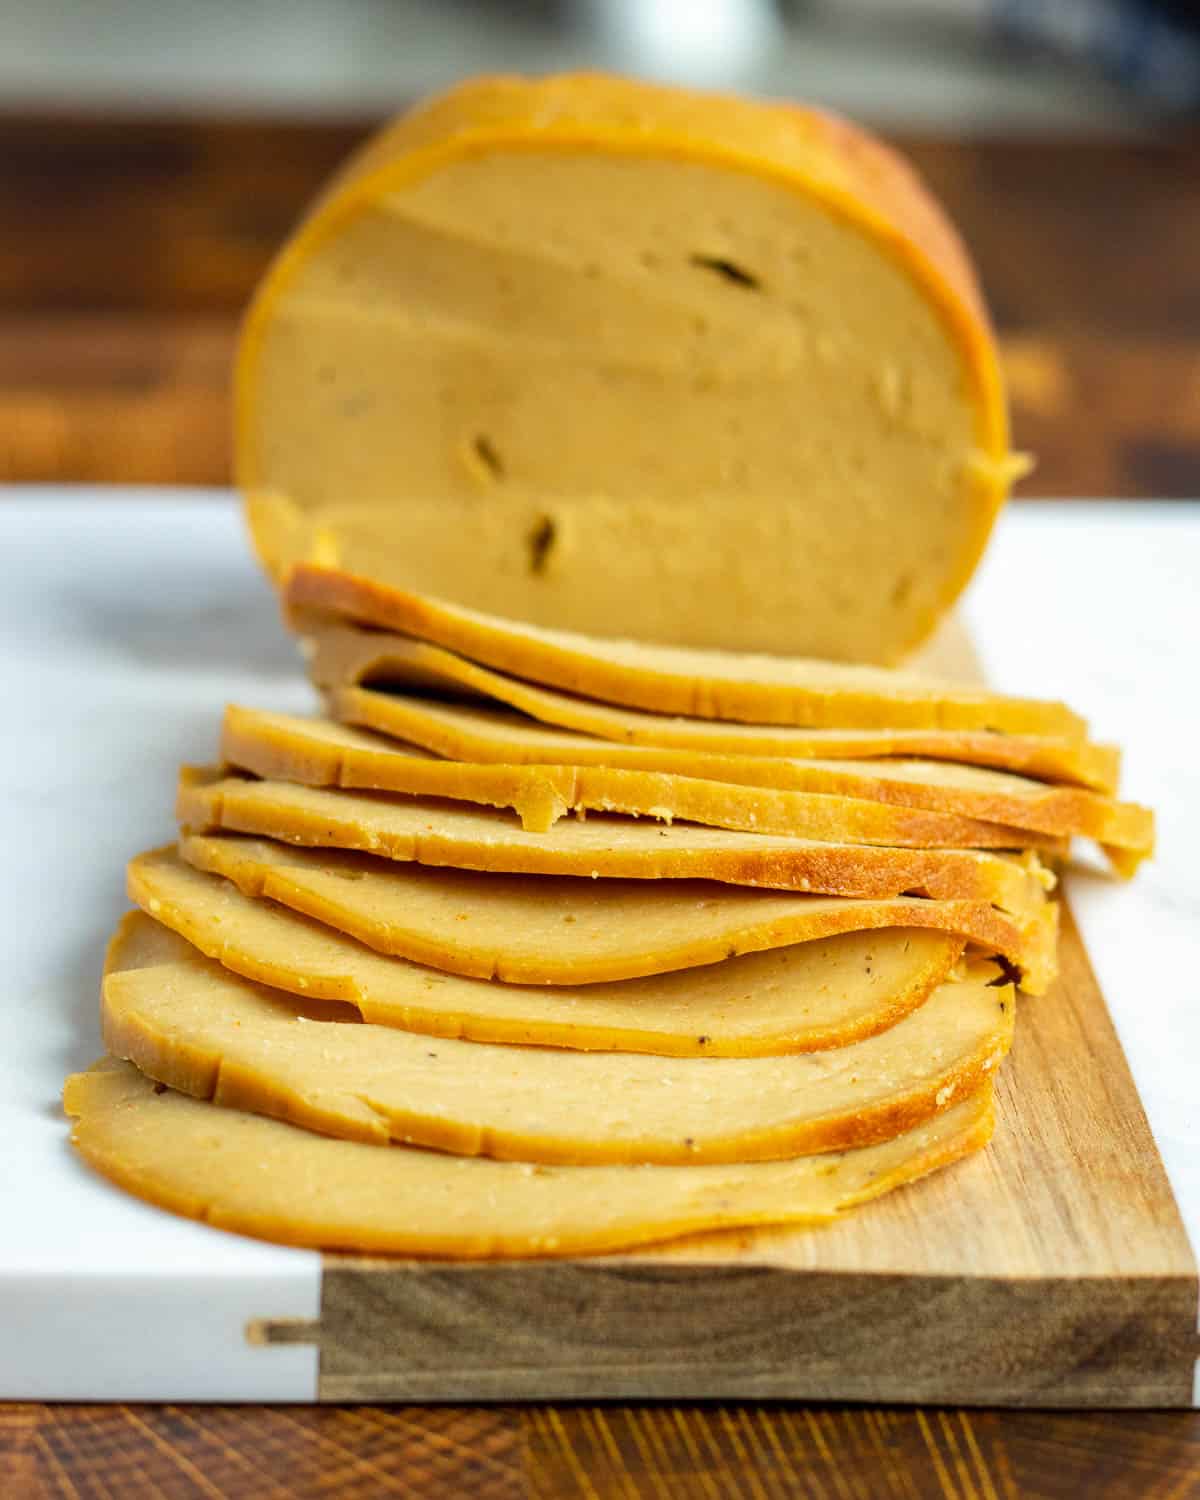
These homemade Vegan Deli Slices are an absolute staple in our house! Packed with protein and flavor, they’re easy to make and super economical compared to store-bought options. Pile them high in your sandwiches or wraps, or add them to your charcuterie spread for an epic snack time.
This recipe makes vegan cold cuts that are reminiscent of oven-baked turkey slices, but it can be easily customized to any of your favorite flavor profiles.

Table of Contents
Why Make Your Own Vegan Lunch Meat?
Nowadays, there are plenty of options in stores when it comes to vegan lunch meat. Unfortunately, they usually come in small packages with just a few servings! At the time I’m writing this blog post (in early 2023), a packet of Tofurky vegan deli slices costs about $4.50 at my local Kroger store and contains only 3 servings.
My partner and I can easily blow through a package of vegan cold cuts in just a day or two! I wanted to save some money and avoid creating so much plastic waste, so I developed this recipe.
Not only is homemade vegan lunch meat much more cost-effective, but it’s also so easy to customize with your favorite spices and seasonings.
Ingredients for Vegan Turkey Slices
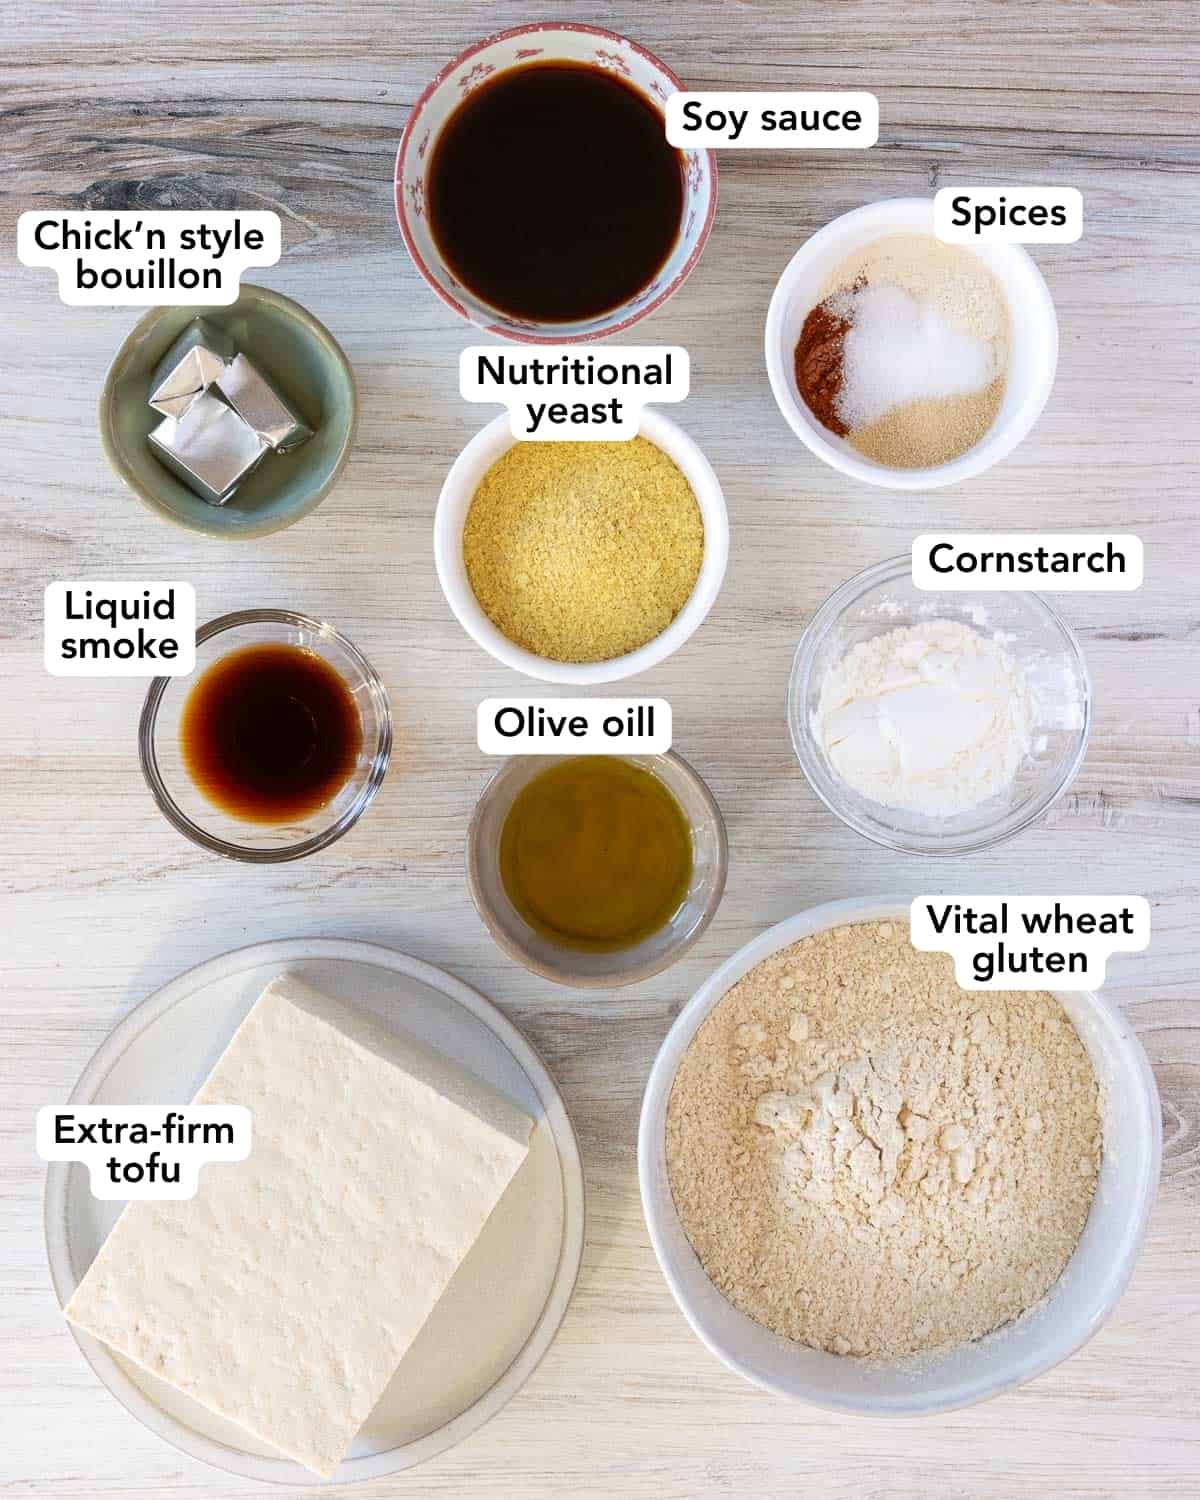
The key ingredients for homemade vegan deli meat are extra-firm tofu and vital wheat gluten. Both are a great source of plant-based protein and fiber. Together, they produce a log of seitan that has a texture remarkably similar to store-bought deli slices. It’s easy to slice super thin for sandwiches, or it can be cubed to use in stir fries and other entrées.
- Vital wheat gluten is the pure protein from wheat. It’s available at many regular grocery stores in the baking aisle, but it can also be ordered easily online.
- Extra-firm tofu is mixed in with the vital wheat gluten as an additional protein source. Seitan made with only gluten tends to be quite chewy and dry, but the tofu produces a more tender and moist result with a more neutral flavor. In this recipe, it isn’t necessary to press the tofu; the extra moisture is already figured into the measurements.
- Olive oil and tapioca starch also improve the texture of this seitan. Olive oil helps to keep the deli slices moist. Tapioca starch (cornstarch can also be used) adds a nice meaty chew.
- Nutritional yeast and soy sauce add umami and some saltiness to the seitan dough. You can also use tamari or liquid aminos in place of soy sauce, or a vegan chicken- or beef-style bouillon.
- Garlic & onion powder, paprika, salt, pepper are the simple savory seasoning blend I like to use in this recipe. Feel free to experiment with your favorite seasonings. Sometimes I add a little poultry spice for a more classic turkey flavor.
How to Make Your Own Vegan Deli Meat
Make the Dough
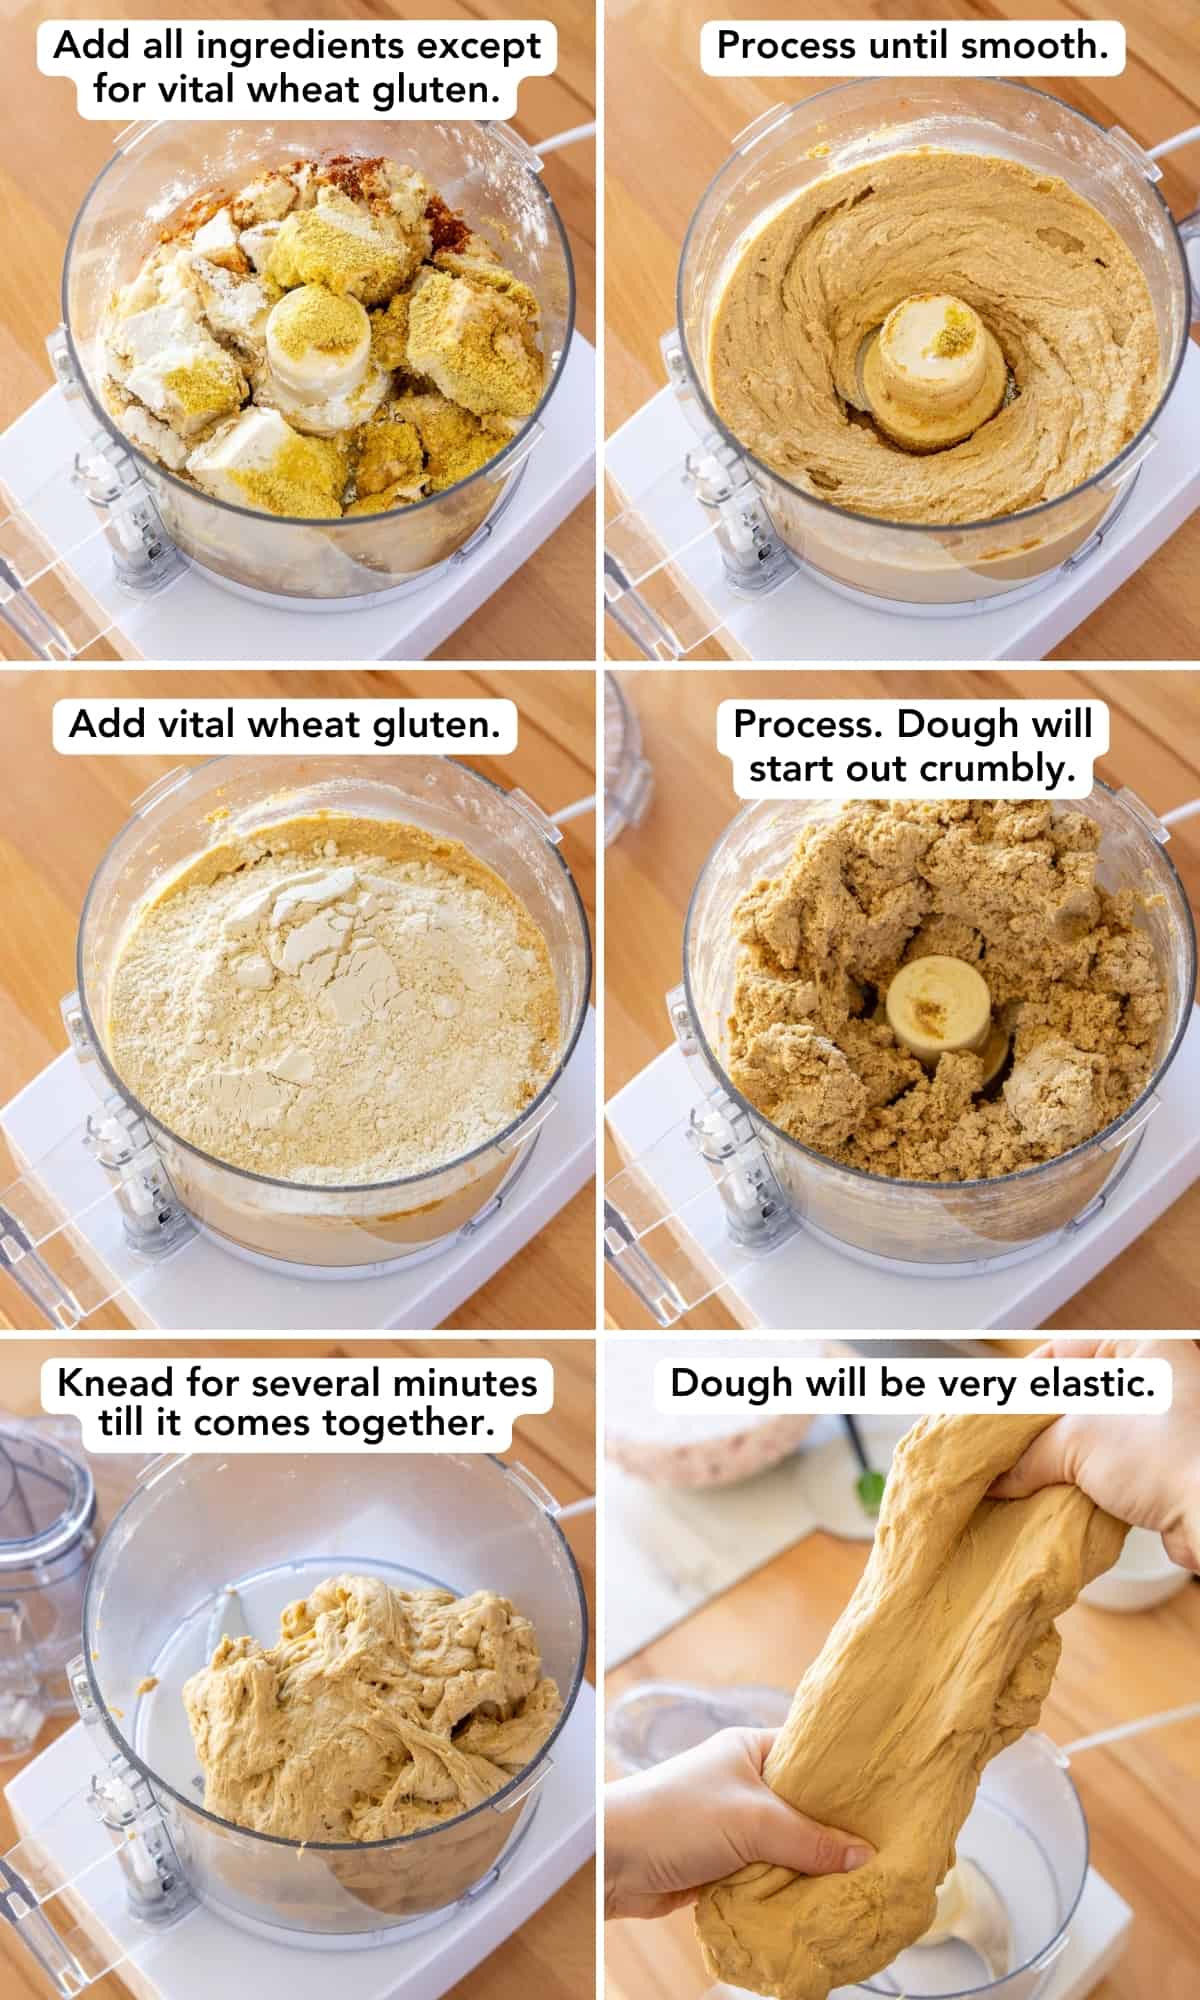
- Drain the tofu and add it to a food processor. (No need to press it first! I’ve taken the liquid into account when testing this recipe.)
- Add in all ingredients except for the vital wheat gluten, and process to form a smooth paste. Scrape down the bowl of the food processor as needed to make sure everything is evenly incorporated.
- Add in the vital wheat gluten and process for a few minutes to form and knead the dough. It’s sufficiently kneaded once it comes together into mostly one large mass.
- If the dough looks very sticky or wet, you can add in extra vital wheat gluten and knead between additions until the dough is firm.
Shape and Wrap the Dough
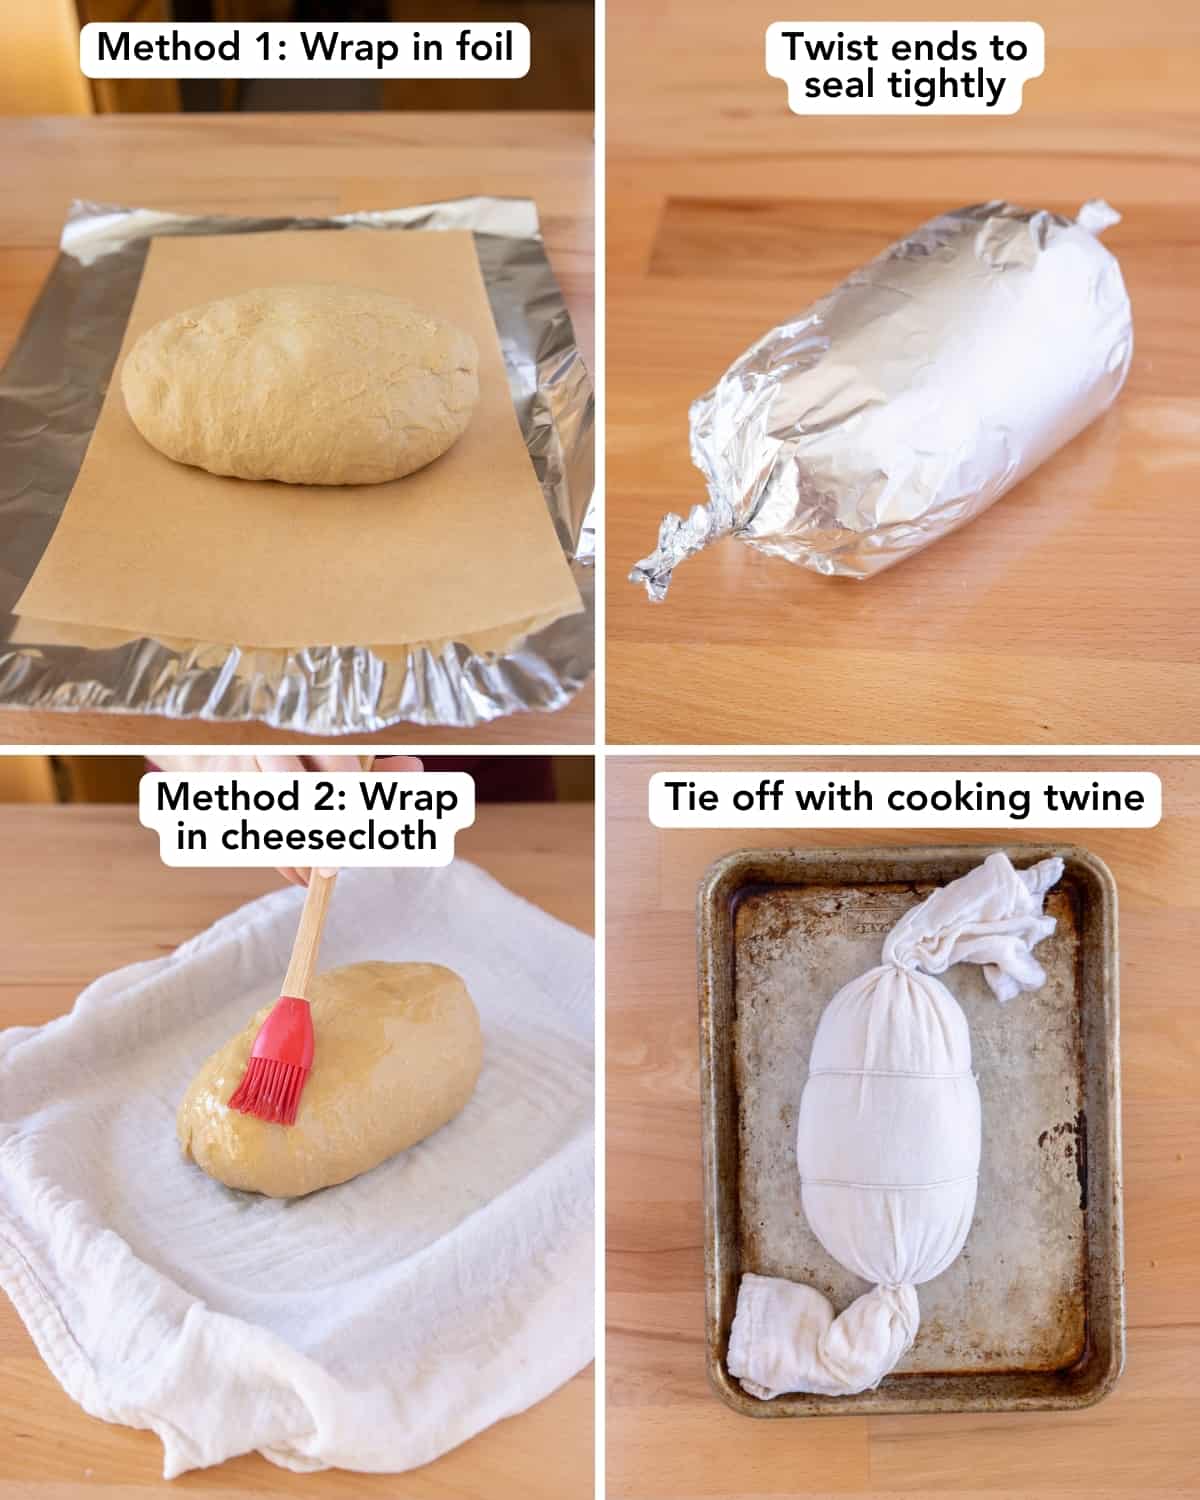
This seitan log can be wrapped two different ways, depending on how you intended to cook it (more details on this in the next section). The two options for wrapping are:
- Shape the dough into a log and wrap it first in parchment, and then in a layer of aluminum foil. Seal the foil by twisting the ends like a Tootsie roll. Note: this method can be both baked in the oven or steamed in the Instant Pot.
- Shape the dough into a log and wrap it in cheesecloth and tie it off with cooking twine. Note: this method can only be steamed in the Instant Pot. (It will dry out in the oven if wrapped this way.)
Cook the Seitan
There are two ways to cook your seitan log: you can bake it in the oven or steam it in your Instant Pot.
Oven Cooking Instructions
- Place the wrapped loaf on a baking tray. Cook in the preheated 350°F for a total of 1 hour. I like to rotate the loaf by 90° every 15 minutes so that a new section is on the bottom each time. This prevents the spice blend from burning, or the bottom of the loaf from getting overly dark or dry.
Instant Pot Cooking Instructions
- Add 1 cup of water to the Instant Pot and place a rack to keep the seitan log from touching the bottom. The loaf can be wrapped in foil as directed above, or in several layers of cheesecloth secured with twine. Place the seitan on the rack.
- Put on the lid, set the valve to Sealing, and pressure cook on High for 45 minutes. Allow to release naturally for 15 minutes before removing the seitan.
Preferably, allow the loaf to cool to room temperature without unwrapping it. Once it has cooled, it can be sliced and enjoyed. If you refrigerate it for a few hours before slicing, it will firm up considerably, making it easier to carve nice thin slices.
Alternative Uses
You don’t have to turn your homemade vegan meat into cold cuts if you don’t want to. This recipe can be used in so many ways.
- Stir-fry it: Chop it into chunks or strips to enjoy in stir-fries.
- Fried rice, soup & pasta: Dice it up into smaller pieces and add it to fried rice, soups, and pasta dishes. (I use it in dishes that usually call for diced ham.)
- Holiday roast: If you’d prefer a homemade vegan roast over a store-bought one for the holidays, look no further! This tofu-seitan log can be served whole next to stuffing, gravy, and the rest of the traditional fixings. You can even add your favorite stuffing when shaping the dough into a log. “Carve” it up when it’s time to serve.
- Cutlets: Slice the log on a bias into 1/2″ slices. Bread and fry/bake for crispy vegan cutlets that can be used in dishes like vegan chicken parmesan.
Recipe FAQ – Substitutions & Variations
Q: Can this recipe be made gluten-free?
This is a question I get often, and unfortunately there’s no good substitution for vital wheat gluten in this particular recipe. It provides all the protein and structure.
Q: Can Vegan Deli Slices be made oil-free?
Yep! Simply omit the oil from the recipe. The slices will be a little on the dry side, but they’ll still be very delicious.
Q: Can I make this without a food processor?
You can use a blender to purée the tofu with the wet ingredients and spices, but a blender won’t be able to knead the dough in the same way as the food processor. You’ll need to hand-knead the dough.
To use a blender, simply add all the ingredients except for the vital wheat gluten to a blender, and blend until smooth. Then add the vital wheat gluten to a bowl and pour the wet mixture in. Stir to combine, and turn the dough out onto a clean surface and knead until firm. Then proceed with the shaping and cooking instructions as written.
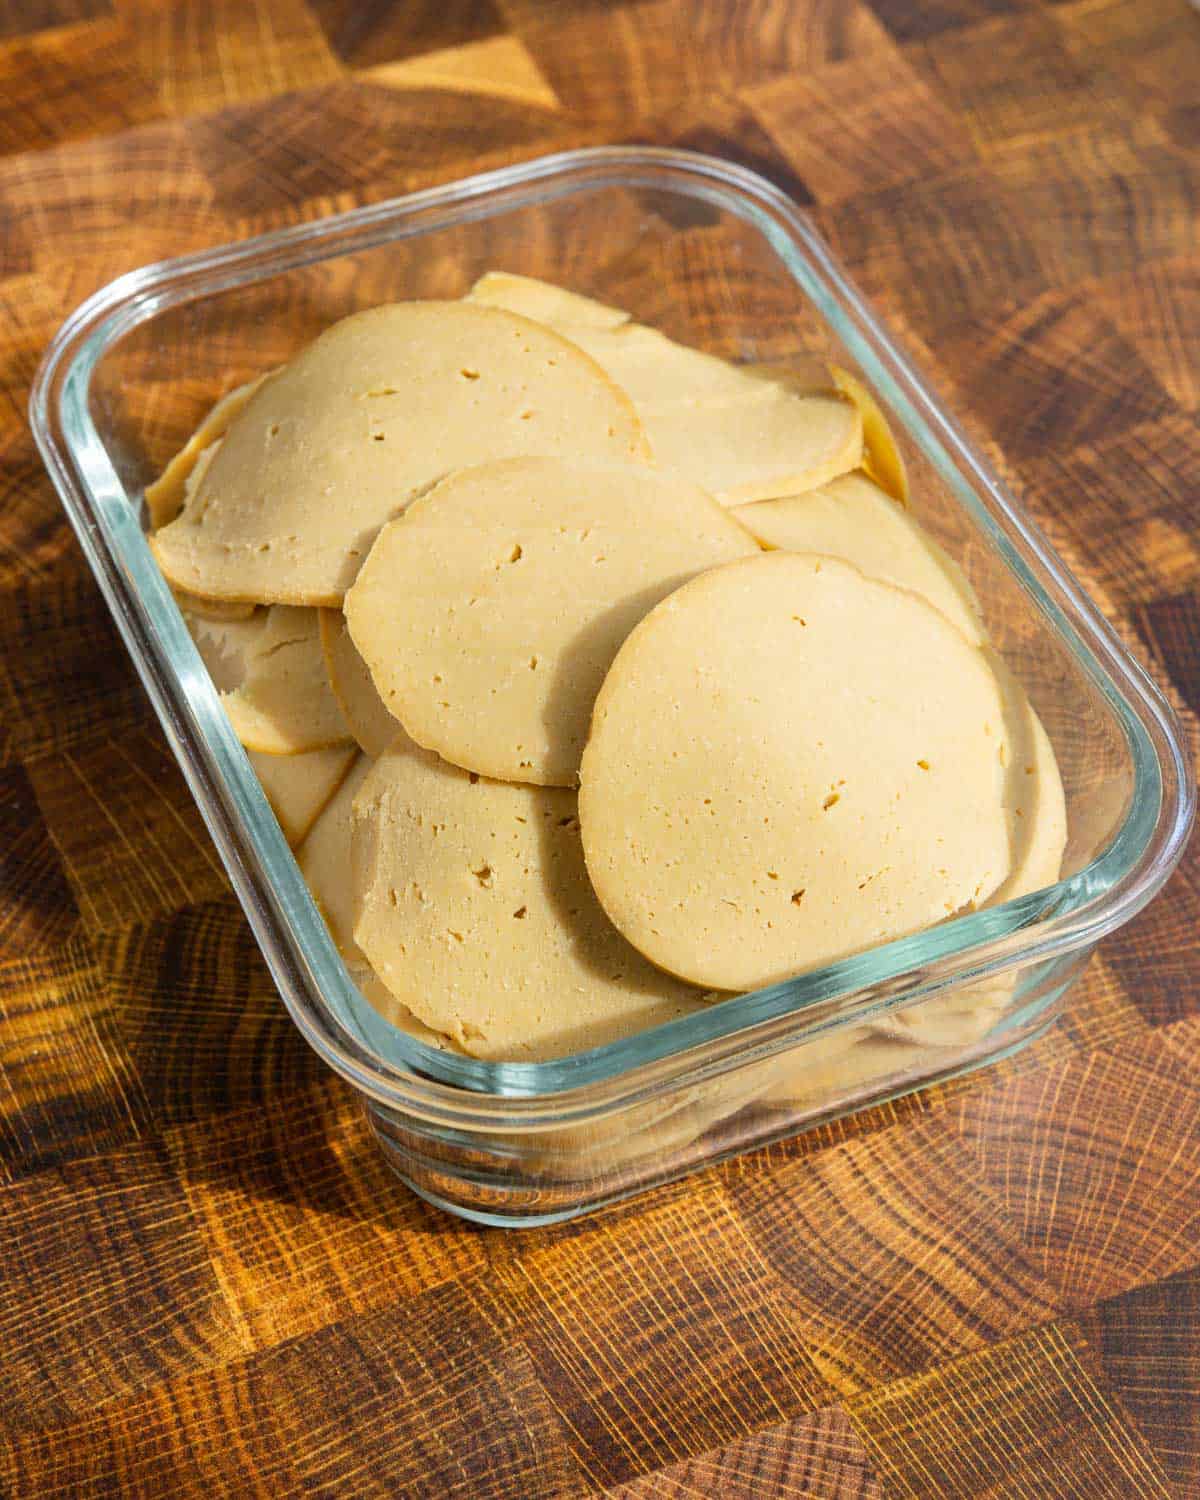
Storing Your Homemade Vegan Deli Slices
Refrigerator: Your plant-based deli slices can be stored in the refrigerator in an airtight container for up to a week, but they are best enjoyed within the first 5 days.
Freezer: Freezing is a great option if you don’t think you’ll be able to eat the entire batch within the first week. Store for up to 1 month in the freezer, and simply defrost in the refrigerator overnight.
You can either freeze log whole, or pre-slice it before freezing. It will be easier to defrost if it’s pre-sliced, but if you’re not sure about how you want to use it, feel free to freeze it whole. If freezing whole, make sure it has cooled before placing in the freezer.
More High-Protein Vegan Recipes
- Eric’s Original Vegan Jerky
- Easy Stovetop Tempeh Bacon
- Vegan Garlic Ginger Meatballs
- Corned Beef Seitan
Did You Make This Recipe?
If you’ve made this recipe and loved it, please leave a 5-star rating and review below! Also, if you post a picture on Instagram and tag me @sarahsvegankitchen_, I’d love to see your work.
Homemade Vegan Deli Slices
Video
Ingredients
- 1 (14 oz) block extra-firm tofu
- 1-2 teaspoons liquid smoke to preference
- 3 tablespoons soy sauce (or 1 tbsp bouillon paste + 2 tablespoons water)
- 2 tablespoons olive oil or oil of choice
- 2 tablespoons cornstarch
- 1/4 cup nutritional yeast
- 2 teaspoons garlic powder
- 2 teaspoons onion powder
- 1 teaspoon paprika
- 1 teaspoon salt (reduce if needed)
- black pepper to preference
- 1 1/2 cups (180g) vital wheat gluten see notes on measuring
Instructions
- If baking: Preheat the oven 350°F.
- Add in wet ingredients and spices: Drain the tofu but do not press it; the liquid is figured into the recipe. Break into a few pieces and add to a food processor along with liquid smoke, soy sauce (or bouillon paste), and olive oil. Also add in tapioca starch and seasonings (nutritional yeast, onion powder, garlic powder, paprika, salt, and pepper). Process into a smooth paste, scraping down the sides of the bowl as needed to incorporate everything evenly.
- Form the dough: Add in vital wheat gluten and run the food processor to combine all ingredients and knead the dough. The dough will go through a few phases: first it will come together; then it may appear to crumble apart. Keep processing and eventually the gluten will develop, and it will come together into a firm dough again. If it's hard on your food processor, you can knead half of the dough at a time and then piece it back together afterward.
- Knead: The dough should be firm enough that it "cleans" the sides of the bowl — i.e., it should not be so wet that it sticks to the container. If it does, sprinkle in vital wheat gluten 1 tablespoon at a time, processing to combine between additions, until a firm dough is achieved.
- Shape & wrap: Remove the dough to a clean surface. Knead it 2-3 times, then shape it into a log. I like to first wrap the seitan in a layer of parchment, followed by a layer of aluminum foil. You can wrap it directly in aluminum if you feel comfortable doing so. Twist off the ends of the foil like a Tootsie roll to seal it in. Make sure the edges of foil overlap each other by at least a few inches, otherwise the loaf might burst out of the seam as it expands during the cooking process.
- Oven Cooking Instructions: Place the wrapped loaf on a baking tray. Cook in the preheated 350°F for a total of 1 hour. I like to rotate the loaf by 90° every 15 minutes so that a new section is on the bottom each time. This prevents the bottom of the loaf from getting overly dark or dry.
- Instant Pot Cooking Instructions: Add 1 cup of water to the Instant Pot and place a rack to keep the seitan log from touching the bottom. The loaf can be wrapped in foil as directed above, or in several layers of cheesecloth secured with twine. Place the seitan on the rack. Put on the lid, set the valve to Sealing, and pressure cook on High for 1 hour. Allow to release naturally for 15 minutes before removing the seitan.
- Cool fully: When the loaf is done cooking, do not unwrap it. Allow it to cool on the counter, then place it in the fridge to chill for a few hours or overnight. (It can be eaten while still warm, but the texture improves and it is easier to slice when chilled, especially if you're going for thin deli slices.)
Notes
Nutrition
The nutrition information provided on Sarah’s Vegan Kitchen is an estimate and is offered for general informational purposes only. Values will vary depending on the specific brands and amounts used.


This is an absolute game-changer for me. My kids love deli slices for sandwiches in their lunch, but inflation made them unaffordable. This recipe is super simple/great tasting/cost-effective. The whole family loves it! Thank you Sarah 🙂
I cannot have wheat/gluten so is there a substitute for vital wheat gluten?
Thanks for sharing! I know the recipe mentions mixing in a blender and kneading by hand, but have you tried the whole process with a Vitamix? Did you have any luck with the kneading portion there? Or should I just play it safe and mix/knead separately?
Thanks so much for this recipe! I was a bit sceptical because my previous takes on seitan didn’t turn out so well but this one really convinced me! I couldn’t wait to let it cool completely but it’s so good, was hardly able to stop eating it. Oh and I used (partly) smoked tofu because I don’t have liquid smoke, but I think it fits really nicely.
This turned out so great, I absolutely love the taste and texture, something Ive been wishing for! Thanks Sarah
Can you use all purpose flour instead of wheat if you don’t have that?
I just made this, it’s very good! Thank you for posting the recipe.
Just finished making this and it came out pretty good. Like other commenters, I did find it a little dry and a little bit too salty so maybe I will cut back on the amount of boullion a little (you forgot to include it in the ingredient list so I wasn’t sure how much to put), and use low sodium soy next time. In terms of dryness I’m not quite sure how to work on that, I don’t want to add too much more oil to it to keep the calories down but all in all, quite happy with it. One of the better Seitan recipes I’ve tried. 🙂
I finally made this, and it is the best seitan I’ve had. I used 2 tsp liquid smoke, and I didn’t taste the gluten. It actually did have a bit of turkey flavor to it. I think next time, I’ll increase the smoke by a tsp.
Thank you
Lawrence
I AM SO GLAD I CAME ACROSS YOUR LINKTREE ON TIKTOK
So I made this tonight! It is in the AirFryer now at 350 on bake mode and I hope it comes out good.
I am very excited.
So I have one question. How would you say storing this works is it freezer safe?
How much protien do you think is in this ?
What portion is a serving?
I know so many questions but I am curious. I look forward to trying more recipes
We always cut our loaf in two and freeze half. Thaws great a d tastes just as fresh to us!
Absolutely delicious and super easy! Like another commenter, I left out the salt and used low-sodium soy sauce. It was still plenty salty. It made a 700 gram loaf and cost the same as a 200 gram package of the cheapest commercial vegan deli slices. The protein content is great as well. This just became a new staple at our house.
Hi Sarah
Any suggestions how this could made less dense? Less gluten flour maybe?
Hey Sarah! I made this recently and it’s delicious, but it was a bit dry. I live in really dry climate, and sometimes need to adjust recipes because of that. Can I ask your opinion on how I might adjust this recipe slightly to make it more juicy? Thank you!
Can I use normal tofu and just press it? My country has either silken or ‘normal’ tofu
Hi Sarah! This is fabulous, but since I batch cook and meal prep, wondering if the leftovers can be frozen for later use? I’m the only Vegan in the house.
Thanks again