These fluffy vegan dinner rolls are inspired by classic Japanese milk bread and use a simple tangzhong (flour paste) in the base to create a pillowy-soft crumb. They bake up tender and stay fresh for days. Buttery soft and golden, they’re a beautiful addition to any holiday spread or dinner party. A guaranteed crowd pleaser that no one will guess is entirely plant-based.
I adapted this recipe from my Vegan Milk Bread recipe to make 15 or 20 pull-apart rolls, perfect for sharing. They can be baked up in a single 9×13″ pan, or across two 9″ round pans or two 8″ square pans.

Table of Contents
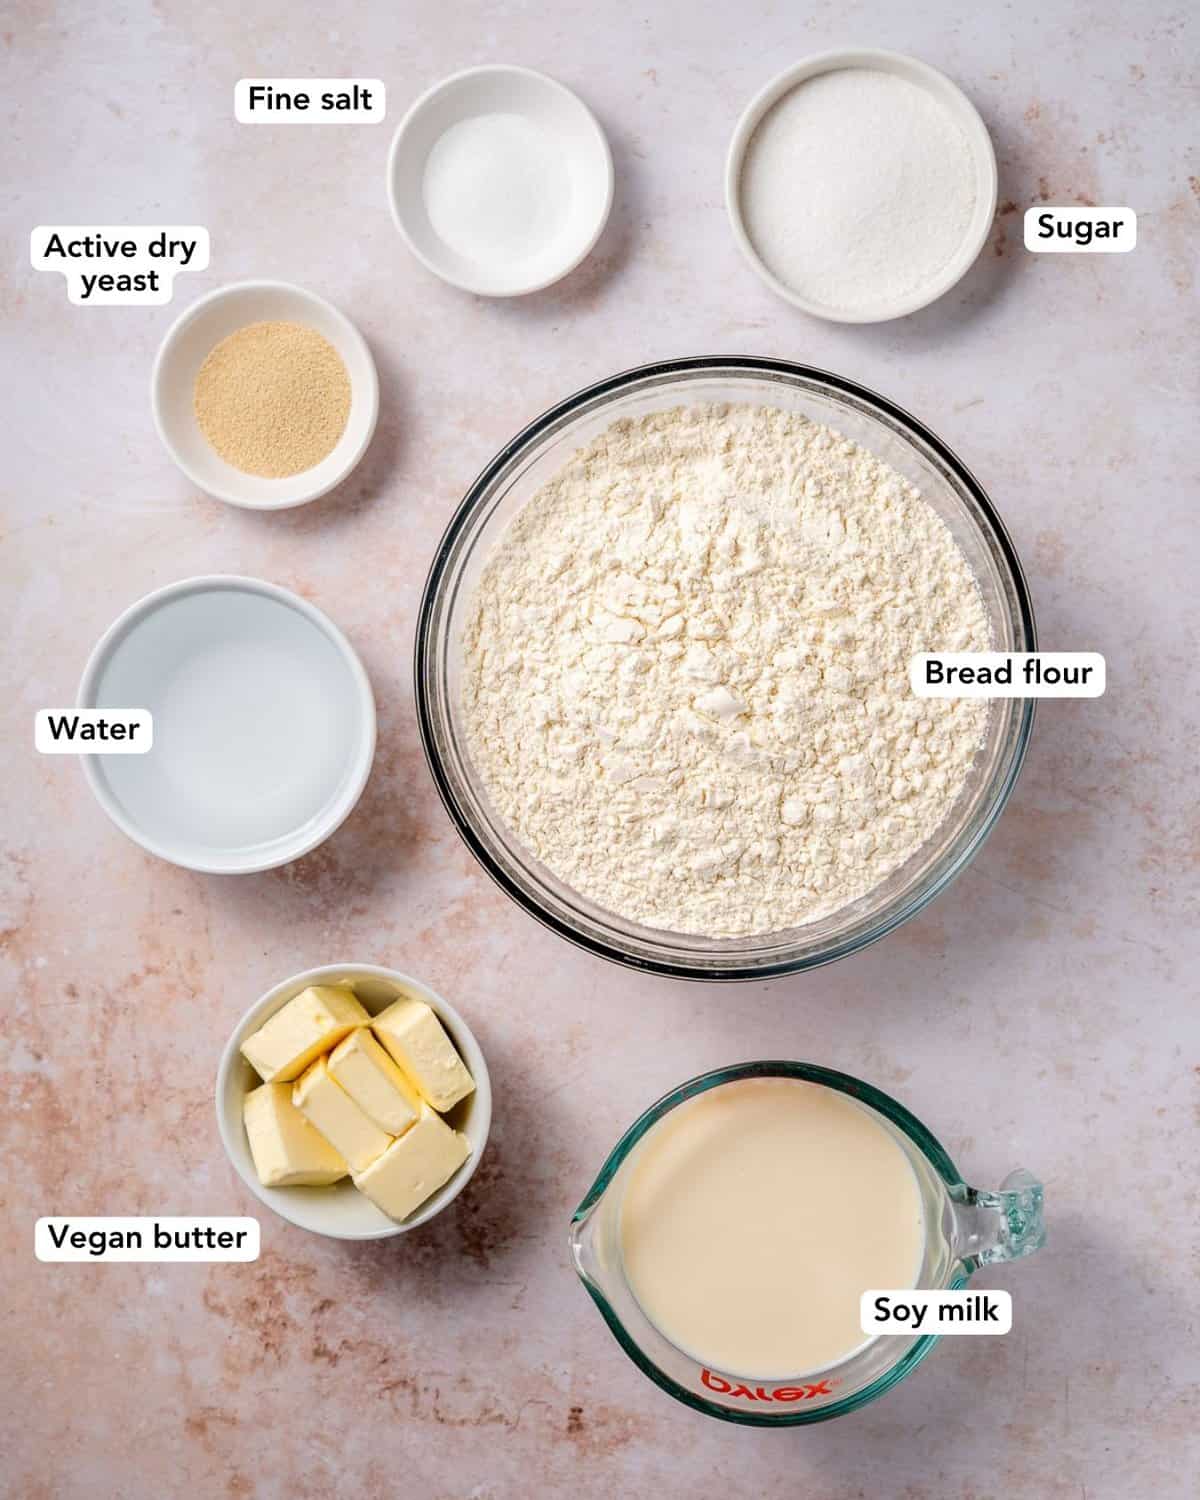
Ingredients for Milk Bread Dinner Rolls
- Bread flour. With a higher gluten content than regular all-purpose flour, bread flour will help you achieve a strong rise — this is crucial if you want extra fluffy bread.
- Water.
- Soy milk. My preferred type of milk for most vegan baking, because it’s creamy, has a protein content similar to dairy milk, and tends to be quite neutral in flavor.
- Vegan butter. Important for a buttery flavor and super tender crumb.
- Sugar & salt. The perfect dinner roll has just the right amount of sweetness and salt.
How to Make the Fluffy Vegan Dinner Rolls (Visual Guide)
Make the Tangzhong
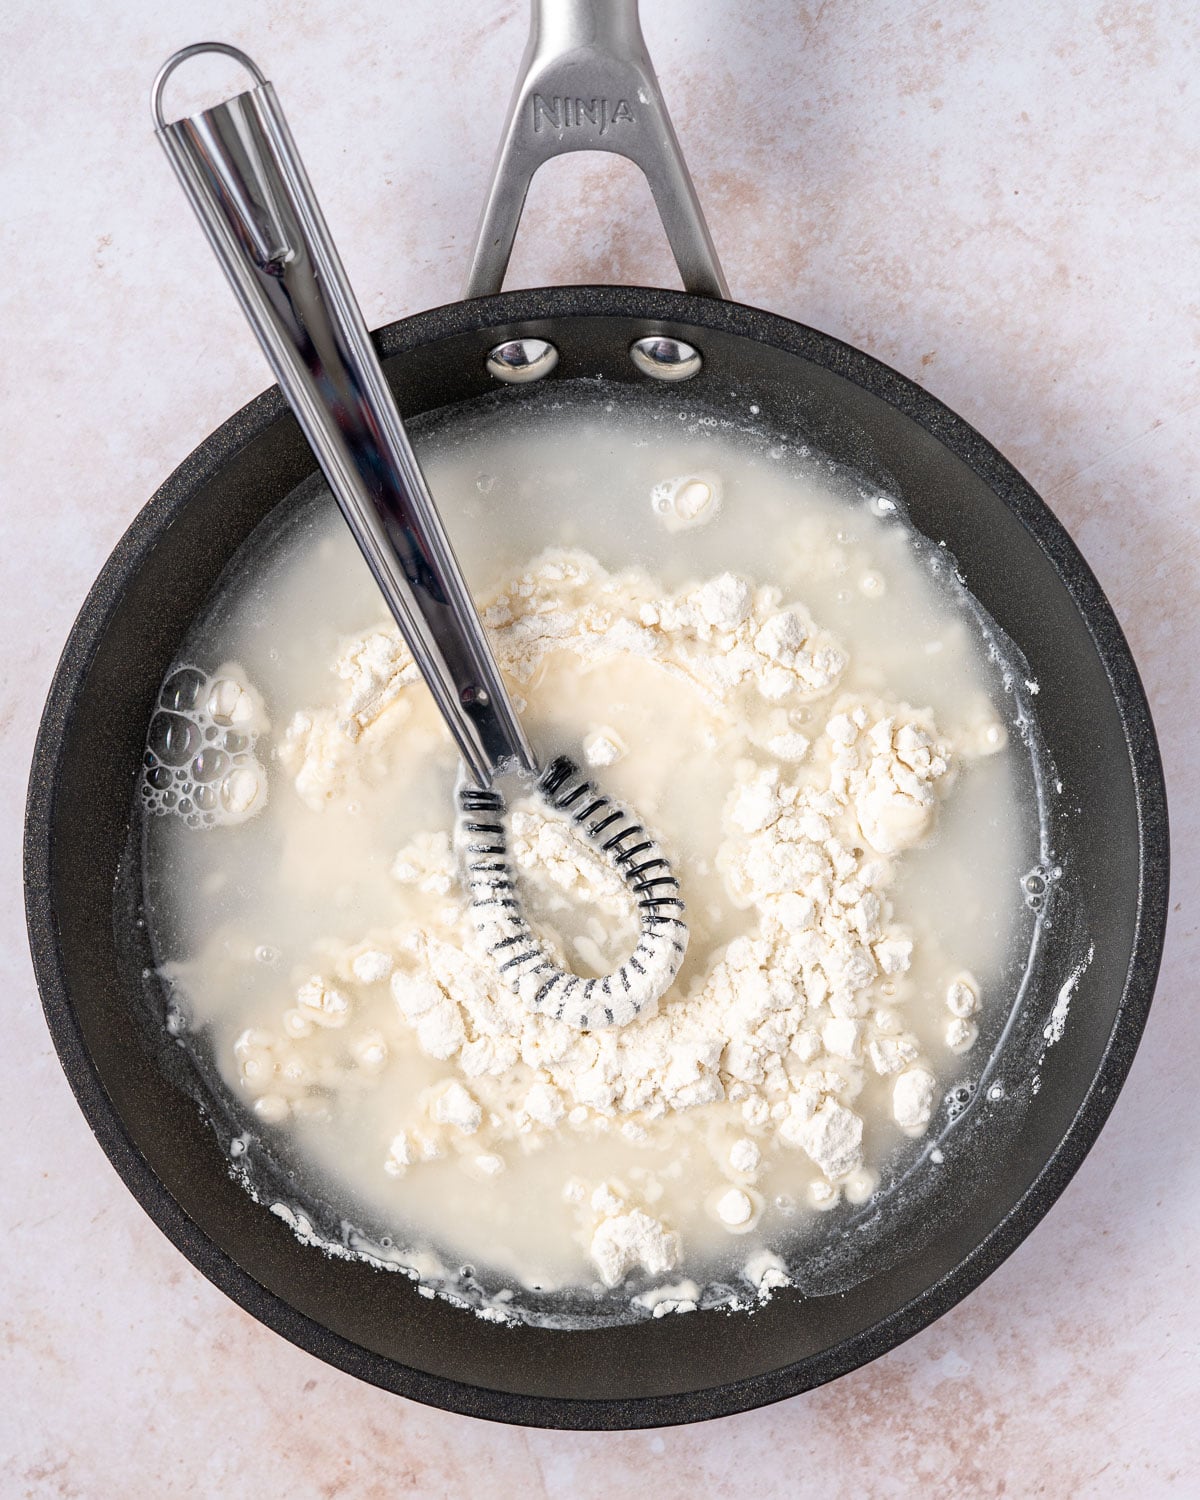
Whisk together ingredients for tangzhong.

Cook until thickened to a paste consistency.
Mix the Dough
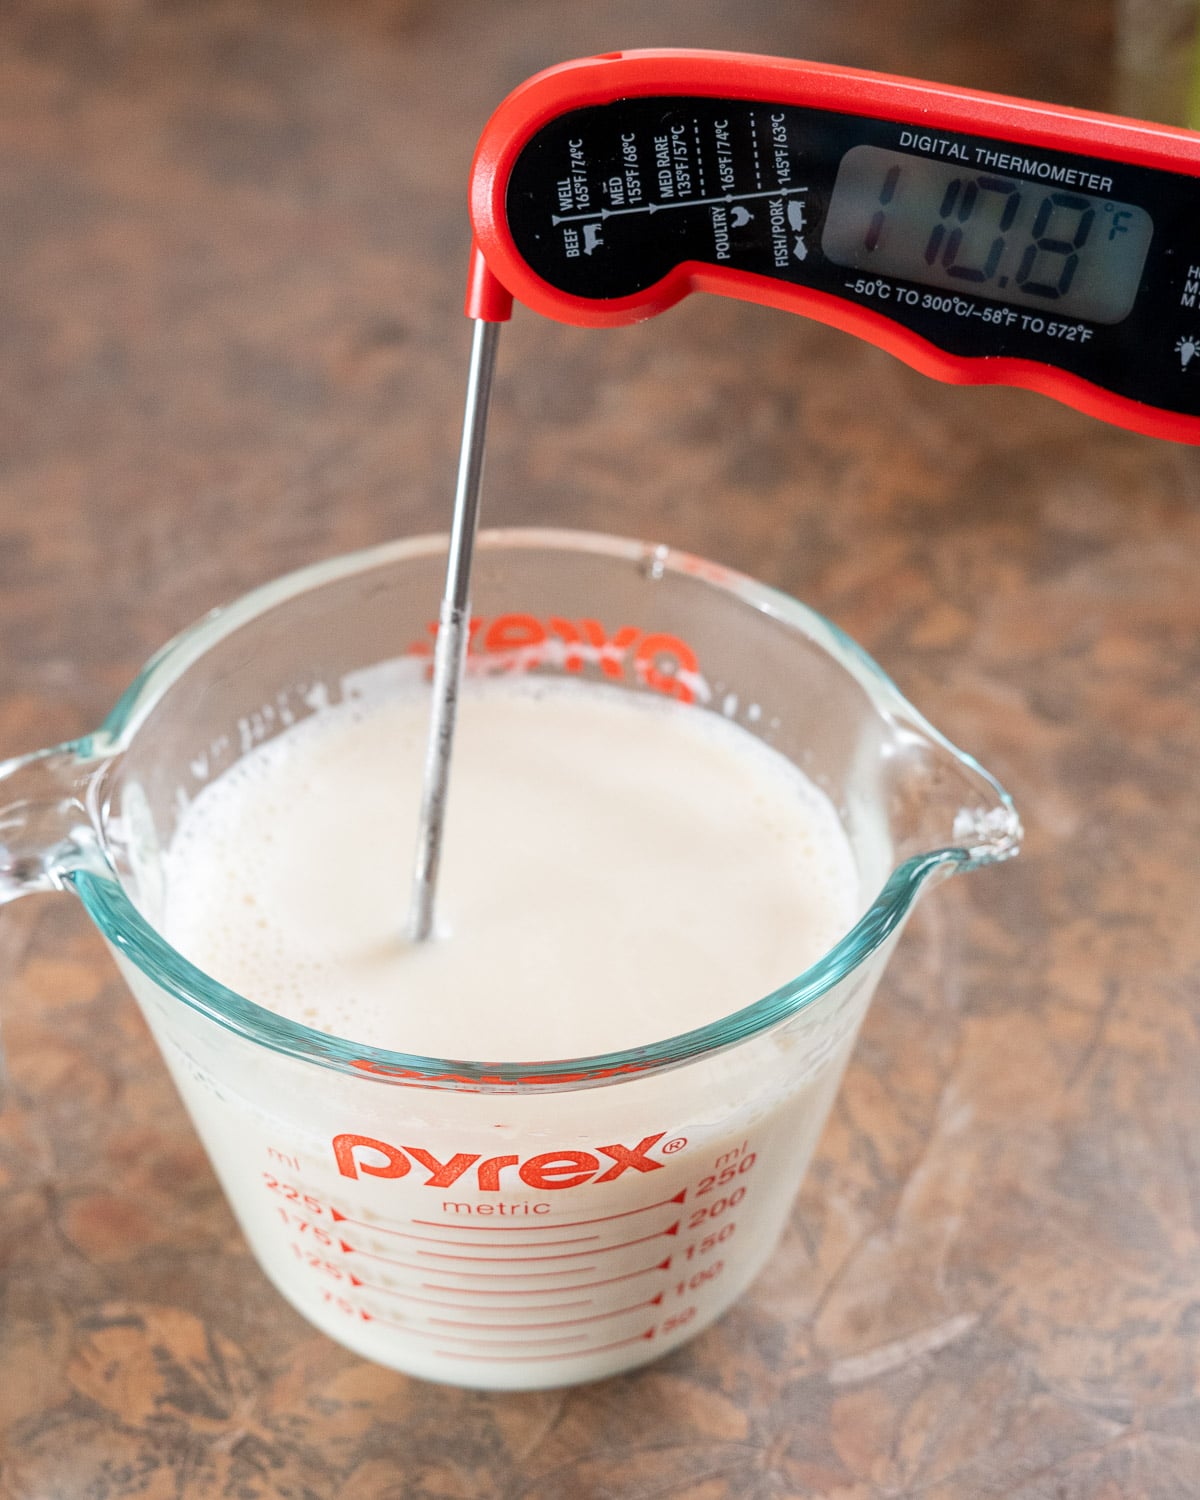
Heat milk till lukewarm.
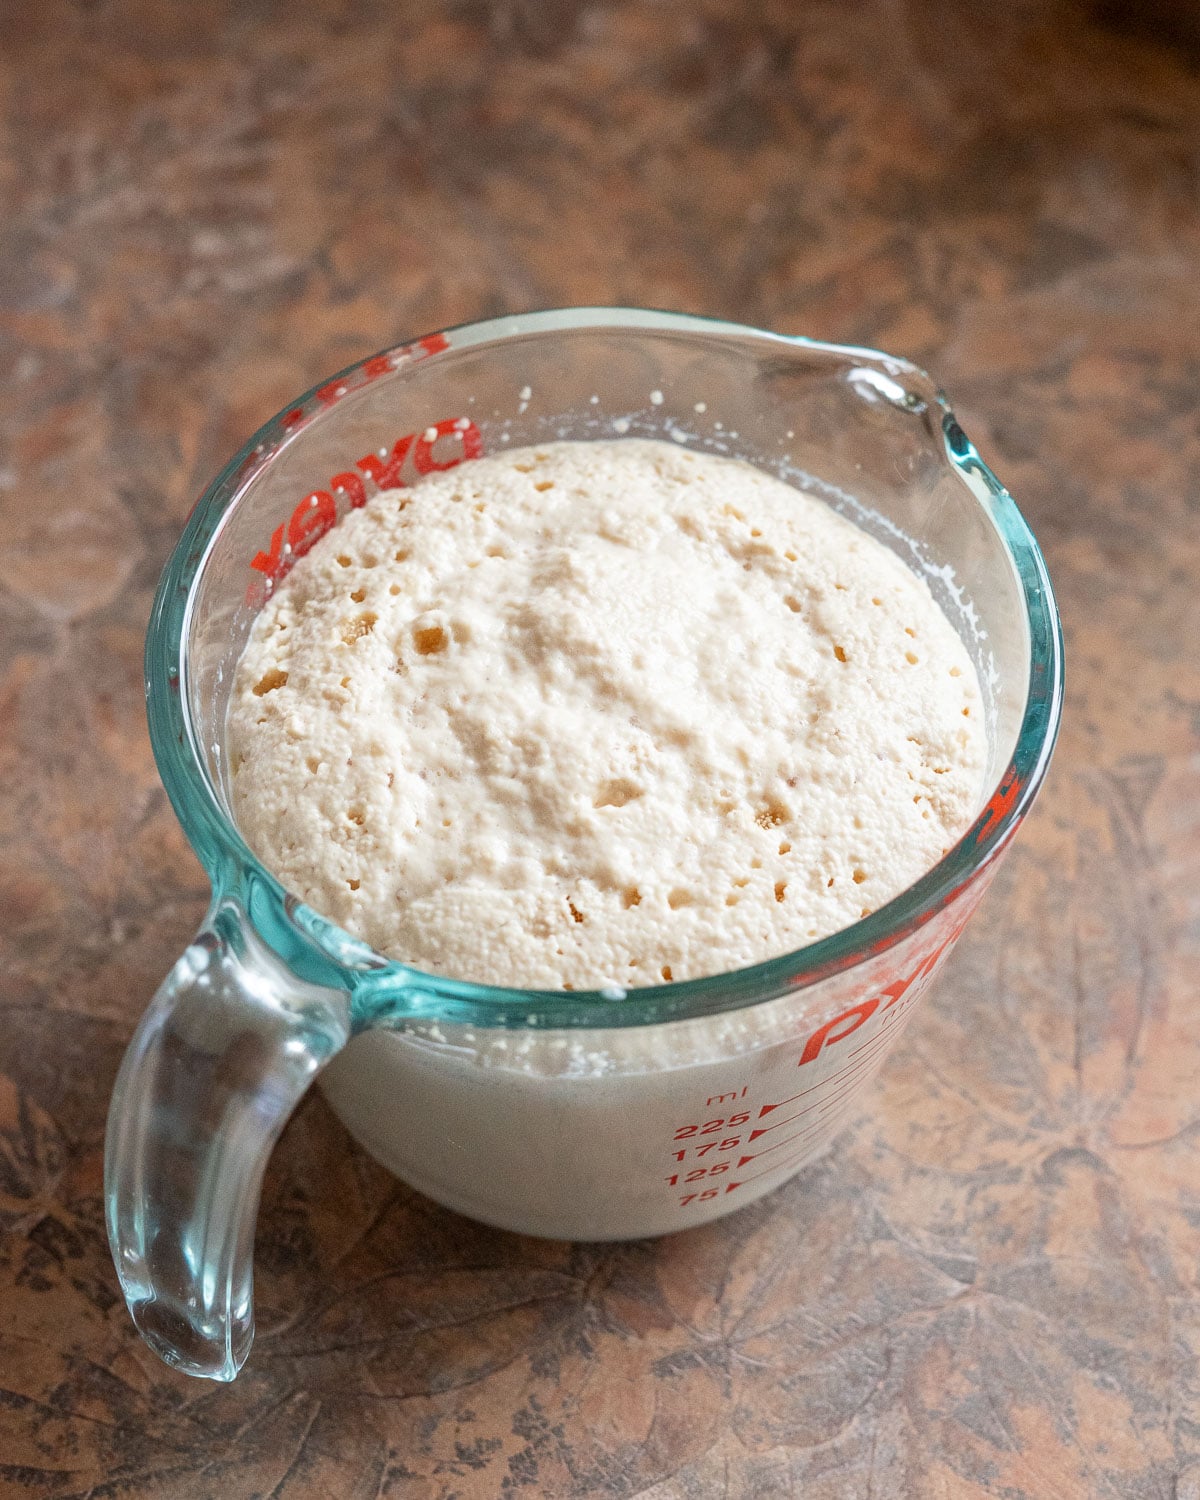
Add yeast and proof yeast till foamy.
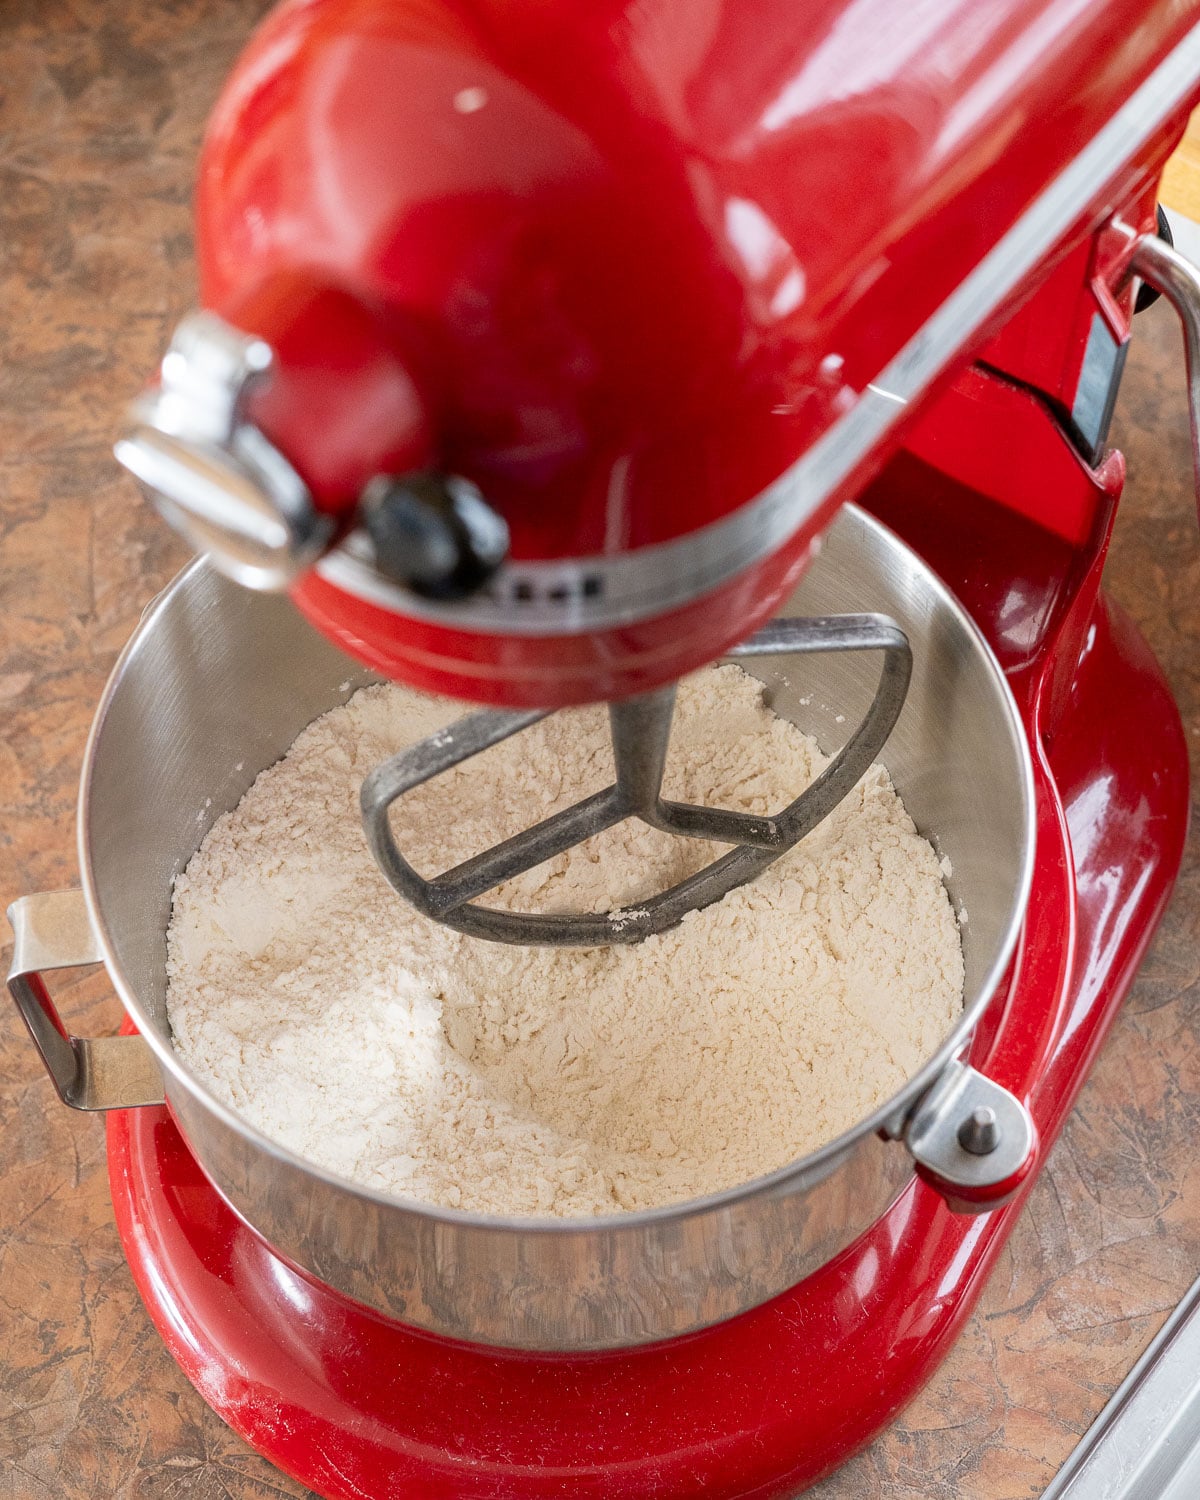
Mix bread flour, salt, and sugar together in the bowl of a stand mixer.
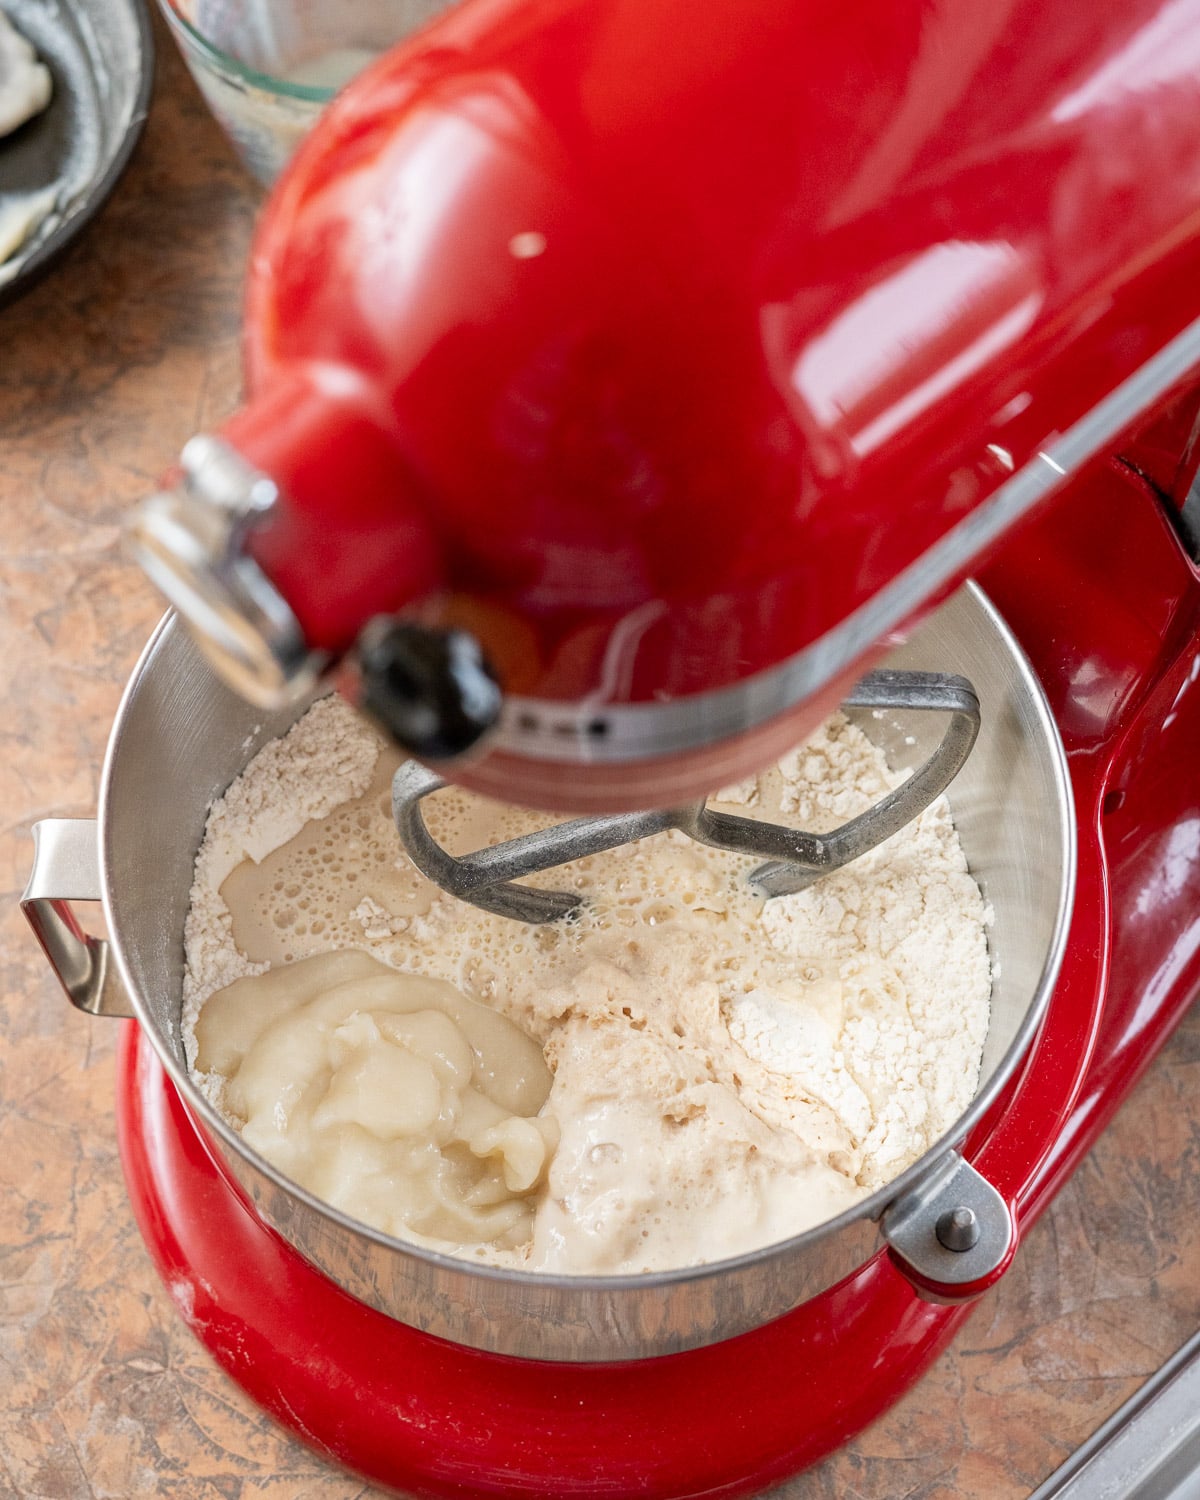
Add proofed yeast mixture, softened butter, and slightly cooled tangzhong.
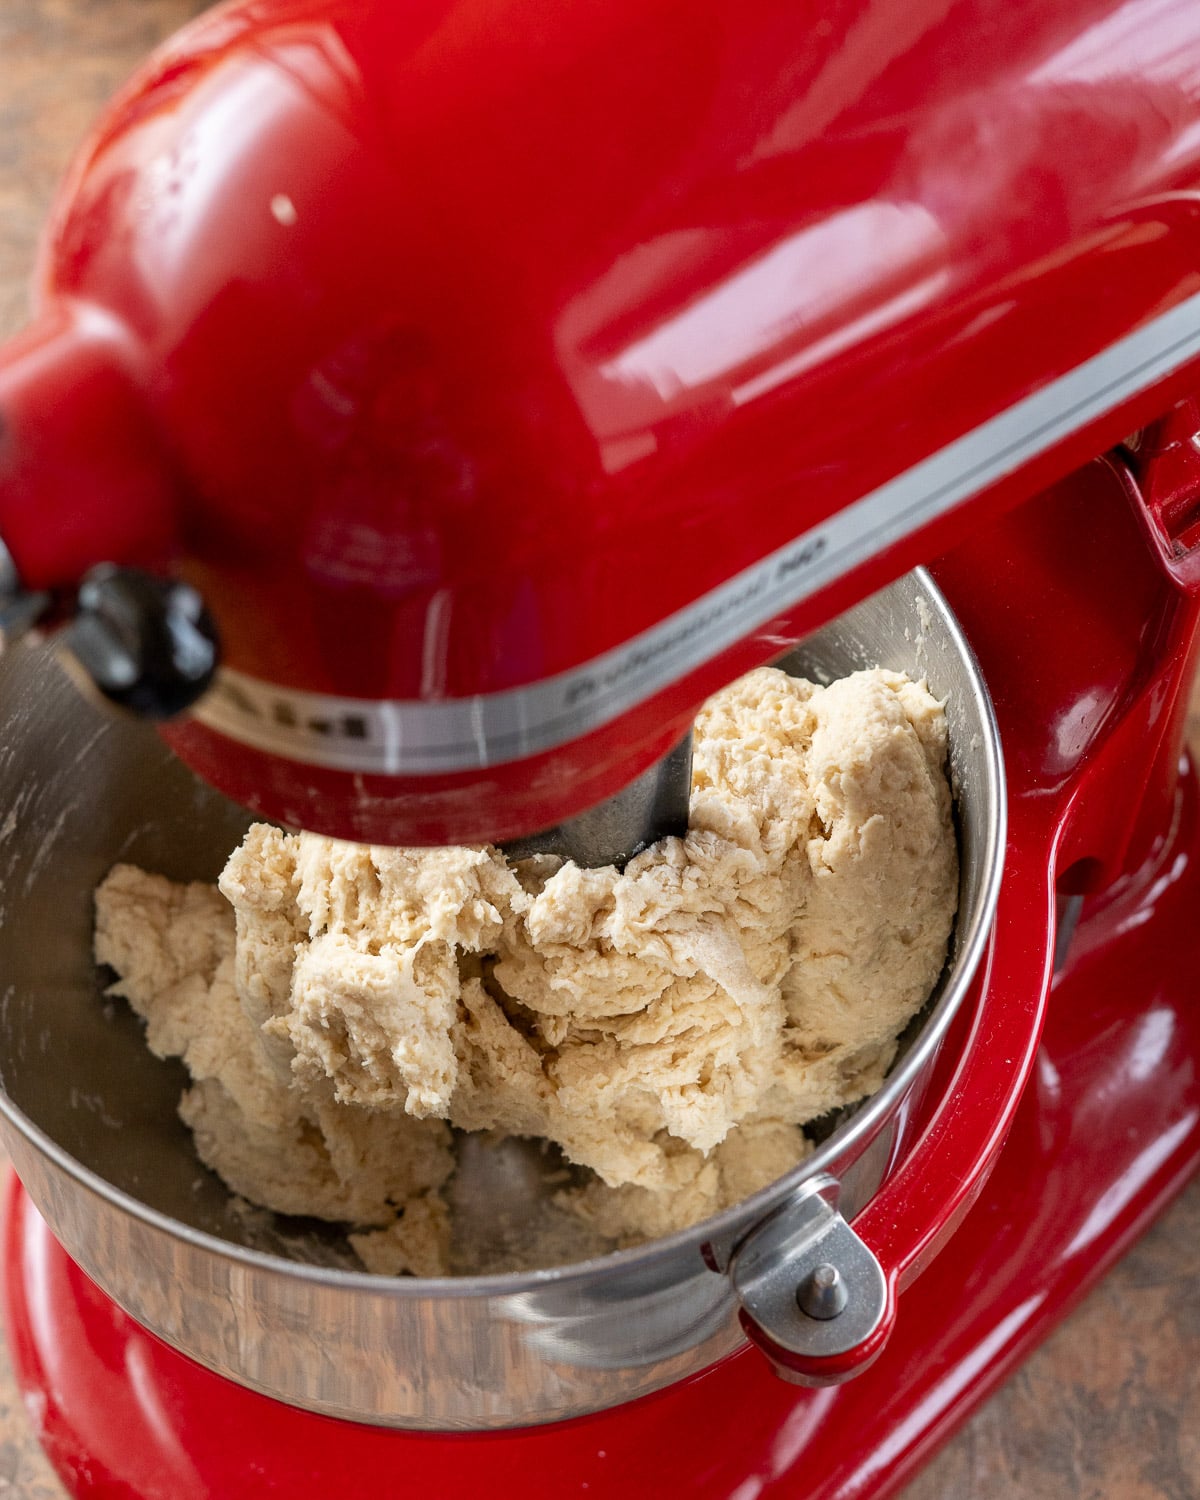
Mix with paddle attachment till everything comes together in a shaggy dough.
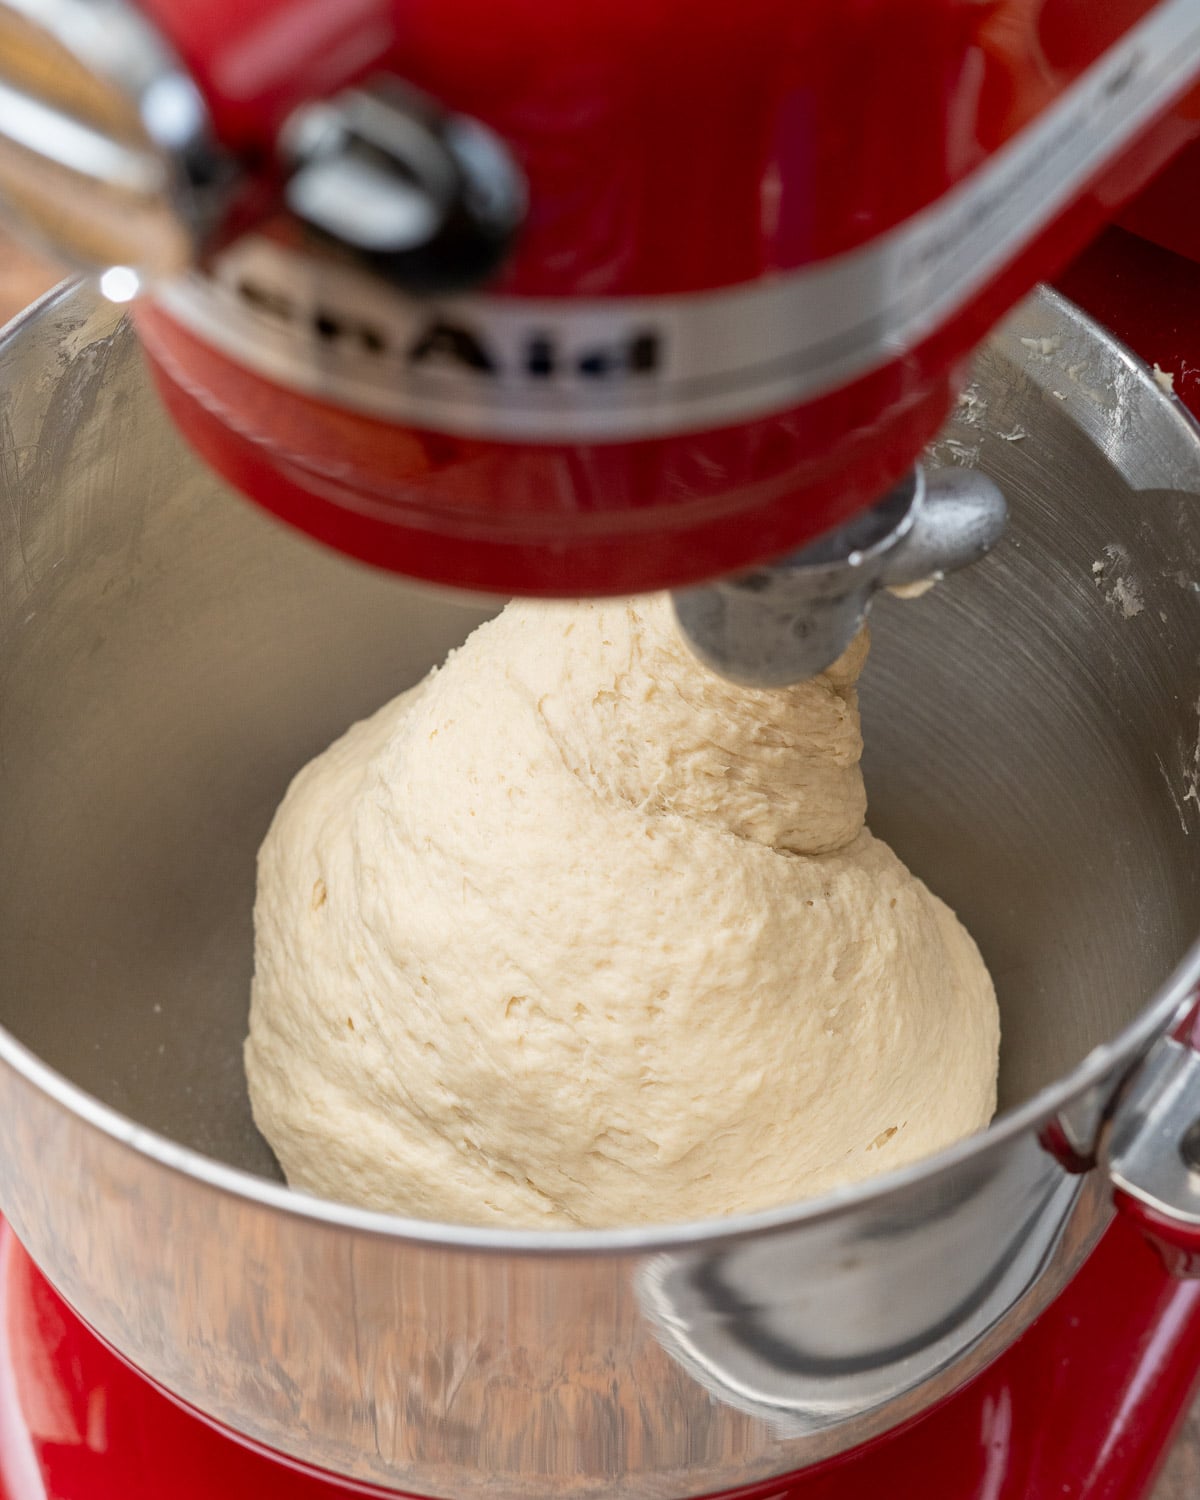
Swap to the dough hook and knead until the dough is smooth, elastic, and springs back when poked. It should clear the sides of the bowl. If it’s overly sticky, knead in extra flour a few tablespoons at a time.
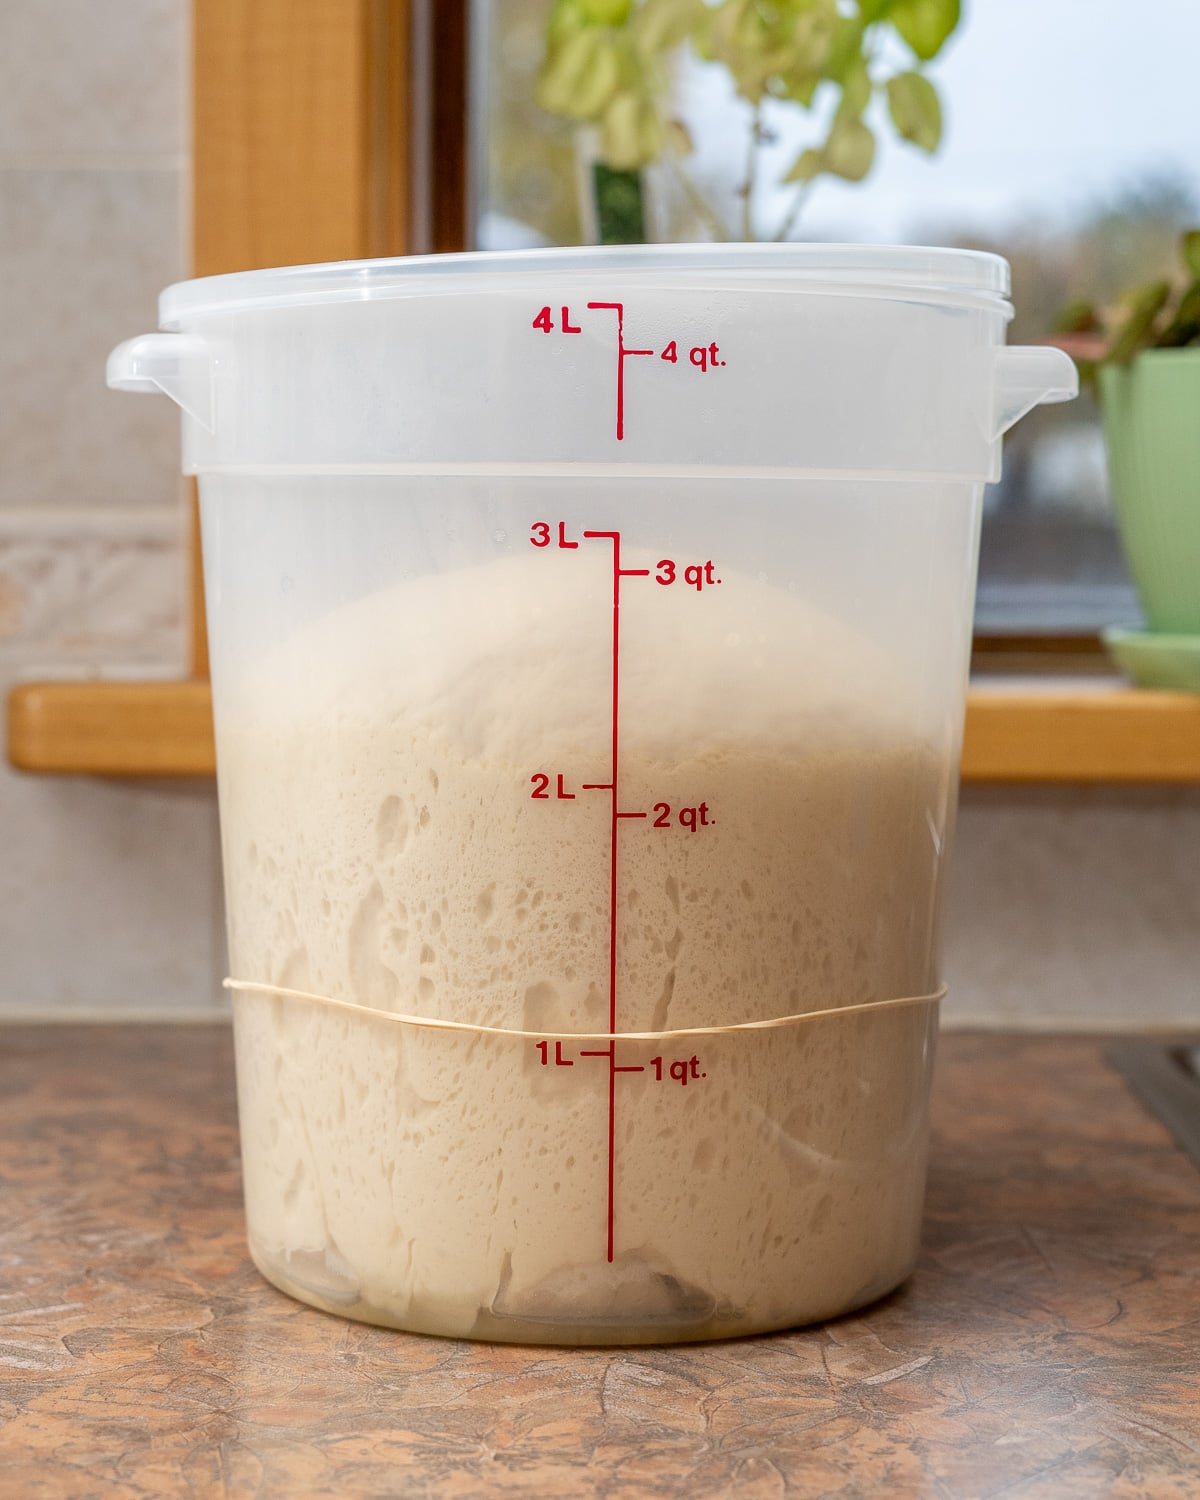
Rise the Dough

Shape the Rolls
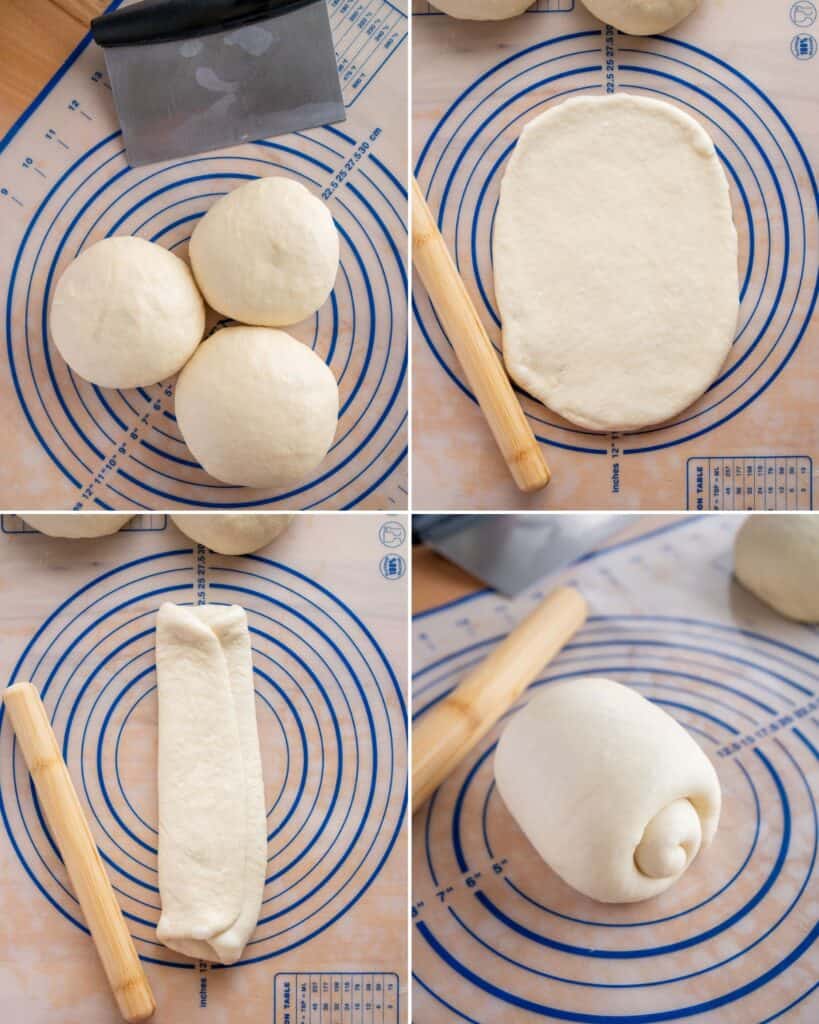
Divide the risen dough into either 15 or 20 pieces, depending on whether you want large or medium dinner rolls. You can either shape the rolls into balls for a classic look, or shape them into small spirals the way I shape the segments of my Vegan Milk Bread loaf.
To shape into spirals, first pre-shape into balls. Roll the balls out into long ovals, then fold the long sides over one another like a letter. Then roll from the short side into a compact log.
Final Rise & Baking
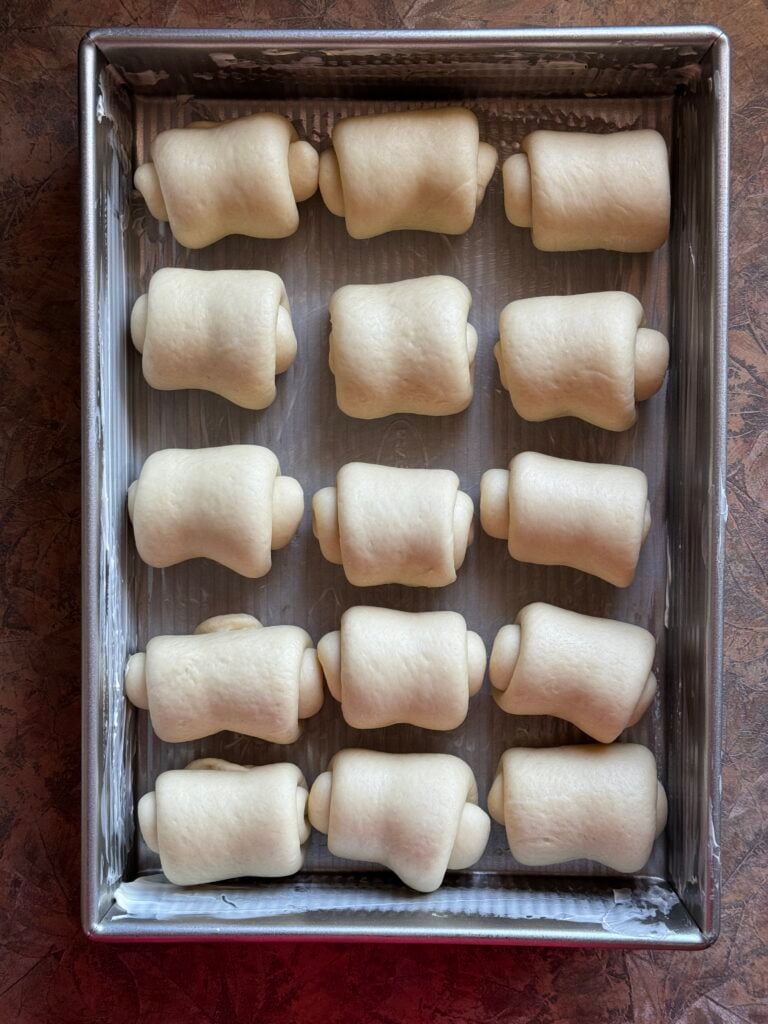

Whichever shape you choose, arrange the rolls in a greased or buttered 9×13″ baking pan. Alternatively, you can divide them between two 9″ round pans, or two 8″ square pans. Cover with a damp towel or plastic wrap and let the rolls rise until roughly doubled in size.

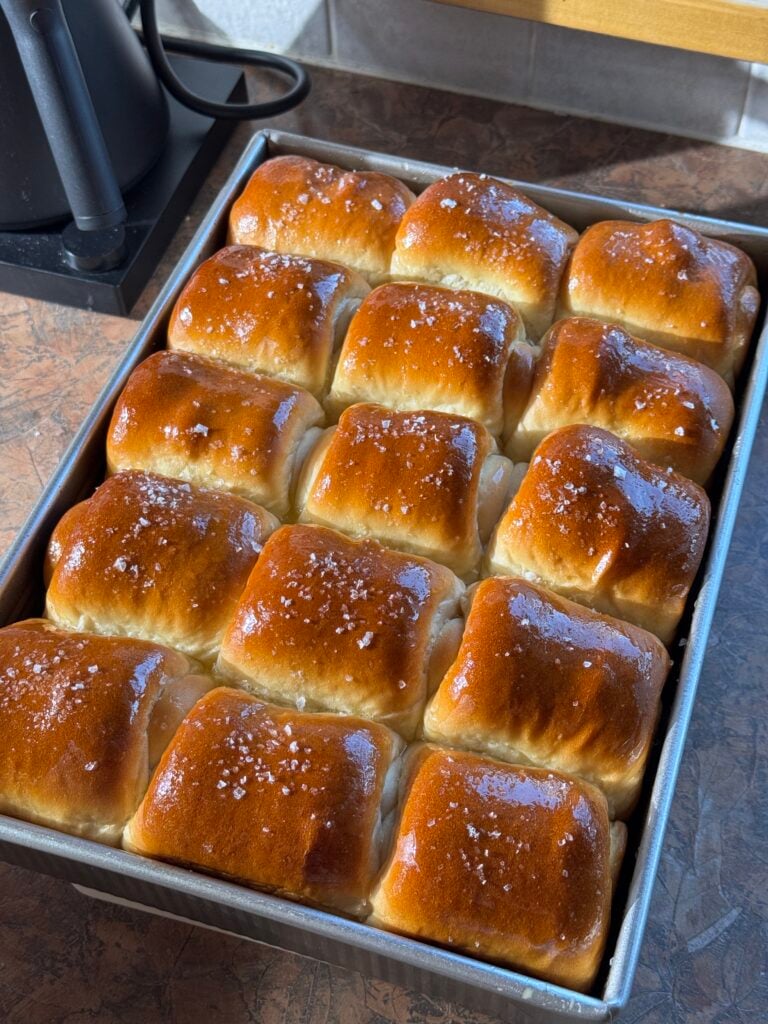
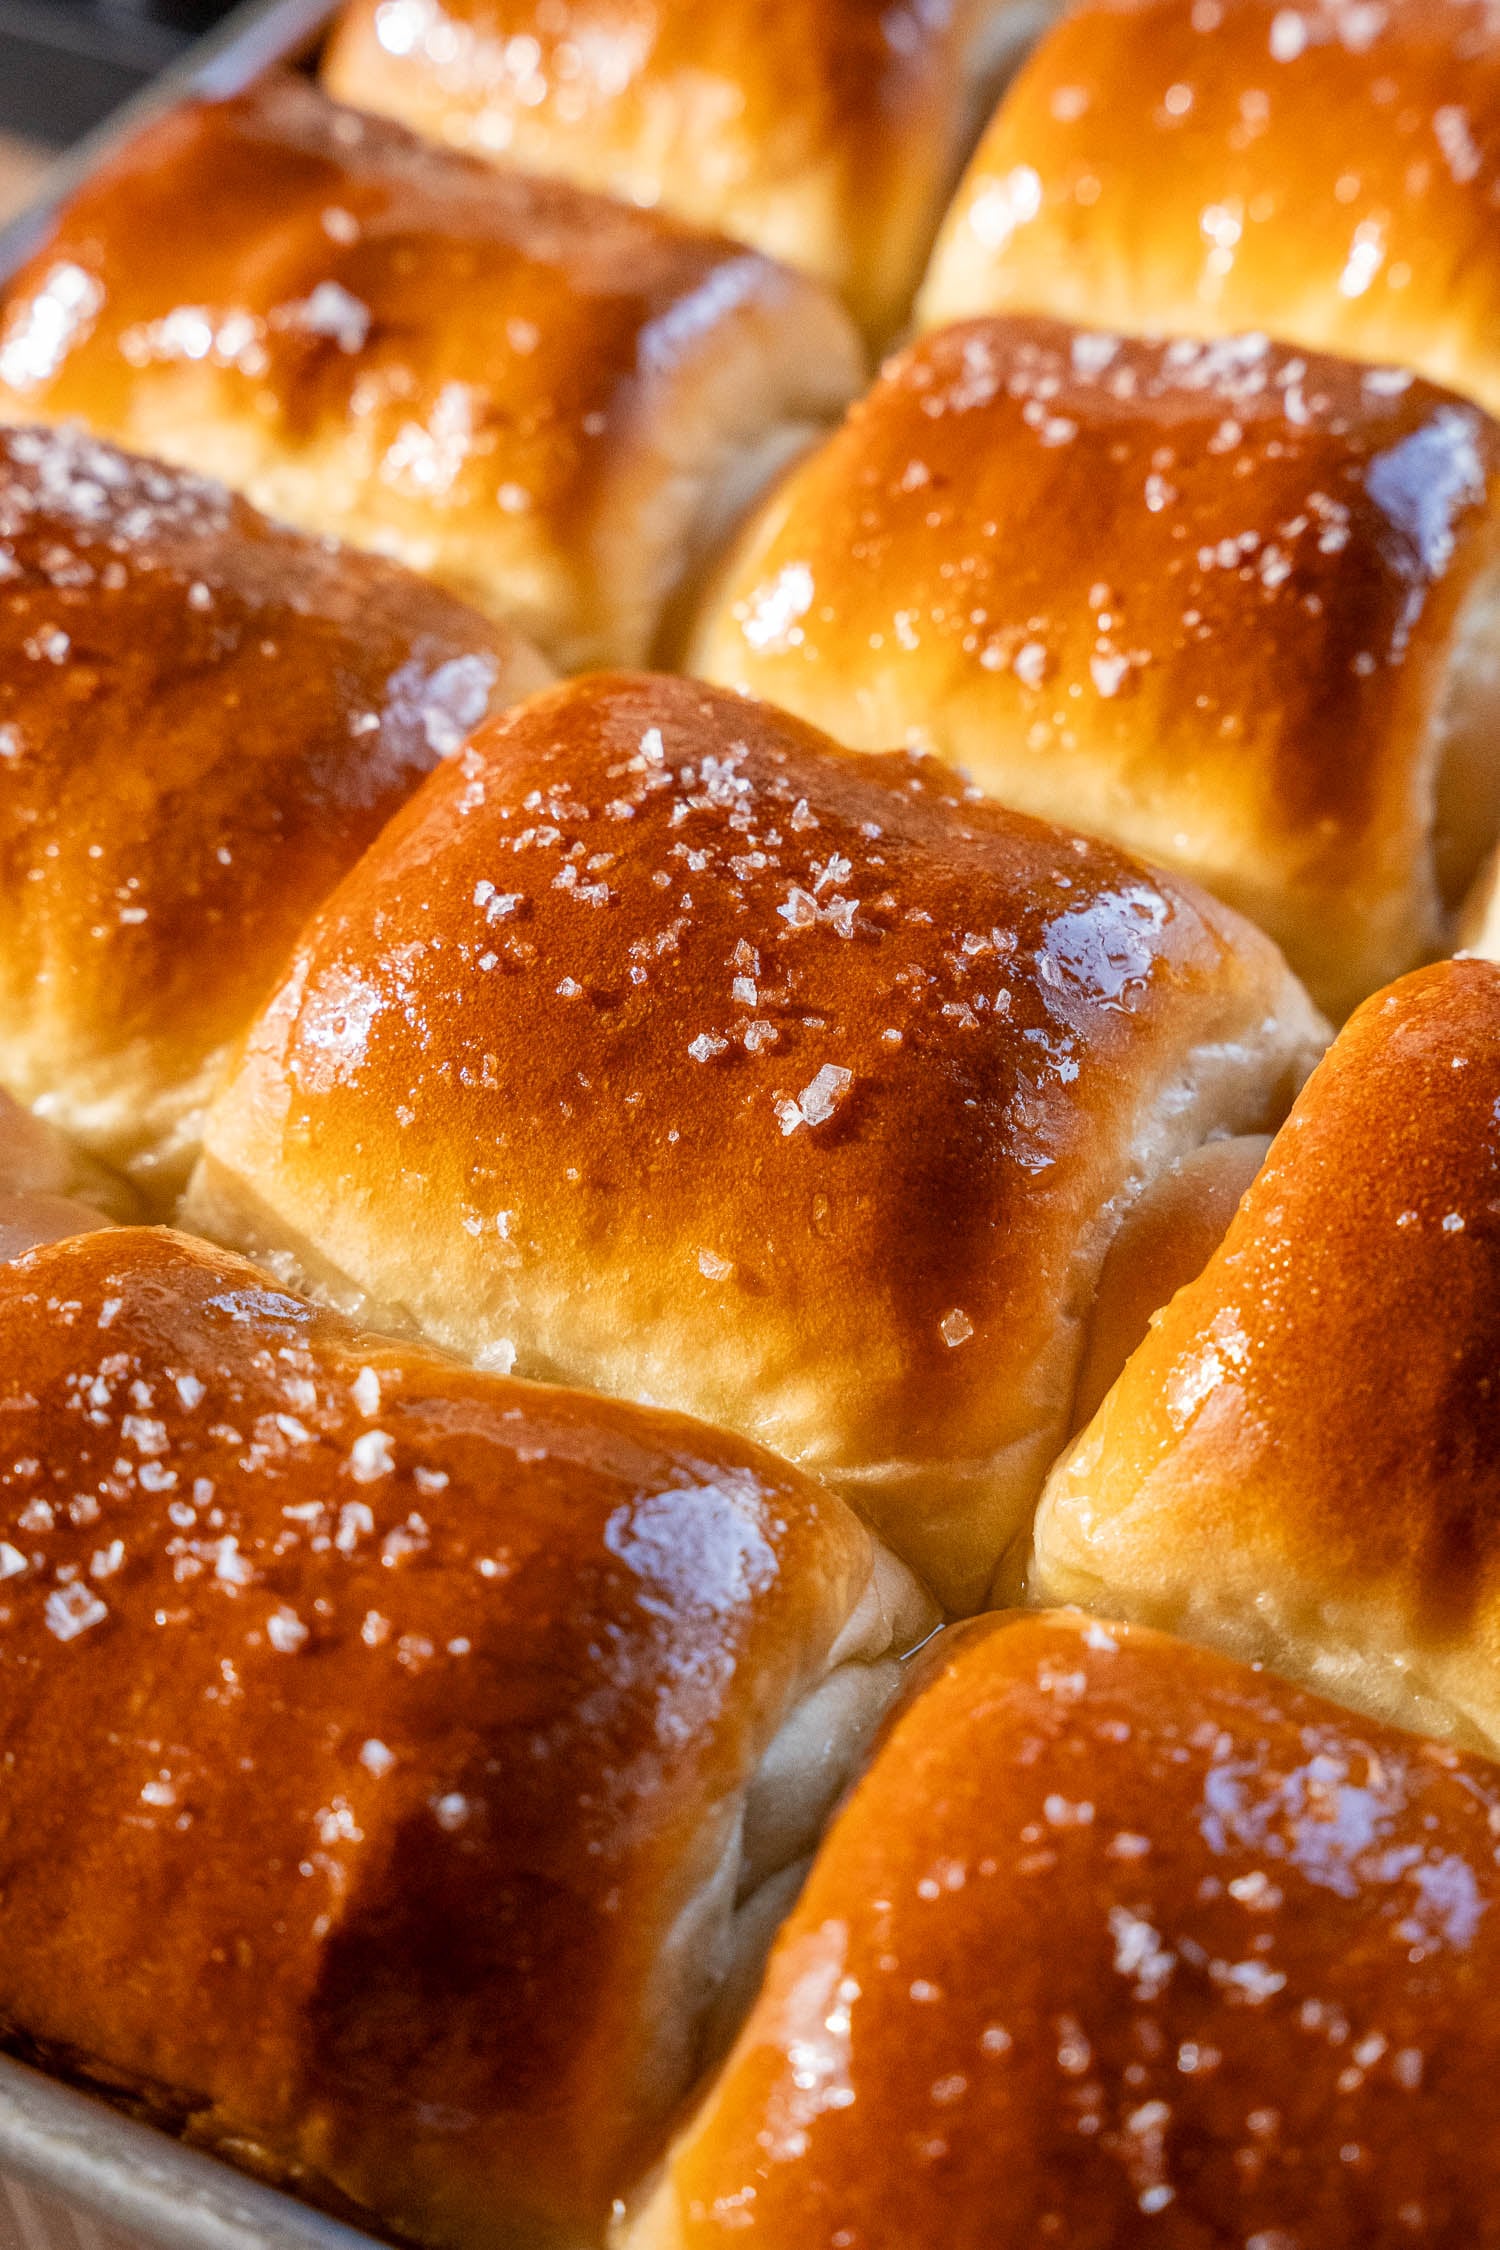
Bake in a preheated 350°F oven until golden brown (about 30 minutes). For the best texture, allow to cool for at least 15 minutes before enjoying. Optionally, brush with melted butter and top with flaky salt.
Sarah’s Recipe Tips
- Go by feel. When working with bread, it’s helpful to learn how the dough should feel and look at different stages of the process. This comes with practice. No matter how precise your measurements are, there will always be variations between different brands of flour. Things like the temperature and humidity of your environment can also have an impact. When kneading, add more flour if the dough seems overly wet/sticky. When rising, judge by the volume of the bread rather than the length of time that has passed.
- Give the rolls a chance to cool. I know it sucks! You want to dig in to your bread when it’s fresh out of the oven. But bread keeps cooking after it comes out of the oven, and it’s full of steam, which makes your bread gummy. Give it a chance to cool — ideally at least 15 minutes — so that steam can escape and the bread can “set.” That’s how to achieve the perfect soft, fluffy and bouncy texture.
Overnight Dinner Rolls
You can make the dough and shape the rolls a day ahead of time, then allow them to cold proof in the fridge overnight. The following morning, simply let the rolls sit out at room temperature for about 60 to 90 minutes. This will allow them to come back up to room temperature and then finish their final rise.
Exact time will vary depending on the temperature of your kitchen, but you are just looking for the rolls to have almost doubled in size from their original shaping. Then simply bake them as the recipe directs.
This is a great way to make rolls for Thanksgiving or holiday dinners, since it allows you to do a bulk of the work and cleanup a day before, while still enjoying fresh-baked rolls!

Frequently Asked Questions
Yes, absolutely! It will just take a bit longer to mix and knead. Simply mix the ingredients in a large mixing bowl. Then turn the dough out onto a clean work surface and knead for 8-12 minutes, until smooth and bouncy, and proceed with the recipe as written. A bench scraper can be a really helpful tool when kneading by hand, in case dough sticks to your work surface.
Sorry, but there is no simple way to make this recipe gluten-free. For yeasted bread recipes, I always recommend looking for a recipe that is specifically formulated to be gluten-free, as simply substituting in a gluten-free flour usually does not work. The Loopy Whisk is a great resource for allergen-friendly baking!
Yes, you can substitute most varieties of plain, unsweetened plant milk. Just don’t use canned coconut milk, as it’s far too fatty and will give the rolls a greasy and dense texture. I would recommend picking a milk with a neutral flavor such as a plain almond or cashew milk.
Technically yes, but I don’t recommend it. The extra gluten content in the bread flour helps makes the rolls extra fluffy and squishy, because those gluten bonds are what trap air. In a pinch, you can use all-purpose flour, but you will likely need to add extra flour to achieve the right texture. You can also make your own higher protein flour by adding about 1 scant tablespoon vital wheat gluten per cup of all-purpose flour.
The rolls don’t taste very sweet; sugar just rounds out the flavor and also helps them to bake up to a nice golden brown. You can definitely reduce the sugar to as few as 2 tablespoons if you like. I wouldn’t omit it entirely because it does help the rolls rise and brown properly.
More Vegan Thanksgiving Recipes
For all of our Thanksgiving recipes, check out our Ultimate Vegan Thanksgiving Guide! There, you’ll find everything you need to have a holiday feast that’s 100% plant-based and unbeatably delicious.

Fluffy Vegan Dinner Rolls (Tangzhong Milk Bread Style)
Video
Equipment
- stand mixer
- Bench scraper
- 9×13" Baking pan
- pastry brush
Ingredients
Tangzhong (Flour Paste)
- 1/3 cup water
- 1/2 cup soy milk
- 1/3 cup bread flour
Dough
- 1 cup lukewarm soy milk (about 110°F) or other plant milk
- 4 1/2 teaspoons active dry yeast (2 standard packets)
- tangzhong from above
- 6 tablespoons softened vegan butter
- 5 cups bread flour plus more for kneading
- 1/3 cup granulated sugar
- 1 1/2 teaspoons fine salt
- vegetable oil to grease the bowl and the baking dish
Vegan Egg Wash (optional)
- 1 tablespoon soy milk
- 1 teaspoon maple syrup
To Finish (optional)
- 1 tablespoon melted vegan butter
- flaky salt
Instructions
Make the Dough
- Make the tangzhong: Whisk together 1/3 cup water, 1/2 cup soy milk, and 1/3 cup bread flour in a small pan. Make sure to break up any lumps of flour. Heat the pan over medium, stirring constantly with a heat-proof spatula, until the mixture thickens to the consistency of wallpaper paste. Remove from heat and allow to cool slightly.
- Proof yeast: Add the 1 cup lukewarm soy milk to the bowl of a stand mixer. Whisk in the 4 ½ teaspoons yeast and allow to proof for ~5 minutes, or until foamy.
- Mix the dough: Into the stand mixer bowl, add the cooled tangzhong, softened butter, 5 cups bread flour, 1/3 cup sugar, and 1 ½ teaspoons fine salt. Mix together on medium speed with the paddle attachment until the ingredients come together in a shaggy dough.
- Knead dough: Swap out the paddle attachment for the dough hook. Knead 8-10 minutes, or until the dough is smooth and elastic. The dough should be clearing the sides of the bowl. If it is excessively wet or sticky, add in extra flour about 2 tablespoons at a time, until the correct texture is achieved. For each addition, mix until the flour fully incorporates before adding more. If kneading by hand, it may take a few extra minutes.
First Rise
- First rise: Shape the kneaded dough into a ball. Drizzle a little vegetable oil in the mixing bowl and place the dough ball inside. Give it a flip to coat it with the oil. Cover with plastic wrap, a damp kitchen towel, or a plate and place the bowl in a warm spot to rise for about 1 hour, or until the dough has doubled in size. If your environment is chilly, it can take up to 2 hours.
Shape & Final Rise
- Prep: Grease a 9×13” baking dish, or two (2) 9” round cake pans with softened butter or vegetable oil.
- Divide the dough: Turn the dough out onto a clean work surface. (I don't recommend flouring your work surface because the surface of the dough needs to stay tacky to shape the rolls properly.) Divide into 15 pieces for large rolls or 20 pieces for regular rolls.
- Shape the rolls: Shape each piece of dough into a ball. (It doesn't need to be precise.) Roll the dough out into an oval, then fold the long sides over one another like a letter. Then roll from the short end so each piece is a compact log. (For more clarity, you can check out the Visual Guide in the blog post — the shaping section.)Alternatively, you can simply shape each roll into a ball. You can do so by tucking the edges of the dough under itself to form a rough ball. Pinch the seams together on the bottom, then place the dough seam-side down on the table. Cup your hand over the dough and roll it in small circles to create tension and smooth out the surface.
- Final rise: Transfer the shaped rolls into the greased baking dish(es). Cover with plastic wrap or a damp kitchen towel to keep them from drying out, and leave them in a warm spot to rise for 60 to 75 minutes, until very puffy. When poked, the dough should bounce back very slowly, leaving a small indentation. If it springs back immediately, it needs to rise longer. Make sure to give them ample rise time, as this is key to super fluffy, squishy rolls.
Bake
- Prep: Preheat the oven to 350°F during the last 10-15 minutes minutes before the rolls are done with their final rise. Position the rack in the middle.
- "Egg" wash: Optionally, brush with a vegan egg wash mixture: 1 tablespoon milk whisked together with 1 teaspoon maple syrup.
- Bake: Bake for 25-30 minutes, or until deep golden brown. If the rolls appear to be browning a little too fast, you can loosely tent with aluminum foil during the last 10 or so minutes of cook time. The internal temperature should be around 200°F.
- Cool and enjoy: Remove from the oven. Allow the rolls to cool for at least 15 minutes before enjoying. (Bread continues to cook after it comes out of the oven. The rolls can be a little gummy without at least a few minutes to cool first.) Optionally, brush with a little melted butter for some extra shine and sprinkle with flaky salt.
Made these to bring to Friendsgiving and I can’t say enough good things about this recipe! The dough is a dream to work with. It was not difficult to make at all. I loved the shape of the rolled dough versus a regular ball, that was a fun new way to make rolls! They turned out perfect, I will definitely be coming back to this recipe. They were all devoured, no left overs. Thanks, Sarah!
These are the BEST dinner rolls you could ever make. They were soft, pillowy, subtly sweet, incredible texture and super easy/approachable to make!
I filled the instructions for overnight cold proof so I could just take them out of the oven in the morning, wait for them to come to temp, then bake them fresh right before mealtime at thanksgiving! I am the only vegan in the family and it’s not often the entire table is raving about one of the items I brought. This year, everyone was delighted by these dinner rolls and it has already been requested that I make them again next year!
You’re now on roll duty every year…you’re welcome! 😀
Made this for thanksgiving, they were more dense than they should have been (definitely error in my part), and my whole non vegan family still devoured them and were sad when they were gone.
These sounded amazing but I wanted to make them non vegan, and they still turned out so good!!! Thank you!
Delicious—the best bread I’ve ever made! I’m so impressed with this recipe. I followed it exactly as written and will definitely be making again and again.
What a compliment. Thank you!
Man, these were such a hit at Thanksgiving! At first I was worried because my dough was kind of thick, but I just let them proof nice and long the second time and they turned out perfect. So fluffy with a slight sweetness. Perfect!
Love to hear it!
These were great for thanksgiving! It was my first time making any type of bread and the directions were super easy to follow. In case it matters, I used Country Crock stick butter (brand of butter wasn’t specified so I assumed that meant any butter would work).
What vegan butter brand would you recommend?
We like Country Crock, Melt, and Violife. But there are a lot of good options! In fact, we have an entire guide about it.
I made these rolls earlier today and they are SO DELICIOUS!!! I am usually hesitant to make breads because I don’t have a stand mixer, but I’m so glad I decided to try this recipe. The rolls are so fluffy and look absolutely beautiful! I can’t wait to bring them to a family dinner and impress everyone! 🙂