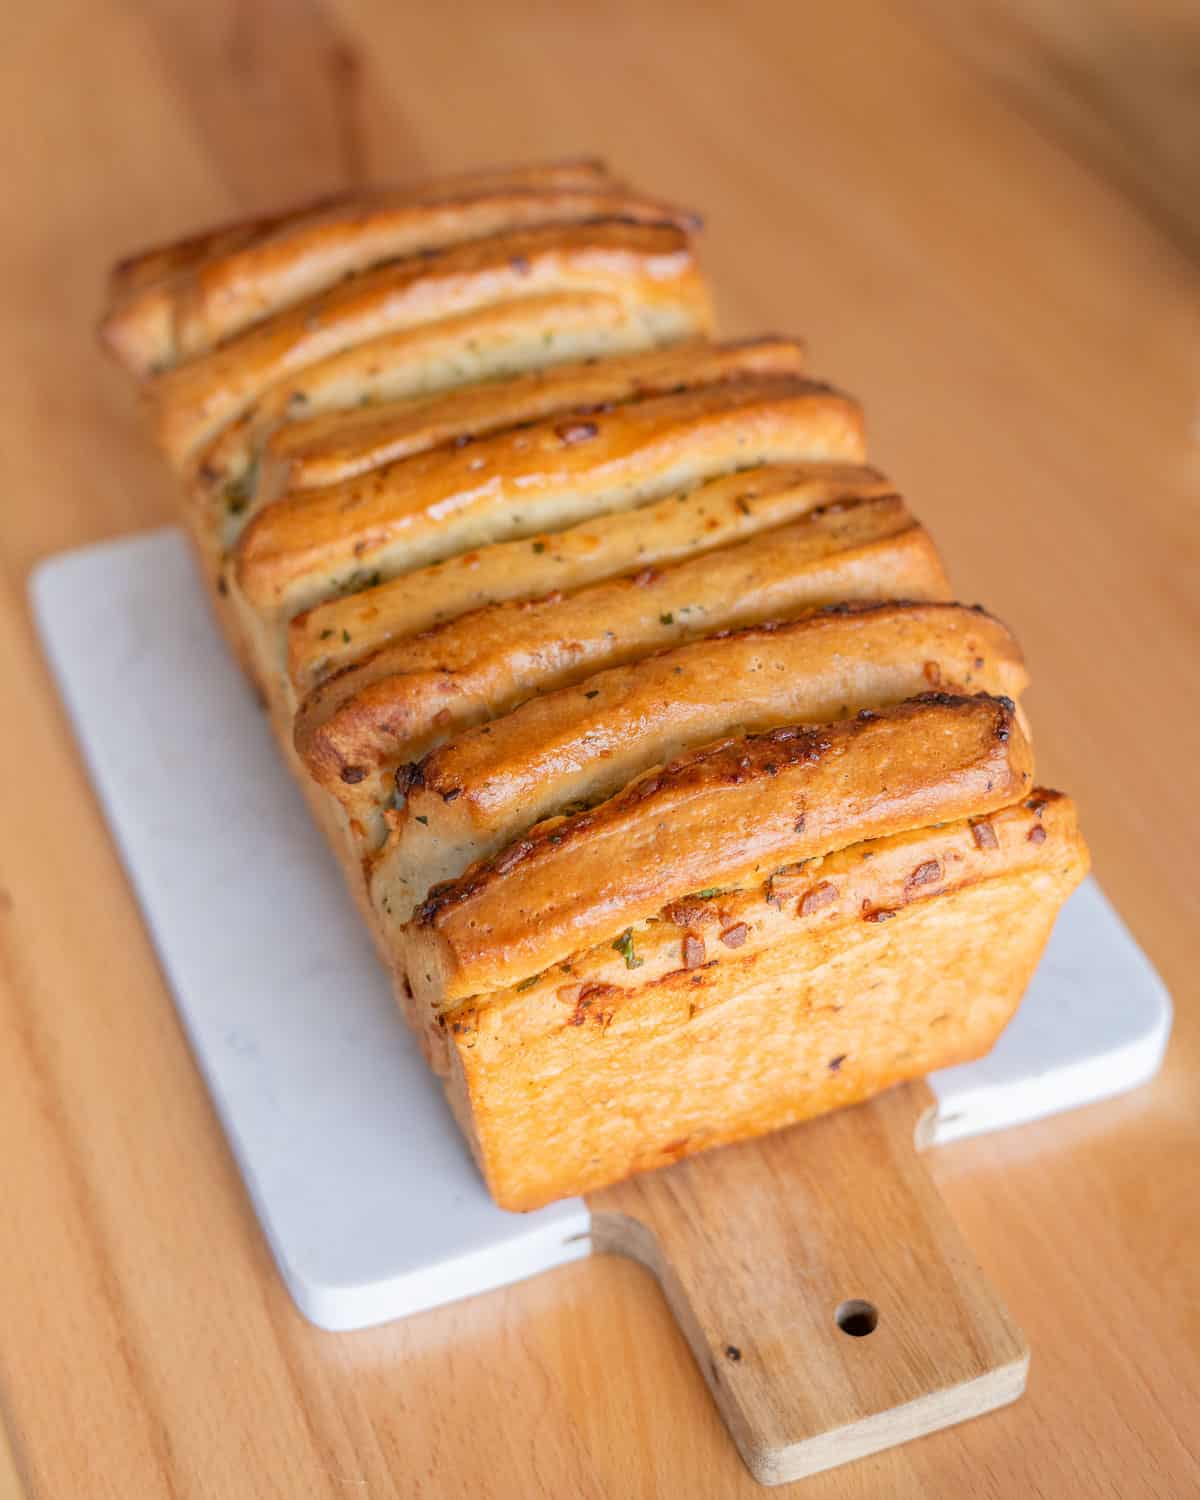
Like most people, we’re suckers for the combination of garlic and herbs. I mean, it doesn’t really get much better than that! Add in a little buttery deliciousness and slather it on some freshly baked bread and you’re left with basically the perfect food. Similar to garlic bread, this vegan pull-apart bread hits all of those notes and then some.
A perfect dish for sharing with friends and family, this vegan take on savory garlic herb pull-apart bread is sure to impress. And the best part is that it’s not actually that hard to make (but don’t tell anyone that part)! All you need is a little bit of patience (typical of bread recipes) and you’ll be enjoying some vegan pull-apart bread.
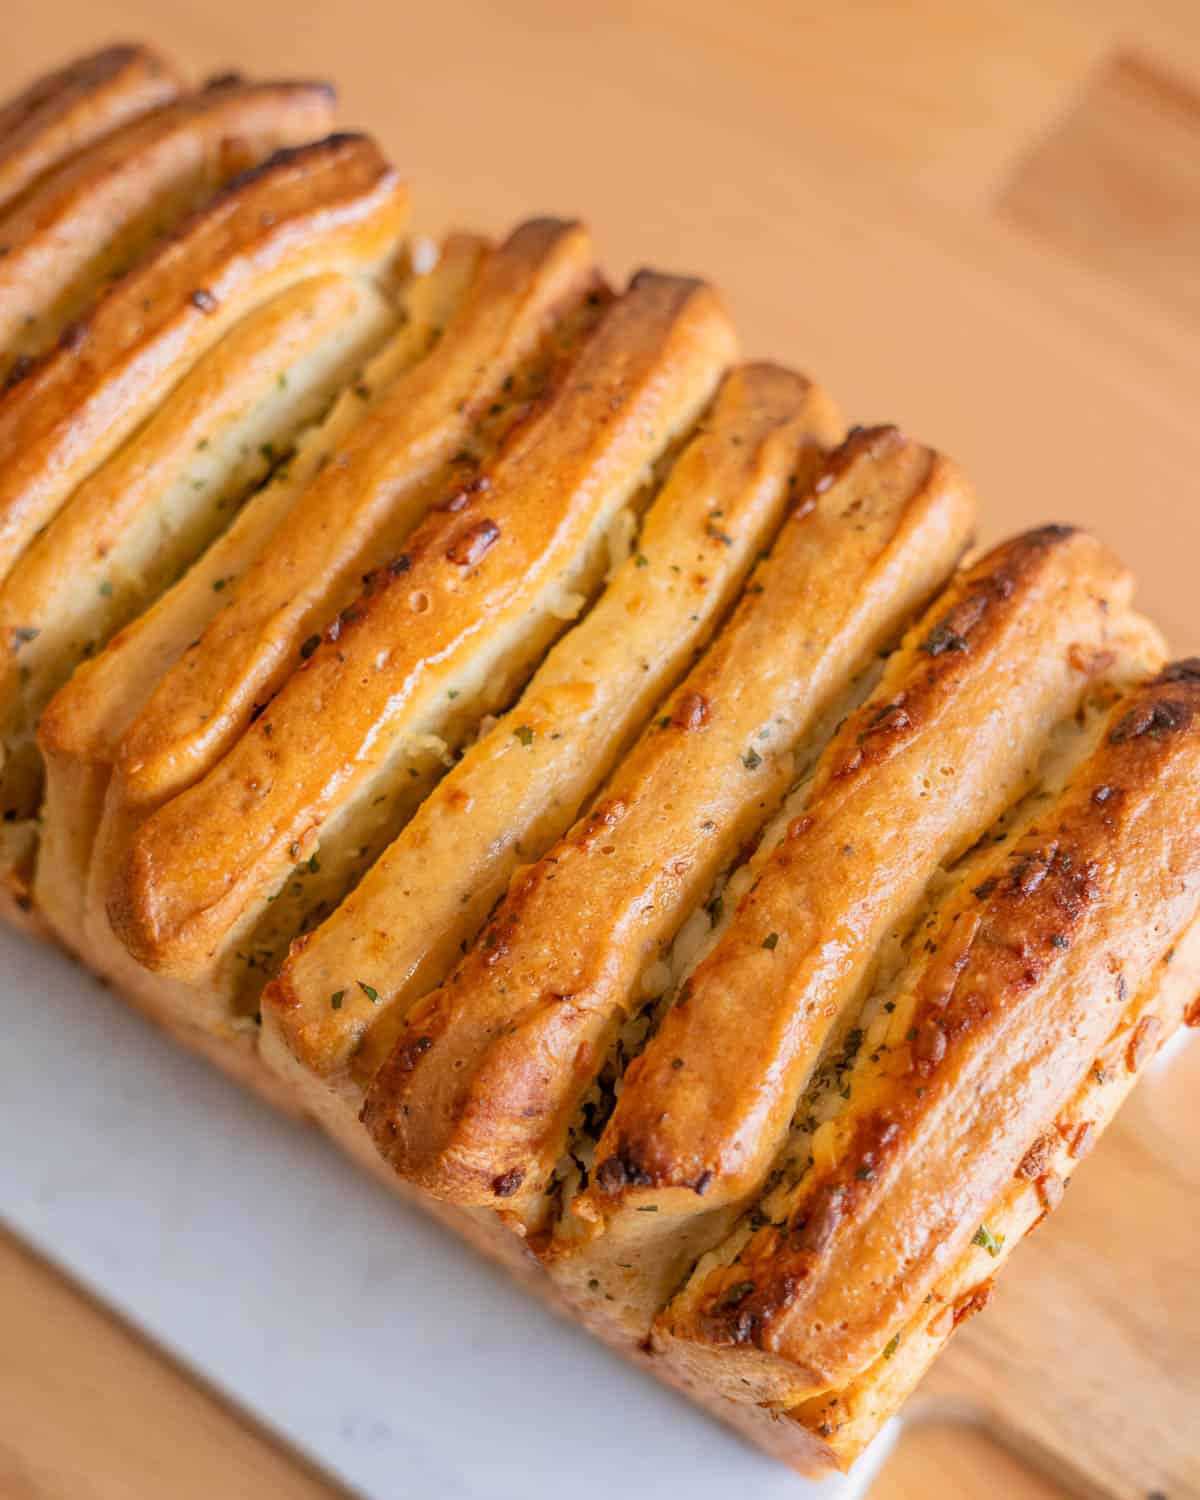
Table of Contents
Ingredients for Garlic Herb Pull-Apart Bread
For the dough
- Bread flour. This type of flour has a higher protein content (gluten) than all-purpose flour, giving your baked goods more structure and a chewier texture. It’s no surprise that it’s perfect for breads!
- Active dry yeast. For rising your pull-apart bread.
- Unsweetened soy milk. A little bit of protein-rich non-dairy milk will add structure and richness to the bread.
- Extra-virgin olive oil. To add moisture to the dough so your bread doesn’t come out dry.
- Sugar. A little bit of sweetness adds balance to this savory recipe.
- Garlic powder and dried herbs. These are going to add a base layer of flavor to the dough.
For the filling
- Vegan butter. This is the base of the filling, providing the buttery goodness that makes the bread so delicious. (More info on the best vegan butter can be found here.)
- Rosemary and parsley. Herbs are in the name of the recipe for a reason! These provide that fresh, savory flavor we all love.
- Garlic. Either fresh or roasted garlic works in this recipe.
- Vegan parmesan or mozzarella. Optional, but a little dairy-free cheese kicks this pull-apart bread into overdrive. We love Follow Your Heart and Violife.
How to Make Vegan Pull-Apart Bread
- Add lukewarm milk and water to a large mixing bowl. Whisk in 2 teaspoons active dry yeast and 1 scant tablespoon sugar. Allow to “proof” for about 5 minutes, or until foamy.
- Add in olive oil, garlic powder, and dried rosemary and whisk to combine.
- Add in bread flour and salt and use a wooden spoon or rubber spatula to mix into a shaggy dough.
- Turn the dough out onto a lightly-floured work surface and knead for 5-10 minutes, or until the dough is smooth and elastic. The dough should spring back when gently poked. If the dough seems too wet and is sticking excessively to your hands or the work surface, gradually work in extra flour about 2 tablespoons at a time, until the correct consistency is achieved.
- When the dough is nice and elastic, shape it into a ball. Drizzle the inside of the mixing bowl with olive oil and place the dough inside, turning to coat with oil.
- Cover the bowl with plastic wrap or a slightly damp kitchen towel and place it in a warm area in your kitchen. Let the dough rise for about 1 hour, or until roughly doubled in size. (If your kitchen is very chilly, it may take a little extra time. On a very warm day, it can take less time. Judge by size rather than time.)
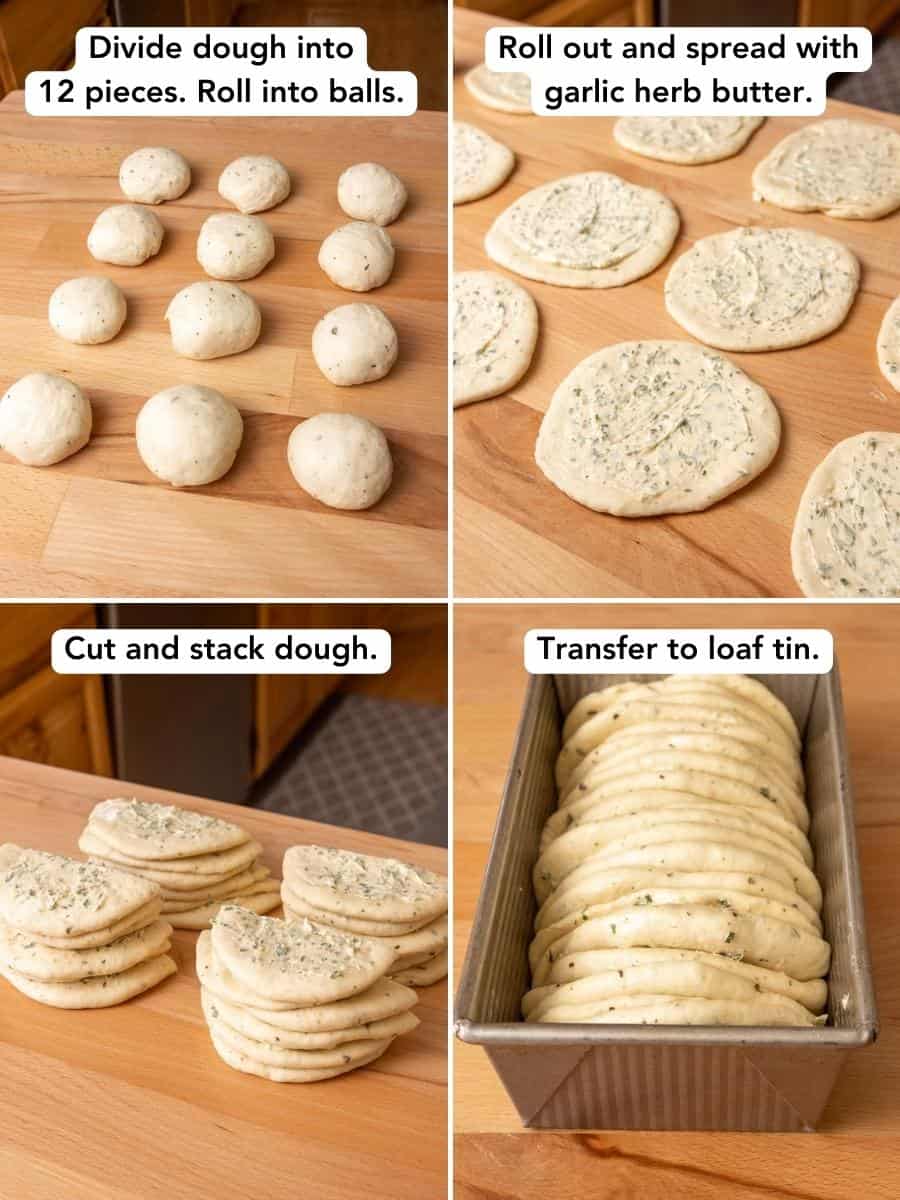
- Turn the risen dough out onto a lightly floured surface. Use a rolling pin to roll out the dough into a roughly 12×16″ rectangle.
- Spread the garlic-herb butter evenly across the dough and then cut into 12 roughly even pieces. (Each piece should be about 4×3″.)
- Stack the pieces of dough and transfer them into a greased loaf tin.
- Lightly cover the loaf with the same plastic wrap or damp kitchen towel used previously. Let this loaf rise for about 45-60 minutes. It should rise and become slightly puffy, cresting slightly over the top of the loaf tin. In this time, preheat your oven to 350°F and place the rack in the lower middle position.
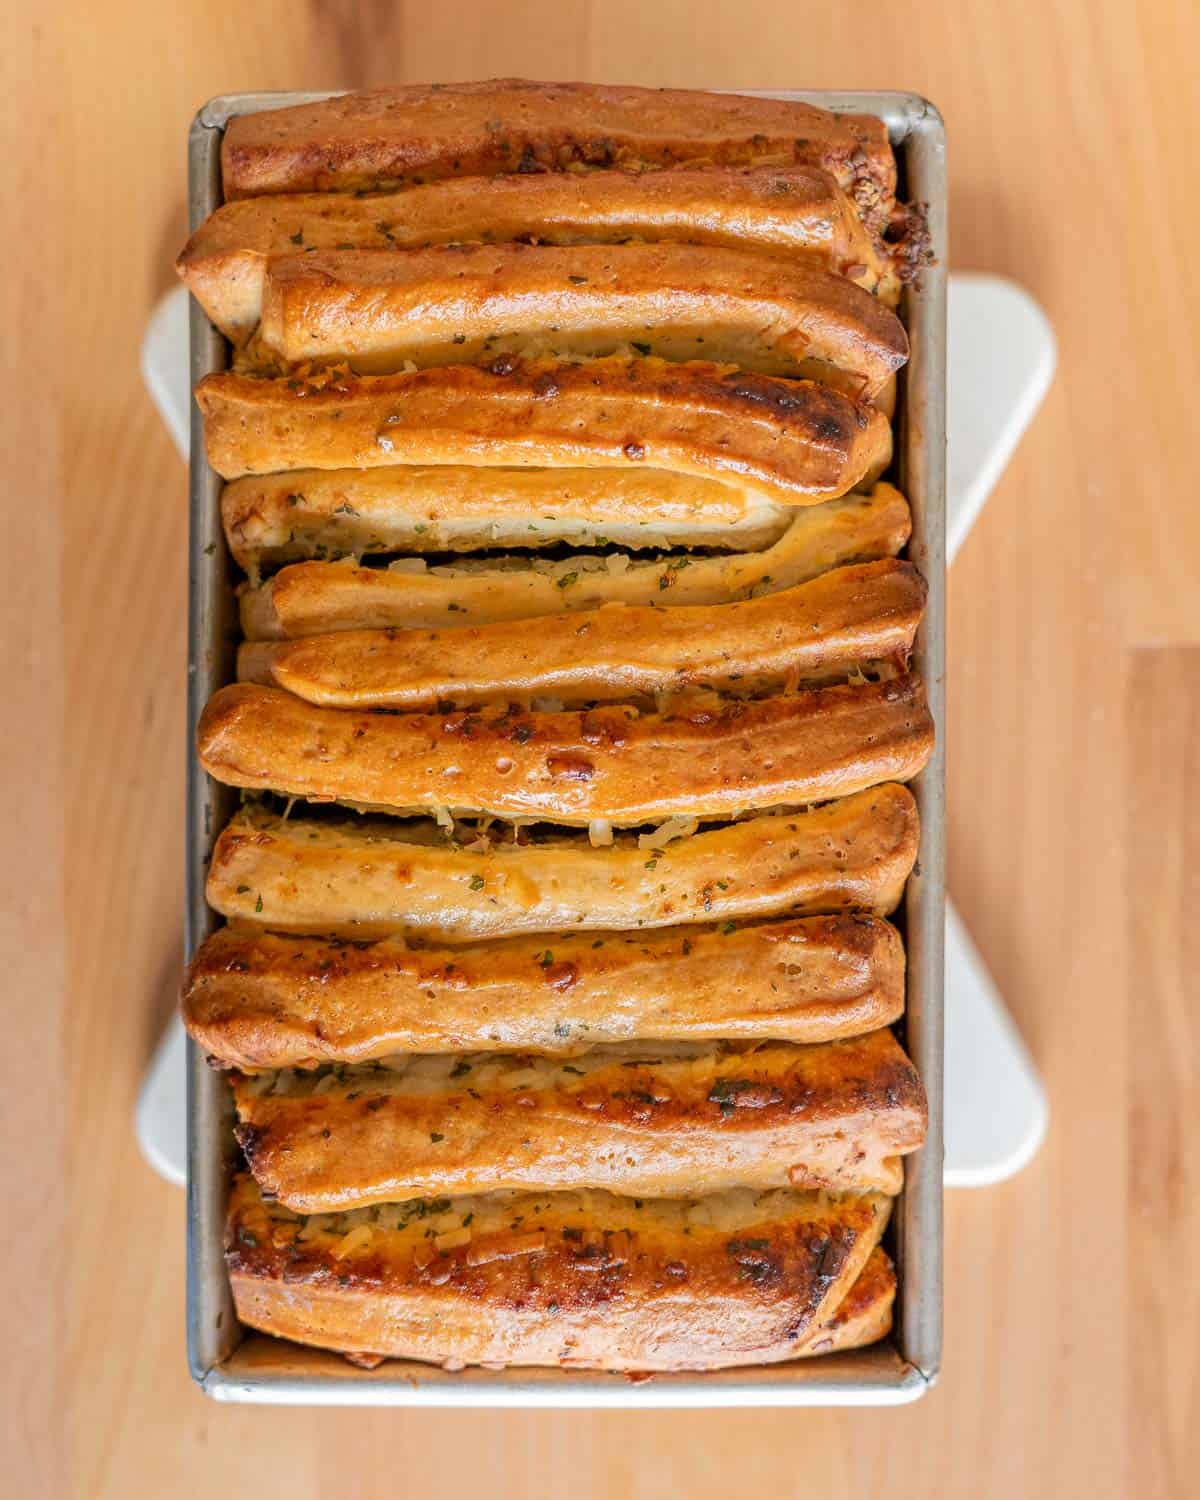
- Once the loaf looks slightly puffy, with the dough risen to just about the height of the loaf tin, place it in the preheated oven and bake for about 40-45 minutes. Because the dough is quite rich, it tends to brown quickly. If it seems like it’s getting too dark, loosely tent it with aluminum foil.
- Carefully remove the loaf from the oven and place on a wire cooling rack. Let it cool in the pan for about 10 minutes before removing it to serve. Vegan pull-apart bread is best enjoyed warm!
Alternate Shaping Method
The original version of this recipe had a different (and slightly more difficult) shaping process. If you want to try this method out, I’ll detail how to do it below. (Note: you can either divide the dough into 6 balls to get 12 slices of bread or 12 balls to get 24 slices of bread. We prefer 6 balls/12 slices because it allows each piece to be fluffier.)
This alternate method picks up at Step 7 of the recipe:
- Turn the risen dough out onto a lightly floured surface. With a knife or bench scraper, divide the dough into 12 roughly even-sized pieces. Shape each piece into a ball by tucking the edges underneath. Place them seam-side down on your work surface and let them rest for about 10 minutes while you prepare the garlic herb butter. (This will allow the gluten to relax.)
- In a small bowl, mix together the softened butter with the chopped rosemary, parsley, minced garlic, salt, and (optional) shredded cheese to form a paste. Set aside.
- Using a rolling pin, roll each of the dough balls out to a circle, roughly 1/4” thick and 6” in diameter. It’s okay if the circles are slightly irregular in shape.
- Divide the garlic herb butter evenly between the 12 discs of dough. Spread the butter across each piece of dough to cover it.
- Cut each dough circle in half, forming half-moon shapes. Stack 6 half-moons on top of each other. Repeat with the remaining dough pieces, creating 4 stacks, each with 6 half-moon pieces of dough. (This isn’t strictly necessary; it’s just to make the transfer to the pan easier and more uniform.)
- Transfer your stacks of dough into a greased loaf tin.
Now you can pick the recipe back up at Step 10.
Sarah’s Recipe Notes
- Properly measure your flour: Fluff up the flour before scooping it into your measuring cup and level it off with a flat edge for an accurate measurement. This ensures your bread has the right texture and consistency. Packing the flour too firmly in the measuring cup will result in overly dense, dry bread.
- Use whichever herbs you like: Feel free to play around with the herbs in this recipe! For example, you can substitute Italian seasoning or thyme for the dried rosemary in the dough. Fresh sage, rosemary and basil are all great options for the garlic herb butter. You can really mix it up every time you make this recipe.
- Roasted garlic: To make this recipe a little extra special, try roasting up a whole head of garlic ahead of time. Squeeze it out, mash it into a paste, and use that in the garlic herb butter in place of the fresh minced garlic. Roasting garlic mellows out the raw bite and gives it a sweeter, more complex flavor that is absolutely delicious in this recipe!
Recipe FAQ for Vegan Pull-Apart Bread
Yes, but since all-purpose flour has less gluten than bread flour, you may need to use more of it. Add in more as you knead the dough until you have the right consistency.
While I’ve never tested this recipe with gluten-free flour, King Arthur makes a gluten-free bread flour that has very positive reviews. Again, I can’t vouch for it personally, and haven’t had much luck personally with gluten-free yeasted doughs.
Yes! See the above recipe tips for more info.
No, but the texture of your pull-apart bread will come out slightly different than if you used soy milk. This is because soy milk is high in protein (similar to dairy milk) whereas most other types of plant milks are not.
Yes. To do this, proof the yeast directly in the stand mixer bowl. Mix everything with the paddle attachment until it comes together. Then you can switch to the dough hook and let the mixer knead for you until the dough is smooth and elastic. It should take less time than doing it by hand.
Troubleshooting
My dough isn’t rising
Make sure that you allow your yeast to proof properly. The yeast mixture should be foamy before you move on to the next step. If it doesn’t appear to be bubbly and active after a few minutes, it might be dead. This can happen if your yeast is very old/expired, stored improperly, or if you added it to soy milk that’s too hot. The liquid should be lukewarm to the touch.
My dough is overly sticky or too dry
You may have used too much (or too little) flour because of improper measuring. See my recipe tips above on how to properly and accurately measure flour. Different brands of flour also vary slightly in terms of gluten content. The ambient humidity in your kitchen is another factor. If the dough is too sticky, you can gradually work in extra flour, a few tablespoons at a time, while kneading the dough. If the dough is too firm or dry, it’s harder to work in water but it can be done. While kneading the dough, occasionally sprinkle extra water over it (very little at a time) and continue to knead until the liquid is absorbed. Repeat until the right texture is achieved.
Storing Your Garlic Herb Pull-Apart Bread
Vegan pull-apart bread is best enjoyed freshly baked. But if you manage to not eat the entire loaf in one day, you can leave it covered on the counter for a day or two. You can also store it in the refrigerator, covered, for up to 3 days. If freezing, just place in an airtight container and freeze for up to 2 months.
To reheat, pop in a 300°F oven until warmed through (usually 10 minutes or so). If frozen, let defrost on the counter until soft first.
Again, this recipe is made to be eaten fresh, so just keep that in mind when eating leftovers!
More Vegan Bread Recipes

Garlic Herb Pull-Apart Bread (Vegan)
Video
Equipment
- Rolling Pin
- Loaf tin 8×4" or 9×5"
- Bench scraper or knife
Ingredients
Dough
- 3/4 cups unsweetened milk of choice I use soy milk; lukewarm (about 110°F)
- 1/2 cup + 2 tablespoons lukewarm water
- 2 1/4 teaspoons active dry yeast (1 standard packet)
- 1 tablespoon sugar
- 3 tablespoons extra-virgin olive oil plus extra for the bowl
- 1 1/2 teaspoons kosher salt
- 3 1/4 cups bread flour plus more for kneading
- 1 teaspoon garlic powder
- 1 teaspoon Italian seasoning or sub 1/4 teaspoon each dried basil, oregano, rosemary, and thyme
Filling
- 5 tablespoons softened vegan butter not melted
- 2-4 tablespoons chopped fresh herbs of choice I like basil and parsley
- 1 tablespoon finely minced garlic or 1 head roasted garlic — see notes
- 1/4 teaspoon salt
- 1/2 cup shredded cheese of choice (optional)
- olive oil or vegan butter to grease loaf tin
Instructions
Mix & Rise the Dough
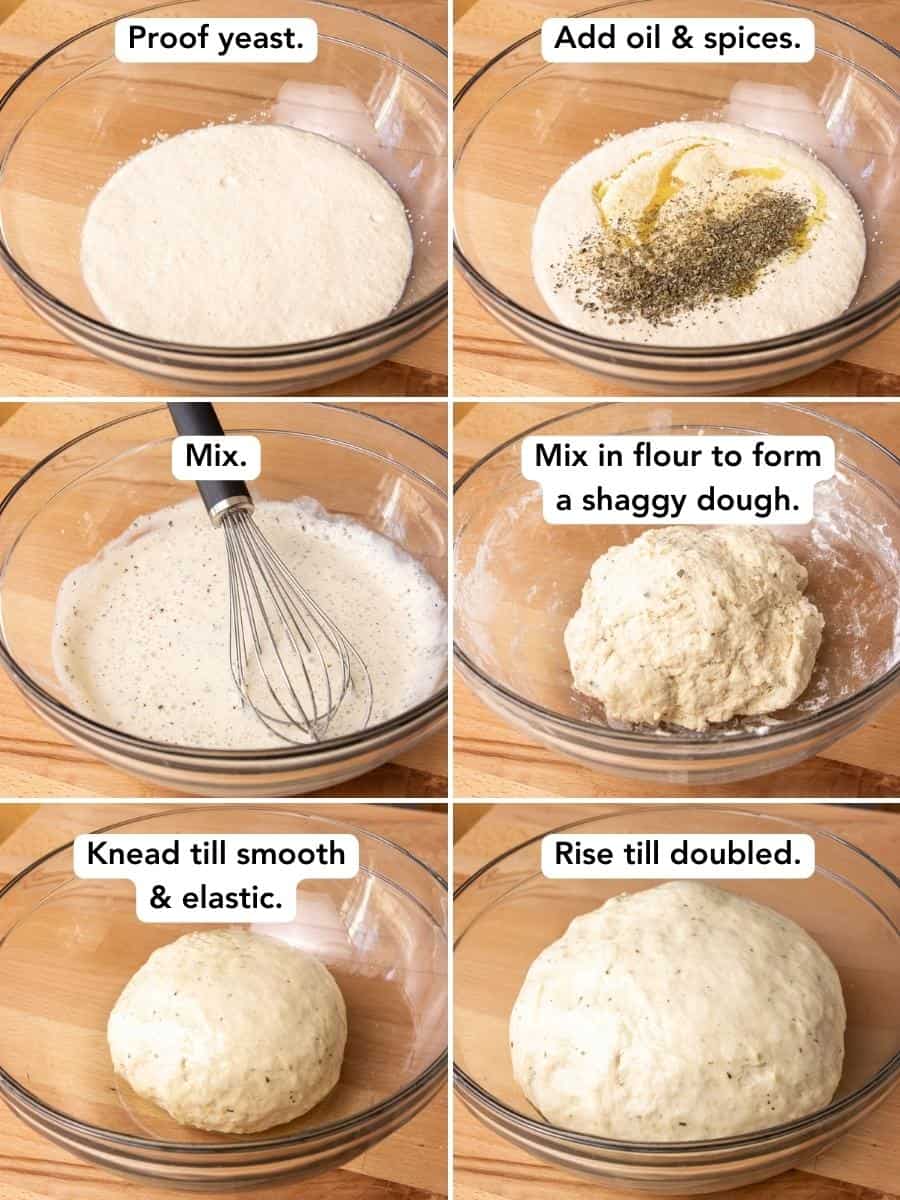
- Proof yeast: Add lukewarm water and milk to a large mixing bowl. Whisk in active dry yeast and sugar. Allow to “proof” for about 5 minutes, or until foamy.
- Mix the dough: Add in bread flour, olive oil, garlic powder, Italian seasoning, and kosher salt and use a wooden spoon or rubber spatula to mix into a shaggy dough.
- Knead dough: Turn the dough out onto a lightly-floured work surface and knead for 8-12 minutes, or until the dough is smooth and elastic. (If using a stand mixer, use the paddle attachment to knead for 6-8 minutes.)If the dough seems too wet and is sticking excessively to your hands or the work surface, gradually knead in extra flour about 2 tablespoons at a time, until the correct consistency is achieved.
- Rise dough: You're done kneading with the dough is elastic and springs back when gently poked. Shape the dough it into a ball, drizzle the inside of the mixing bowl with olive oil, and place the dough in the bowl, turning to coat with oil.Cover the bowl with plastic wrap, a plate, or a slightly damp kitchen towel and place it in a warm area in your kitchen. Let the dough rise for about 1 hour, or until roughly doubled in size. (If your kitchen is very chilly, it may take a little extra time. On a very warm day, it can take less time. Judge by size rather than time.)
Shaping & Final Proofing
- Note: There are many different ways to shape pull-apart bread! For an alternate method, see the recipe notes.
- Make the garlic herb butter: In a small bowl, mix together the softened butter with the chopped fresh herbs of choice, minced garlic (or 1 head of roasted garlic mashed into a paste), salt, and (optional) shredded cheese.
- Prep: Grease a standard 9×5" loaf tin with butter or olive oil, or line with parchment for easy removal.
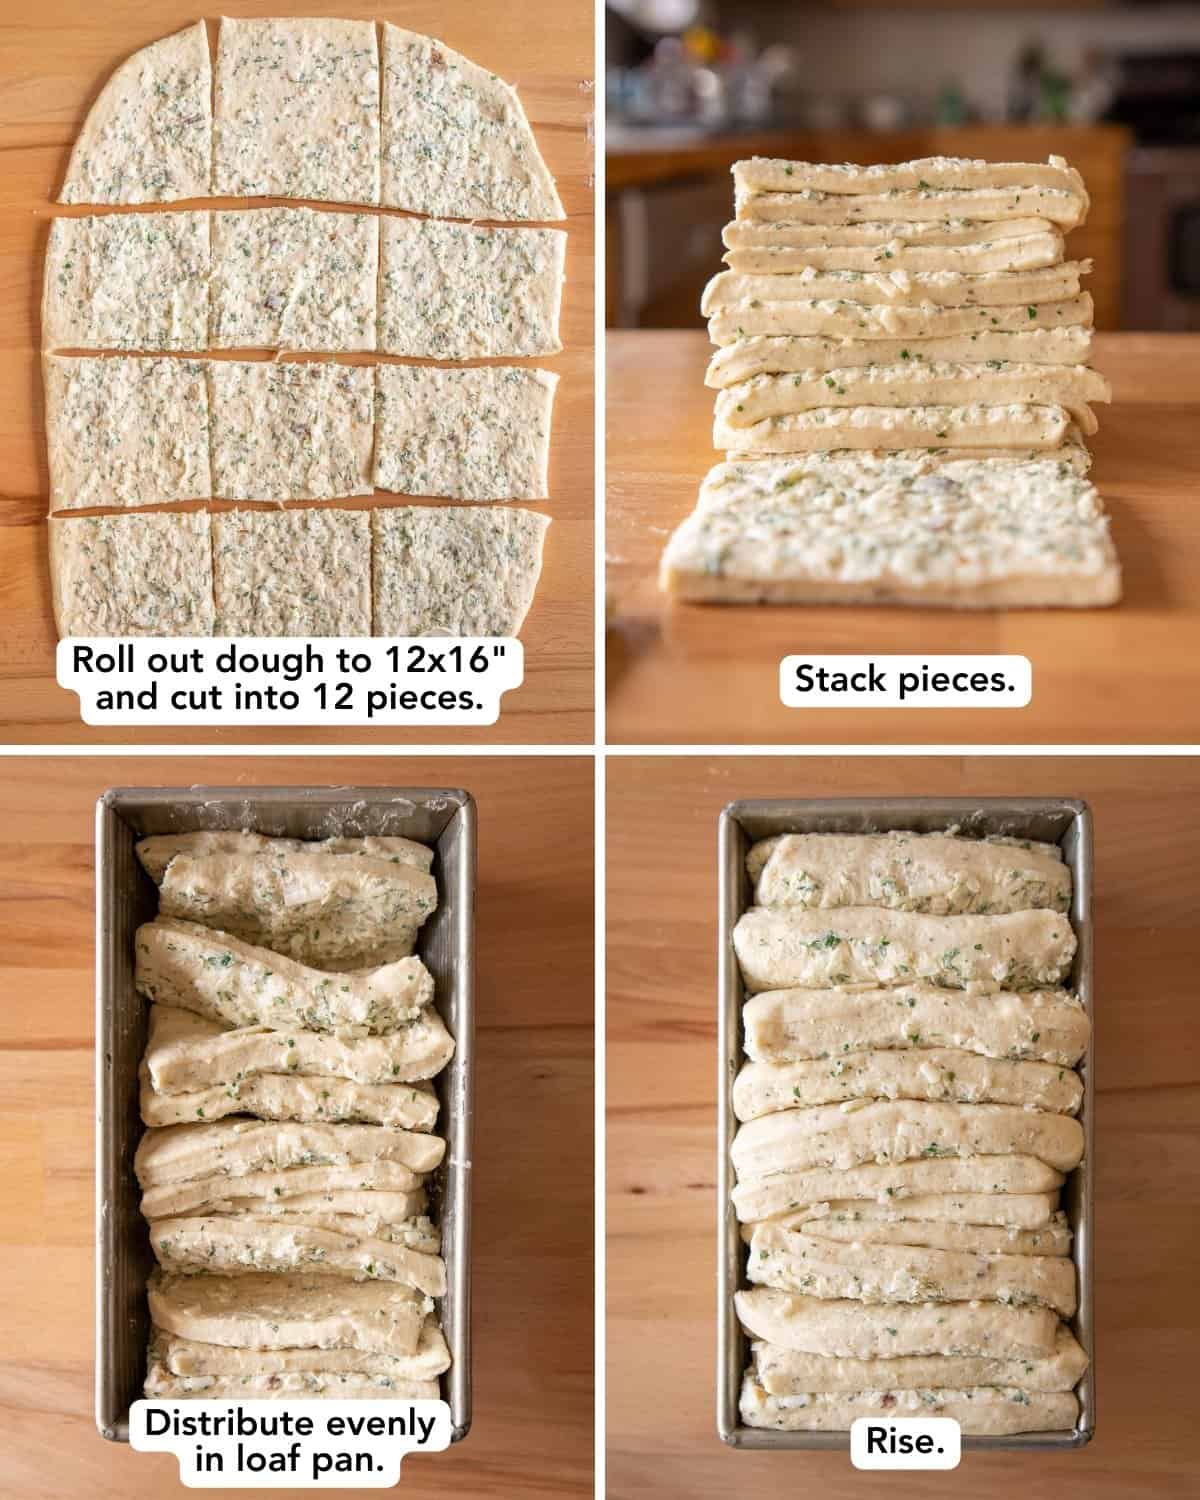
- Roll dough into a rectangle: Turn the risen dough out onto a lightly floured surface. Using a rolling pin, roll the dough out into a rectangle that’s roughly 12×16”.
- Spread the butter: Spread the garlic herb butter across the rolled out dough, coating the entire surface as evenly as possible.
- Cut and stack the dough: With a sharp knife or pizza cutter, cut the dough into 12 pieces, with each piece about 4×3" in size. Stack all 12 pieces on top of one another and transfer to the prepared loaf tin, adjusting so they are evenly distributed. Cover loosely with plastic wrap or a damp kitchen towel.
- Final rise: Let the loaf rise, covered, for 45 minutes to 1 hour. It should be visibly puffy and slightly cresting over the top of the loaf tin (if you're using a 9×5"). Try not to skimp on the final rise time — it's important if you want your bread to be as fluffy as possible! In this time, preheat your oven to 350°F and place the rack in the lower middle position.
Final Proofing & Baking
- Bake: Once the loaf has risen, place it in the preheated oven and bake for about 40-45 minutes, or until the internal temperature reaches at least 190°F. Because the dough is quite rich, it can brown quickly. If it seems like it’s getting too dark, loosely tent it with aluminum foil halfway through the cooktime.
- Slightly cool: Carefully remove the loaf from the oven and place on a wire cooling rack. Let it cool in the pan for about 10 minutes before removing it to serve. It’s best enjoyed warm, with the cheese still gooey! I also love serving this with a side of marinara for dipping.
Notes
- Turn the risen dough out onto a lightly floured surface. With a knife or bench scraper, divide the dough into 12 roughly even-sized pieces. (If you prefer thicker slices, divide into only 6 pieces.) Shape each piece into a ball by tucking the edges underneath. Place them seam-side down on your work surface and let them rest for about 10 minutes while you prepare the garlic herb butter. (This will allow the gluten to relax.)
- Prepare the garlic herb butter.
- Using a rolling pin, roll each of the dough balls out to a circle, roughly 1/4” thick and about 5″ in diameter. It’s okay if the circles are slightly irregular in shape. (If you wanted thicker slices and you divided the dough into only 6 pieces in step 1, still roll them out to about 5″ in diameter.)
- Divide the garlic herb butter evenly between the 12 discs of dough. Spread the butter across each piece of dough to cover it.
- Cut each dough circle in half, forming half-moon shapes. Stack 6 half-moons on top of each other. Repeat with the remaining dough pieces, creating 4 stacks, each with 6 half-moon pieces of dough. (This isn’t strictly necessary; it’s just to make the transfer to the pan easier and more uniform.)
- Grease a standard loaf tin and transfer the stacks into the tin, standing up.
- Proceed with the recipe as written.
Can you use gluten-free flour with this recipe? Can you use regular dairy products this recipe? Thank you in advance
That is exactly what I was going to ask because I need to make it GF. Since others used regular milk and butter, I bet the one-to-one flour would work too.
Some 1:1 gluten-free flours are made for baking things like quick breads and cookies while others are made for baking bread and other yeast-risen recipes. Just make sure you’re using the correct replacement if you’re going to try to make this recipe gluten-free!
why not look for an explicitly gluten-free recipe?
This bread was amazing! No soggy bottom or anything I read in the comments. I opted for rolling out the dough into a rectangle and cutting it into squares. Then, I stacked the pieces and transferred them to the pan. I baked it covered with aluminum foil for like 50 minutes and then, uncovered for like 10. It turned out so delicious, so soft and herby. Loved the recipe, I really appreciate your work, Sarah <3
Would the milk measurement be the same if cow’s milk was used?
yes, I did 1:1 ratio along with cow’s butter
I used regular dairy milk and butter and the measurements were the same- it worked perfectly 👍
I am a bit concerned about the amount of fat that’s in this recipe. While baking, all that fat will melt and pool at the bottom of the pan, giving it a heavy and soggy look, taste and feel, would it not? That’s why these pictures are precisely taken as to NOT show the removal of the bread from the pan, nor the bottom of the slices. Call me crazy but I don’t believe that the bottom of this bread will be good.
I had the same concerns but it actually became the best part of the bread lol. It did not sog and the butter was absorbed very well. If anything the top half of my batch was a tad bit dry but balanced out with the buttery bottom.
wait till you find out how focaccia is made..
Tried this with dairy instead of vegan products, and lots of rosemary. Flavor was there but needed a tad bit more salt. Def brush with butter once done as the top dried out a bit which is totally normal with most breads but since this was a pull apart bread, the top wasn’t that appealing, so more butter it was! I’d give this a 7.5 out of 10. Fun to make!
I made this with oat milk and ghee, and forgot the cheese. I also realized halfway through that I didn’t have a bread pan and ended up cutting the disks in quarters and layering them over each other in two 6in, 1.5in deep cake tins.
Still turned out amazing!
Can we use this same recipe and modify to use as cinnamon raisen bread? Oh my gosh!!!
Made it yesterday and it was the best Garlic Bread I’ve ever had!!
I used almond milk instead since I didn’t have soy and this came out great! I was expecting to screw it up somehow but it came out perfectly and everyone loved it. Thanks so much!
Hi Sarah! Thank you for the recipe. Was looking for a garlic pull apart bread recipe for a while.. the bread is baking and looking good. I also had some leftover dough cause I have a smaller tin. Made some pita pockets on the stove top on high heat and it turned out amazing!! Looking forward to the bread now 😀
Hi there, my loaf tin comes with a slidable cover…can i use this for proofing (with lid closed)? Also when i put it into the oven for final step of baking, should i keep the lid closed? This may mean i might open it a couple times while baking to check doneness.
Made one with the active yeast but now I only have the rapid rise blue pack. Is there anything different I need to do with the milk and sugar with this kind?
My bread tin was only 3/4 full, not sure what to do about that
This came out so good thank you so much for the recipe!
Doesn’t work at altitude.
Sorry to hear that! However, this recipe was developed at 5,000ft. (I live In Colorado.)
I’m at approx. 1000’ altitude will it work for me, also how large is your pan it looks long I only reg average size bread pan what do you think, can’t wait to try this. Thank you for the recipe
I tried it with dried jalapenos – came out great! Used some hot honey as a dipping sauce. Excited to try different combinations with this recipe moving forward.
Maybe is it because I’m French and don’t know the cup measurment but I had an issue with the flour.
Just 3/4 of 1 cup (as mentioned) was clearly not enough, it was too liquid.
I had to add a lot of flour to make a dough.
Is it something I didn’t understood ?
“3 1/4 cups” is referring to 3 cups + 1/4 cup of flour. Hopefully it turned out okay!
Very nice! I made this for the first time yesterday. My autistic 8yr old wanted it while it was still baking in the oven. When it was done he ended up eating half the loaf (we shared) and daddy ate the other half when he got home along with the wonton ravioli I made for us for day. My 8yr old was handing me the empty container today so I ended up making it again today for him. This time I used chives and onion powder in the dough along with 1tsp onion powder and 1tsp minced onion. The filling was a couple tsp roasted garlic puree, 1tsp garlic powder and 1 tsp minced garlic, as well as parsley, onion powder and 1tbsp nutritional yeast. It’s turned out beautifully. He’s very excited for it.
Made this bread today, bake and looks done but it is very light in color. If I bake it longer will I try it out too much?
I didn’t do the vegan recipe, but my husband doesn’t do cheese so we did a vegetarian alternative with butter and whole milk instant dry milk.
I found that the proofing took a bit longer than expected even with a New England winter, so I opened the oven and let the heat rise to help the dough rise for a bit.
I did the roll out and cut into squares, and at first it didn’t look like it was going to fit into the entire loaf pan, but after proofing it was perfect.
Delicious. We used it all week as garlic bread for pasta, a dipping bread for beef stew, a snack, and as a toast for breakfast eggs. Great recipe!
The softest bread I’ve ever made!
If you’re stuck trying a bunch of bread recipes, being misguided by the internet and overall just not having that soft bread you’re craving for, this is it!
The moisture and butter between the dough plates makes the inside become soft.
I paired this recipe with the “Creamy Vegan Cashew Ranch” recipe, and it turned out even better. Although, I do wish this bread had a bit more flavour – maybe more salt would’ve helped.
Either way, the dough was extremely easy to handle and the taste + texture was great!
I made this today. Followed directions using cows milk and butter. First time I’ve ever made bread from scratch. Turned out perfectly. Delish! Thank you.
Such a good recipe! Super savory and garlicky. Really hard to stop eating, lol. Dip it in some good marinara and oh man, it’s like heaven. 5 stars!
This flour ratio didn’t work for a tropical area, so I had to add another whole cup of flour. The dough raised so much, though, that it spilled off my tin while baking. It was still very fluffy inside and crunchy on the outside. My family enjoyed it very much. In the other hand, I also had lots of leftover filling… Which isn’t a bad thing at all, considering we get to have herb toast whenever for a few days more. I’ll definitely try it again in the future, I’ll just have to keep these adjustments in mind.
I’ve made this a million times since stumbling upon this recipe. I’ve used both bread flour and all purpose with great results. Super yummy & easy!
I made this using dairy products and it was delicious!! I was wondering if I could put it in the fridge before the second rise and then take it out let it rise and then bake it when I’m ready?
Will anything changes if we substitute active dry yeast with instant yeast?
This sounds delicious! Can I use sourdough starter for the yeast instead of yeast?
This was my first time baking bread. I used dairy products instead and it turned out pretty good!! I only had a round pan so I made them into small round balls, so they turned out like buns! Soft inside and pretty crisp outside though the top half was a tad bit dry, the bottom was perfect. Thank you Sarah!!
Hi Sarah. I tried this bread today, and it is easily the best bread I have ever had…..and I take bread pretty seriously lol. The recipe is incredible, the bread turns out super soft and garlicky…it’s just sooo good, everyone loved it. Thank you for the recipe….I may try your challah bread next :)….oh and how cool is it that you don’t have to slice it, just peel the layers, very impressive 🙂