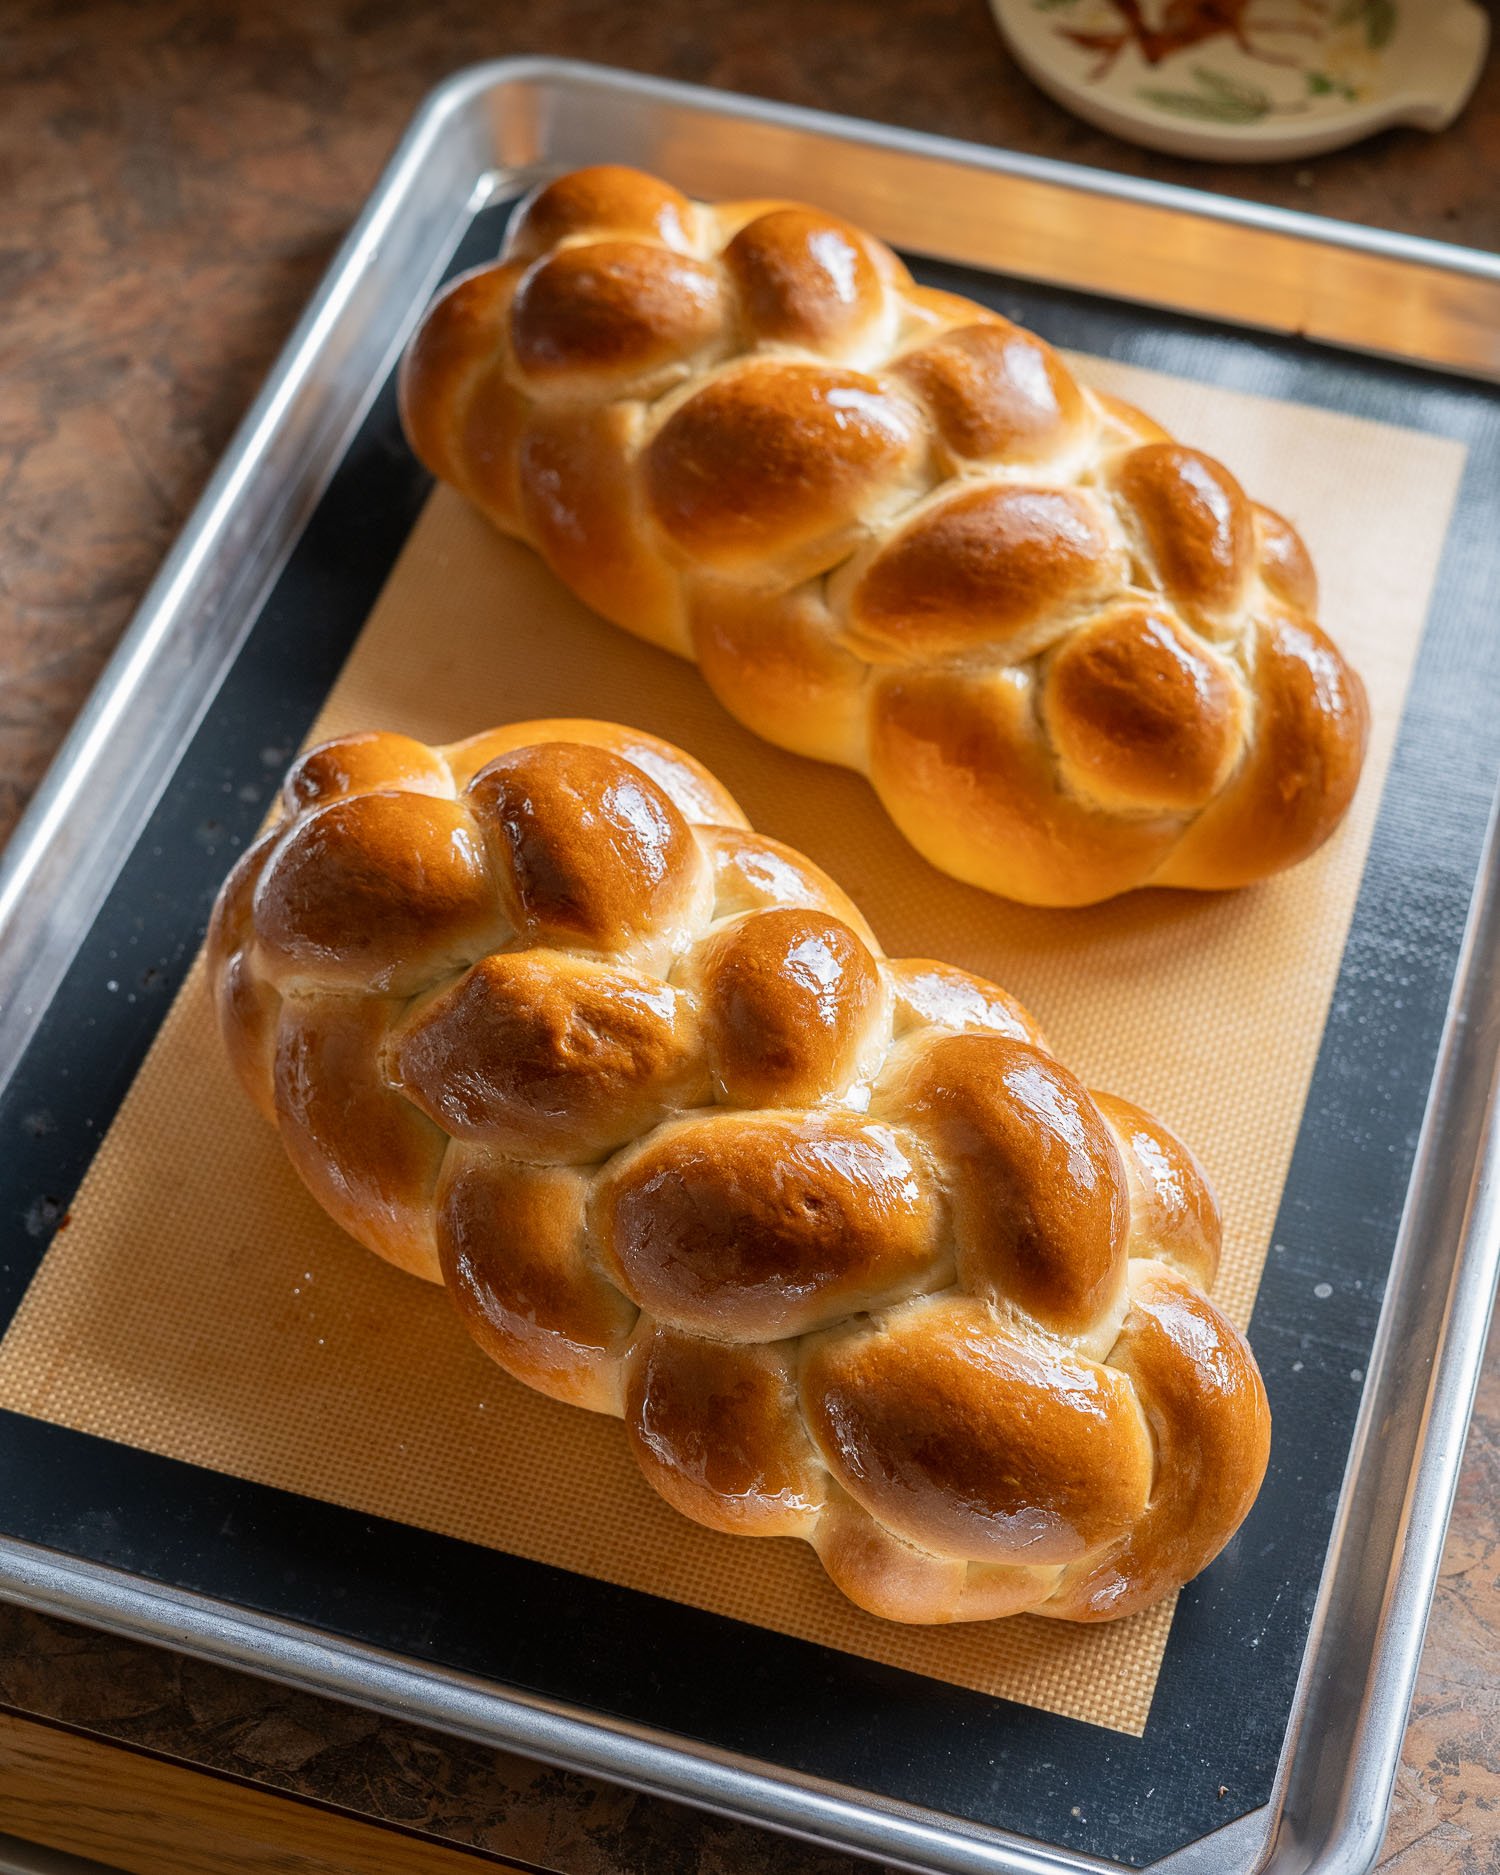
With Rosh Hashana (the Jewish New Year) approaching, I’m sharing one of my all-time favorite recipes for homemade bread. This vegan-friendly challah (also known as “water challah”) calls for just a few simple ingredients , yet the results are so special! This recipe yields 2 beautiful braided loaves that are perfectly golden brown, sweet, soft and fluffy.
I always recommend this recipe to beginner bread bakers, because it is so simple to make but so delicious and visually impressive. It can be prepared by hand, although a stand mixer will do a lot of the hard work for you.
Back when I lived in a co-op in college, I’d bake big batches of bread every weekend for my housemates. I’d rotate recipes each week: wheat, oat, baguettes, pumpernickle, and more. Every time I made challah, I’d make twice as much because it was such a crowd favorite, it would disappear in a snap. Hopefully this challah brings you as much joy as it has brought me over the years!
Table of Contents
What Is Challah?
Challah is a type of bread enjoyed as part of Jewish culture on Shabbat and special holidays. The meaning of “challah” has evolved over time, but today in the US we generally think of the kind of braided bread that’s sweet, soft and fluffy. The dough is often enriched with eggs, which add richness and a lovely golden color. Sometimes it’s sweetened with honey, which in Jewish culture symbolizes the wish for a sweet year.
“Water challah,” on the other hand, is very common outside of the United States. Popular in traditional Jewish bakeries in Europe and the Middle East, it’s less sweet, a little on the lighter side, and vegan by default.
Historically, Jewish people in Europe would reserve the more indulgent enriched challah for special occasions since eggs, sugar and oil were expensive. Once they immigrated to the US, however, the cheaper prices for these ingredients led to the popularization of enriched challahs. This is the type of challah that my fiancé, Eric, grew up eating in his Jewish household.

Why Do We Braid Challah?
Challah is well-known for its gorgeous braided shape. There are a few reasons we braid challah. It’s meant to symbolize the unity of the Jewish people while also differentiating it from normal, everyday bread. Since challah is enjoyed on Shabbat and other holidays, Jews thought it should look as special as it is — in a way elevating the mundane with our time and care.
An exception is on Rosh Hashana, the Jewish New Year, when a round challah is made to symbolize the cyclical nature of time and the beginning and end of the year, connecting as one.
Ingredients for Vegan Challah
- Bread flour. The higher protein content in bread flour gives challah the structure it needs to maintain its braided shape.
- Yeast. To allow the bread to rise. Instant or active dry yeast will both work.
- Sugar. A little sweetness gives challah its classic flavor.
- Water.
- Oil. To give the challah the perfect level of richness.
- Salt.
How to Make Vegan Challah
Make the Dough
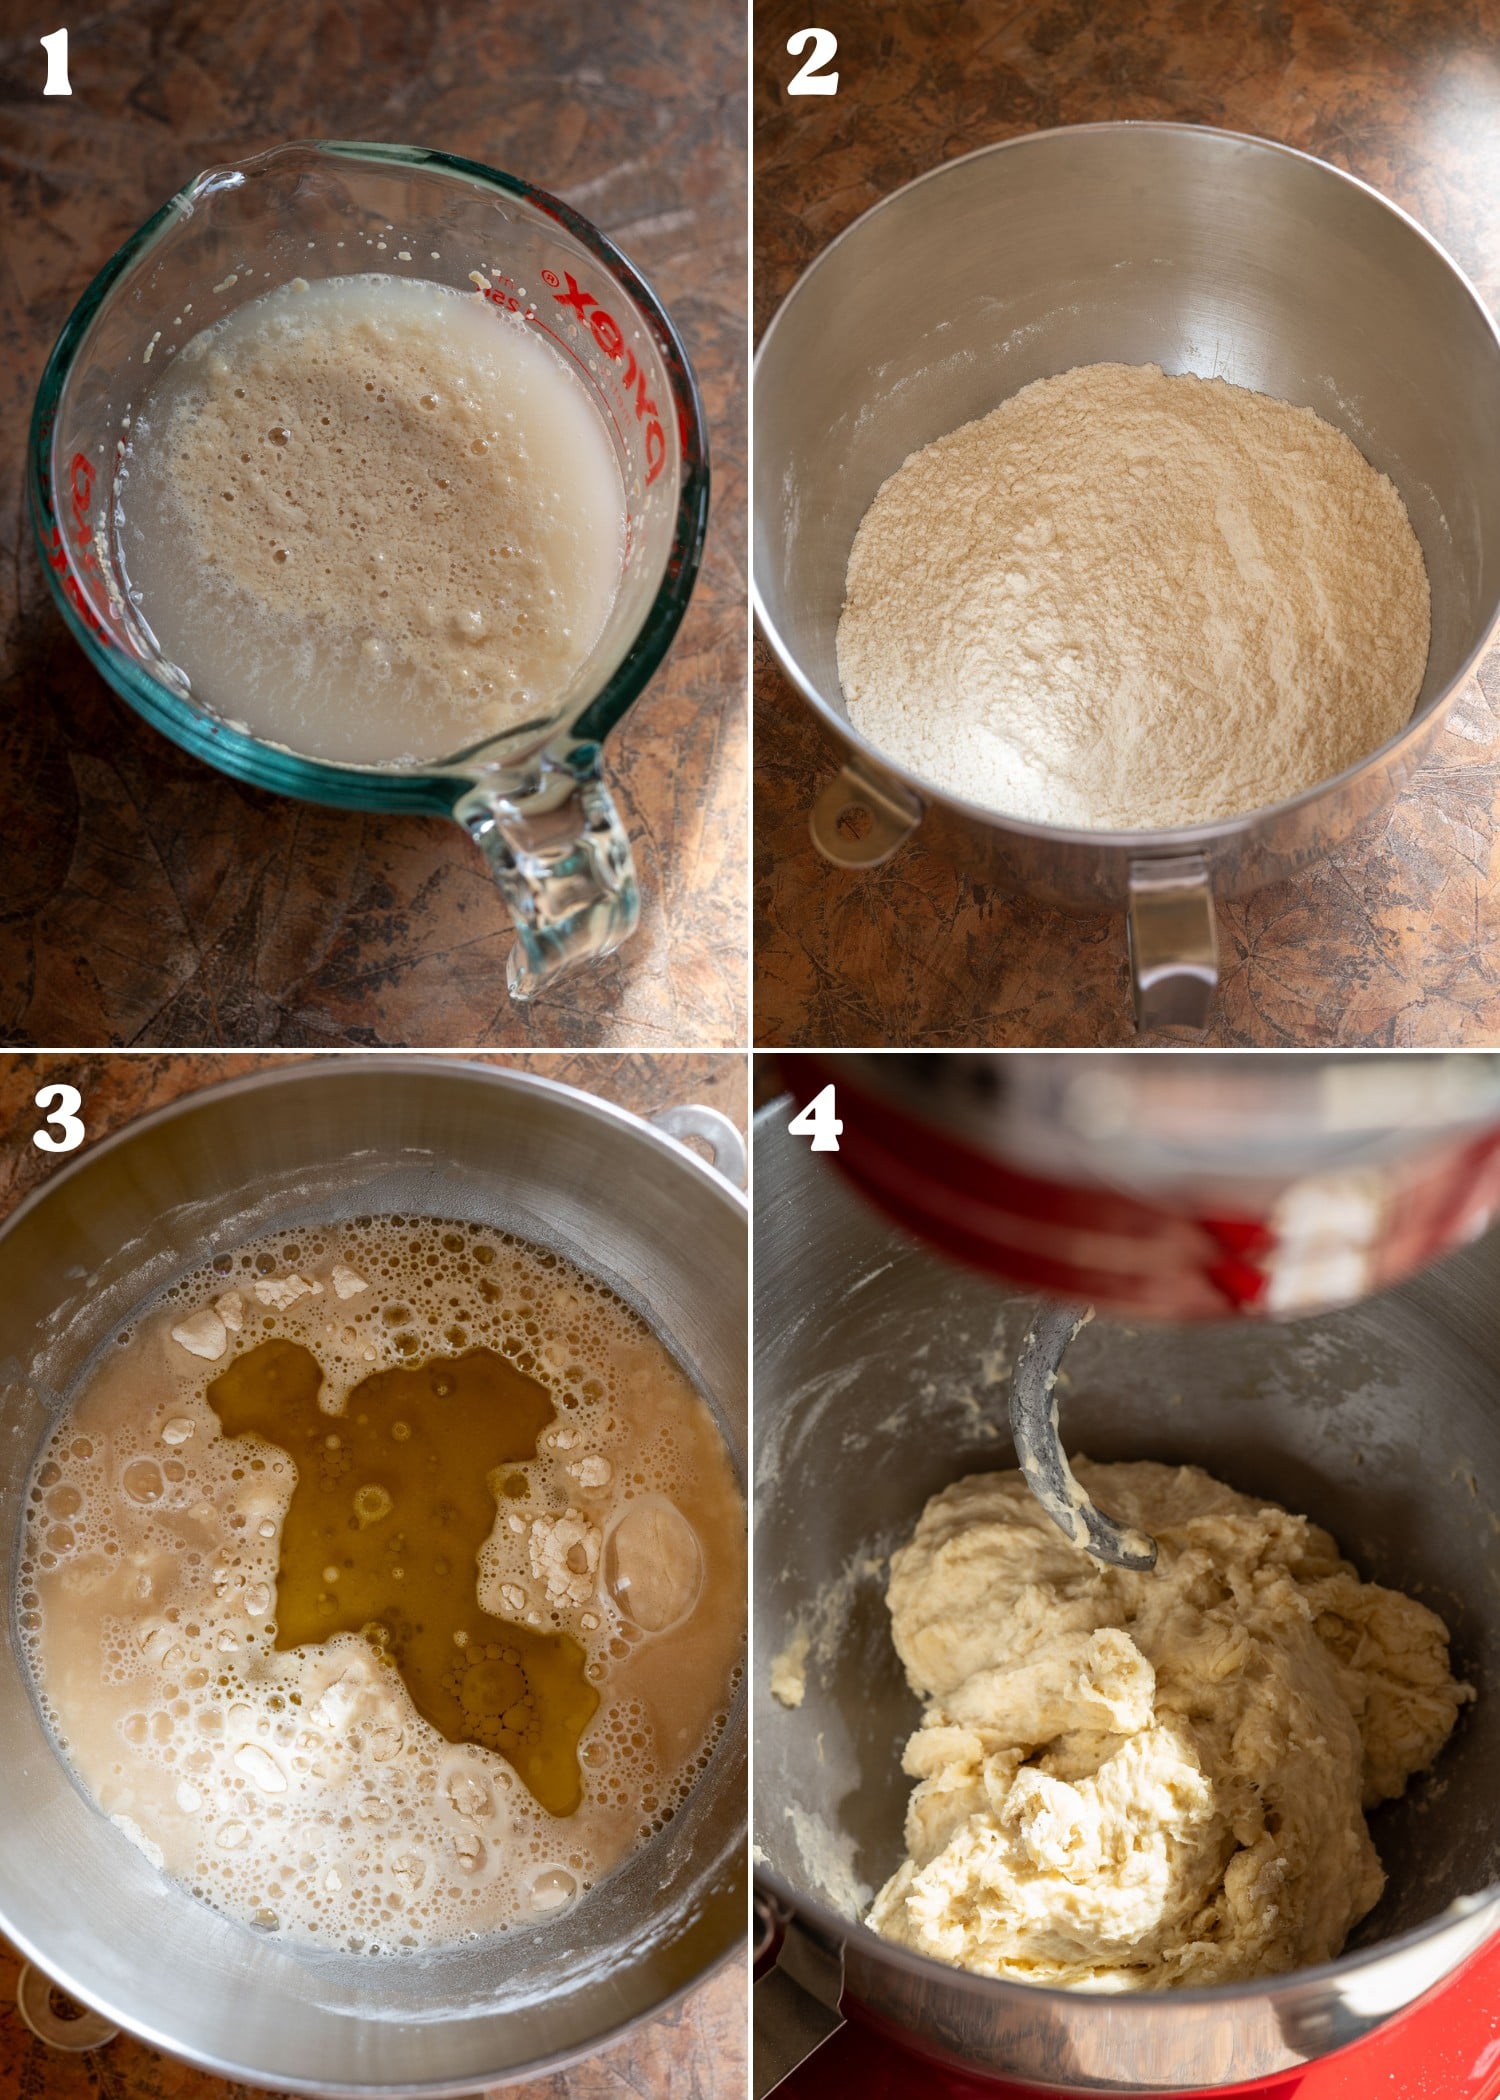
- Proof the yeast: Sprinkle the yeast over lukewarm water and give it about 5 minutes to become foamy.
- Mix dry ingredients: In the meantime, add dry ingredients to the bowl of a stand mixer and mix.
- Add wet ingredients: Add the proofed yeast mixture along with oil to the bowl.
- Initial mix: Use the dough hook to mix and form a shaggy dough.
Knead and Rise the Dough
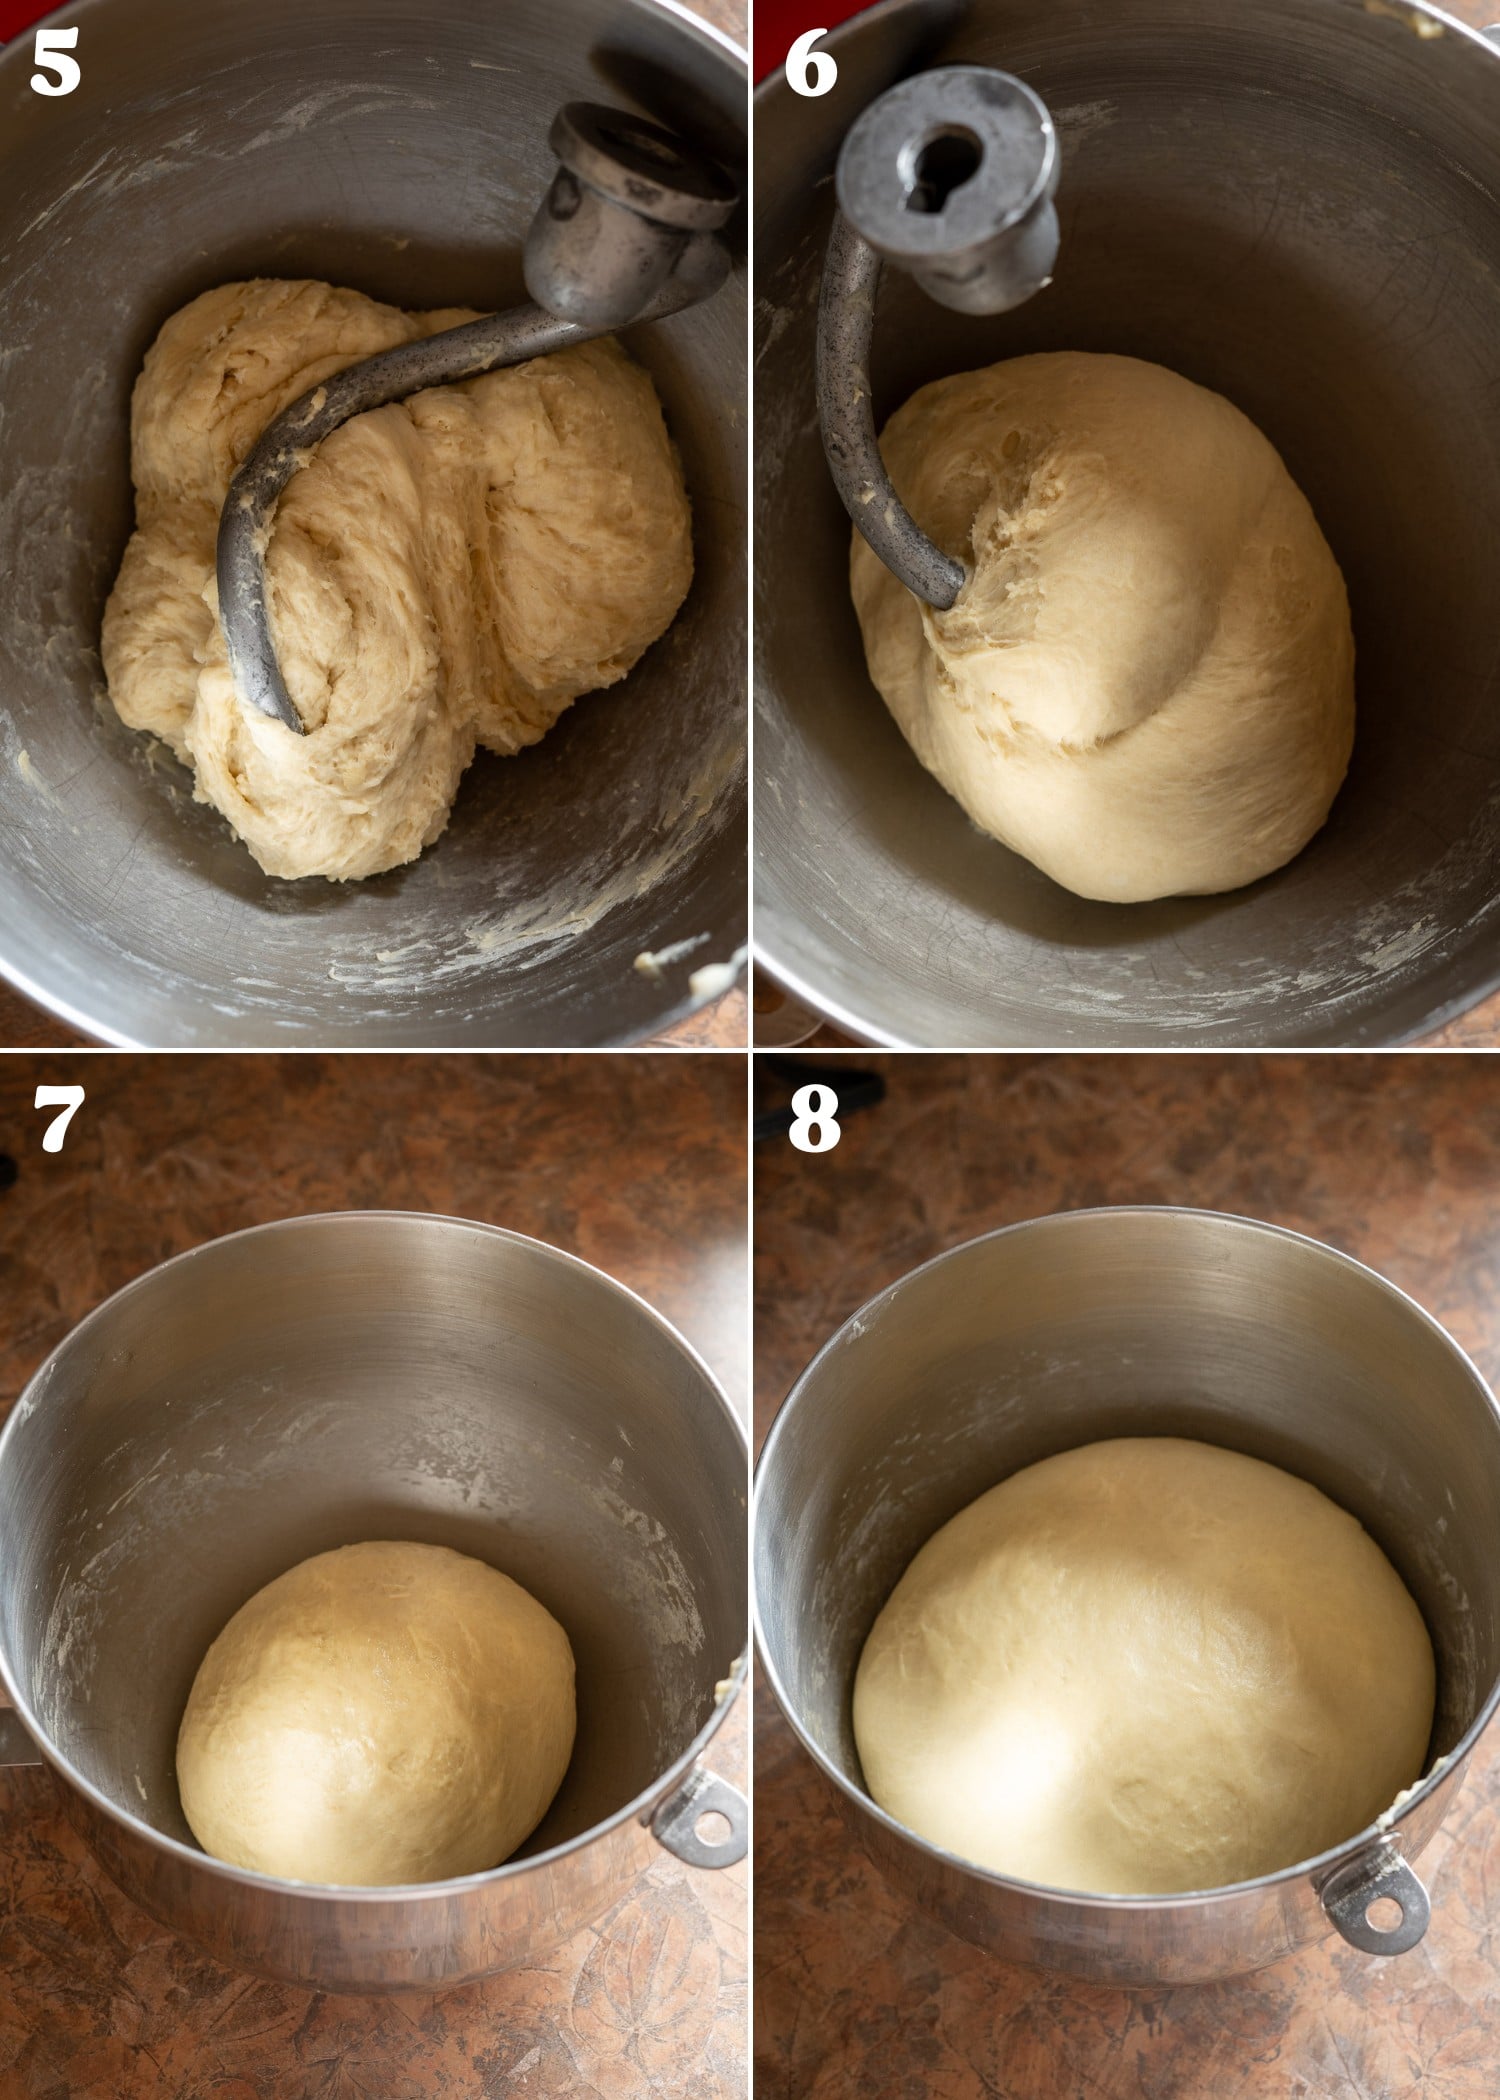
- Rest and knead: Let the dough rest for about 10 minutes so it can hydrate. Then begin kneading with the dough hook.
- Knead till smooth: Knead the dough for about 6-8 minutes, or until smooth and elastic. Add extra flour a few tablespoons at a time if the dough is too sticky.
- Oil and cover: Form the dough into a ball. Lightly grease the bowl, coating the dough. Cover and place in a warm spot to rise.
- Rise until doubled: This usually takes about 1 hour but can take longer if the kitchen is very cold. Go by volume rather than time.
Shape and Rise the Loaves
- Divide into portions: Depending on your desired shape, divide the dough into portions according to the number of strands you will need. Cover and allow to rest for about 10 minutes to relax the gluten.
- Roll into strands: Roll the dough pieces out into strands. Make sure to keep the dough covered when you are not working with it so it doesn’t dry out.
- Shape loaves: Braid the loaves as desired. See the “Shaping Challah” section for more details and resources about how to achieve a beautiful braid with different numbers of strands. If you wish to add toppings (sesame seeds, everything seasoning, etc.), you can do that now. See the FAQ for instructions. Transfer the loaves to a lined baking tray.
- Final rise: Cover the shaped loaves and allow them to rise in a warm spot until very puffy — about doubled in size. Don’t skimp on the final rise; this is key if you want the fluffiest, softest challah. I usually let them rise for another hour. It can take less time if it’s warm in the kitchen, or more time during the winter when it’s chilly. To check for readiness, poke the loaf. You want it to leave an indentation. If it springs back quickly, it needs more time.

Shaping Challah
My personal favorite shape for challah is a 6-strand braid. Here is the tutorial I used to learn how to braid using 6 strands of dough.

I also love the look of a 4 strand braid or even a simple 3 strand braid. Here’s a good tutorial for 4 strands.

Serving Suggestions
You can keep your vegan challah plain or top it with your favorite seasonings! A few popular options are poppy seeds, sesame seeds, or everything seasoning (which contains both of those seeds plus other aromatics).
When it comes to serving your challah, we love eating it with soups or dishes that have a lot of sauce for dipping. Whether it’s vegan matzo ball soup, chick’n paprikash, or even vegan beef stew, it’s going to be delicious!
Saving the best for last, you can also use your leftover challah to make vegan challah French toast!
How to Store Vegan Challah
This bread is best if eaten within the first 2-3 days, but it will keep for up to 5 days at room temperature if you wrap it or keep it in a breadbox or other sealed container. Make sure you allow the bread to cool fully before putting it in a sealed container, otherwise there will be condensation (which can cause mold).
If you think you might not be able to eat it that quickly, I recommend cutting the loaf in half, wrapping it thoroughly, and freezing one half. It will keep in the freezer for up to 3 months.
Troubleshooting Homemade Challah
You can knead in extra flour as needed to achieve the correct dough texture. Start with 1-2 tablespoons at a time and make sure to incorporate it fully before adding in more. A lot of factors can influence the moisture of the dough (including humidity, the brand of the flour, and the way you measure it), so it is always best to go by feel.
There’s a chance that you over-packed your flour when measuring it out. That’s ok! You can gradually incorporate extra moisture into the dough by sprinkling water on the surface while kneading, about a teaspoon at a time. It will take a minute for the dough to absorb the extra moisture — it will start out becoming a little slimy. Just be patient and it will incorporate. Sprinkle extra water onto the surface of the dough gradually, kneading until it fully absorbs before adding more. If you are kneading the dough by hand, you can accomplish the same thing by wetting your hands while kneading until the dough softens up.
Make sure that your yeast is nice and foamy within a few minutes after you add it to your water. If there is no activity, the yeast might be expired. I like to keep my yeast in a sealed container in the freezer to extend its life. There’s also a chance that your water was too hot, killing the yeast. The lukewarm water should be just about 110°F — like a warm bath, but comfortable to the touch.
Because there is sugar in the dough, the challah can brown quickly. I usually don’t have an issue with this, but it can depend on your oven. Make sure the rack is positioned in the center of the oven; the loaf can darken too quickly on the top or bottom if it’s too close to the top or bottom of the oven. If your loaf is browning faster than desired, just loosely tent it with some aluminum foil during the last 10 or so minutes of baking time.
Another thing I always recommend is to grab an oven thermometer. They’re inexpensive and can help you make sure your temperatures are accurate! Your oven may be running a little hot.
Bread keeps cooking even when it comes out of the oven! Ideally, you need to let your bread cool fully before slicing into it so that the center is fully cooked and not gummy. I know it can be tough to wait, so if you’re in a hurry I recommend waiting at least 20-30 minutes before digging in.
There’s also a chance that the bread was under-proofed (i.e. needed to rise longer) when you baked it. Under-proofed bread can be dense and gummy because there isn’t enough air in it. Make sure that the loaves are just about doubled in size and very puffy when you put them in the oven.
One last possibility is that your oven temps are cooler than needed. Make sure you let give your oven plenty of time to preheat! An inexpensive oven thermometer can help you make sure your oven is at the right temperature.
Recipe FAQ
Challah is not traditionally made with butter (or any dairy), in order to keep it pareve. However, you are welcome to substitute in vegan butter if you feel you would prefer the taste. I haven’t tested it personally but it should work just fine. I recommend softening the butter first, or melting it and allowing it to cool before adding.
In the US, the most common type of challah is enriched with eggs. However, “water challah” (challah made without eggs) is very common in traditional Jewish bakeries in Europe and the Middle East. Trust me when I say that the bread is still wonderfully fluffy and soft without eggs or any plant-based alternatives!
If you would like to use soy milk instead of water, you can. However, challah is traditionally made with water, so I personally don’t find the recipe to be lacking when prepared that way.
Yes, the recipe will work perfectly when halved.
You can make 1 large loaf rather than 2 smaller ones if you prefer. Or you can divide the dough into more portions and make 4 or more smaller loaves. (It’s fun to make personal loaves when hosting or when cooking with kids.) You will just need to adjust the cook time to avoid under- or over-cooking. A probe thermometer can help. Bread should reach 190°F internally to be properly cooked.
Vegan Challah Bread (Water Challah)
Video
Equipment
- stand mixer (optional but helpful)
- dough hook attachment
- large baking sheet
- silicone baking mat or parchment
- pastry brush
Ingredients
- 1 cup + 2 tablespoons lukewarm water about 110°F
- 1 (0.25 ounce) packet active dry yeast 2 ¼ teaspoons, or 7 grams
- 1/4 cup white sugar add an extra 1-2 tablespoons for a sweeter loaf
- 1/3 cup vegetable oil I like olive or sunflower; any neutral oil is fine
- 4 cups bread flour about 520 grams, plus more for kneading
- 1 1/2 teaspoons fine salt or 2 teaspoons coarse kosher salt
Vegan Egg Wash Substitute (optional)
- 2 tablespoons soy milk or sub aquafaba
- 1 teaspoon vegetable oil (optional, for extra glossiness)
- 1 teaspoon maple syrup (optional, for extra browning)
Instructions
Make the Dough
- Proof yeast: In a small bowl or measuring cup, sprinkle yeast over lukewarm water. Allow it to proof for about 5 minutes, until foamy.
- Mix dry ingredients: Meanwhile in the bowl of a stand mixer, combine bread flour, sugar and salt. Mix briefly to combine.
- Mix dough ingredients: Pour the yeast mixture into the dry ingredients, along with the vegetable oil. Fit the stand mixer with the dough hook attachment and mix on medium speed until the ingredients come together into a rough dough.
- Short rest (Optional but recommended): After the initial mix, cover the bowl and allow the dough to rest for about 10-15 minutes. This will give the flour a chance to hydrate so it kneads more easily.
- Knead dough: Knead the dough on medium speed for about 6-8 minutes. The dough will go from shaggy to smooth and elastic. It may be a little tacky but should easily clear the sides of the bowl. If the dough seems excessively sticky or wet, add in extra bread flour 1-2 tbsps at a time, kneading between additions.
- Grease the bowl: Lift the dough out of the bowl and form it into a ball. Drizzle a little bit of oil in the bowl, then place the dough back into the bowl and turn it over to coat it with the oil.
- Rise until doubled: Cover the bowl to rise. You can use a plate, some plastic wrap, or a dampened kitchen cloth. Allow to rise in a warm place until roughly doubled in size. It usually takes about 1 hour, but can take longer if the kitchen is chilly. Go by volume rather than time.
Shape the Challah Loaves
- Divide dough in half: Turn dough out and divide into 2 halves, to make 2 loaves. Work with 1 loaf at a time, keeping the other dough covered so it doesn't dry out.
- Divide into portions: You can do a simple 3-strand braid, or scroll to the "Shaping Techniques" section in the notes section for video tutorials for a 4-strand, 6-strand, and round braided challah. When forming the strands, divide the dough into the number of strands. (You can use a scale for precision.) Then roughly shape each piece into a ball. Cover and allow to rest for about 10-15 minutes so the gluten can relax. (Otherwise it will resist being rolled out.)
- Roll out strands: Roll each piece out using your palms, into a long strand, tapering the ends. This is similar to shaping a baguette. Once the strands are all prepared, braid the loaves in your preferred fashion, tucking the ends underneath the loaf. Repeat the process for the 2nd loaf.
- Note: Avoid using too much flour on your work surface when rolling out the strands. You can use a small amount to keep the dough from sticking to the surface or your hands, but if you use too much, it will be hard to shape your strands cleanly. Generally if the dough is the correct texture, you should be able to roll it out with minimal flour.
Final Rise & Bake
- Final rise: Once the loaves has been shaped, transfer them to a large baking sheet lined with parchment or a silicone baking mat. Space them with enough room to double in size. Cover loosely with plastic wrap or a dampened kitchen towel and allow to rise until almost doubled in size. This usually takes about 1 hour, but can take up to 2. Be patient if you want the fluffiest challah possible. To test for readiness, give the dough a poke. The indentation should remain. If it springs back, the loaf needs to rise for longer.
- Preheat oven: Start to preheat your oven to 350°F when the loaf is almost ready to bake.
- Brush with vegan egg wash: This step is optional if you'd like your challah to have a slightly more glossy finish. Brush lightly with either plain soy milk, or a mixture of soy milk, oil, and maple syrup. (Soy milk works best because of its higher protein content, but other plant milks can work too.)
- Bake: Bake the loaf for 35-40 minutes. If needed, tent it loosely with aluminum foil during the last stretch of baking to keep it from getting to dark.
- Cool and enjoy: Remove the dough from the oven. Let it cool on the cookie sheet for about 10 minutes, then transfer it to a wire cooling rack to cool fully. Bread continues to cook out of the oven and it can be a little gummy if you cut into it too early.
Any chance you have tried this with gluten-free flour? Am I just dreaming?
Thanks!
Hi! I’m so sorry to be seeing this comment so late, but I thought I’d answer for future readers. I haven’t experimented much with gluten-free flours and yeast-leavened doughs, unfortunately. I did a quick search and it seems most gluten-free challah recipes rely on the protein structure of eggs, plus added psyllium husk to achieve the fluffy texture and rise. I may do a little research/experimentation and try to share gluten-free bread options in the future!
This turned out delicious! Will absolutely make again.
Hi! Do you think I could substitute pumpkin purée for the sweet potato?
I love this vegan challah recipe! It looks so fluffy and delicious. Can’t wait to try it for my next family gathering. Thank you for sharing such a wonderful alternative!
Great recipe! Usually the only breads I make are flatbreads, but this one was fun and relatively beginner-friendly, even though I had to watch a few videos on braiding and making the rolls. Definitely brush vegan butter or oil on top right after baking to soften the crust!
Question – I greased the bowl during the first rise as you suggest, but that made it difficult to make nice balls and rolls after the rise was finished (since the bread wouldn’t stick to itself when shaping). Did I just add to much oil? Or maybe if my dough is soft enough I can just skip this step?
This came out absolutely amazing and was gone in a matter of minutes. I did have to watch the braiding tutorial like 10 times though. I can’t wait to make it again. Thank you for this incredible recipe!
Me: “I’m going to get so lean being vegan!!”
This website: [Jason batemen meme]
I’m not a baker. I’m certainly not a bread-maker nor do I have any experience working with yeast… didn’t turn on my oven once during the pandemic!!! I thought jumping straight into challah, vegan no less, was going to be an unmitigated disaster of accidental wrong-matzah proportions. But no, it turned out amazing. That’s 100% thanks to the recipe instructions…. I promise I am bringing zero skill to the table.
Thank you for sharing, I’m going to being trying all your recipes (starting with the carbs, of course!!)
Shabbat Shalom
Hey Sarah! With Thanksgiving right around the corner, I was wondering if you had any ideas about how to turn this into a *pumpkin* challah? Maybe replacing a bit of the water and oil with pumpkin? Idk. I’m happy to experiment on my own, but as the vegan bread queen, I was hoping you may have an idea or two in your back pocket!
Hi Alexa! We actually used to have a challah recipe that used sweet potato for the moisture and color, but Sarah found that this version of the recipe is just better all around.
P.S. – shoutout Food Blogger Pro!
I made this for Thanksgiving and absolutely loved it! It was my first time baking a six-stranded braid as well. The only problem I had is that it burned significantly on the bottom. I used parchment paper but my trays were dark — could that have been the problem? I scraped off the charred bits and salvaged the loaves but would like to avoid that for next time. I’m used to egg challah substitutes so I was at first missing a slightly sweeter flavor but loved this one in its own right and will definitely be making again.
Incredible recipe 🙂 My partner and I polished off a loaf in one sitting and will probably do the same thing tomorrow with the other. Will absolutely be making this again and again!
I made one loaf with the 6-strand braid–my first time doing that. I did cheat a little and prepared the dough in a bread machine. It looked beautiful even though it was not as glossy as the picture. I used all the egg wash ingredients, but maybe I didn’t use enough because I only used about half of it. It was delicious and a little addictive. I will definitely make this again when I want a classic challah bread for our Shabbat dinners.