Making tofu at home is such a rewarding experience! It definitely takes time and effort, but it’s so cool to see how the process works. The flavor profile is even more mild than store-bought tofu and it works perfectly in any tofu dish. If you have some time on your hands and want to try a neat food project, try making your own homemade tofu!

Table of Contents
Ingredients for Homemade Tofu
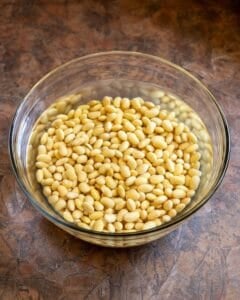
- Dried soybeans. We’ll use these to make homemade soy milk, which we will then transform into tofu. Use high-quality beans. Laura Brand Non-GMO Soybeans are my favorite.
- Water.
- Nigari. This is my preferred coagulant when making homemade tofu. It contains magnesium chloride, which reacts with the protein in the soy milk, causing the soy milk to curdle. I purchase crystallized nigari, but it can also be purchased in liquid form.
Equipment to Make Tofu from Scratch
- High powered blender. You’ll need this to blend your soaked soybeans into a soy milk. You can pull this off with a regular blender but it may take much longer. Just make sure to blend until the milk is completely smooth and not chunky.
- Two large stockpots. The soy milk is cooked in two phases: once with the pulp in it, and once after straining. If you only have one large stockpot, that’s fine; simply strain the soy milk into a large bowl or pitcher. Rinse the original stockpot out, and pour the milk back into it for the second phase. Make sure the pot has several extra inches of head space, because the soy milk gets very foamy and the foam can rapidly expand and boil over if the fit is too tight. A heavy bottom is also ideal, to prevent the soy milk from sticking to the bottom and scorching.
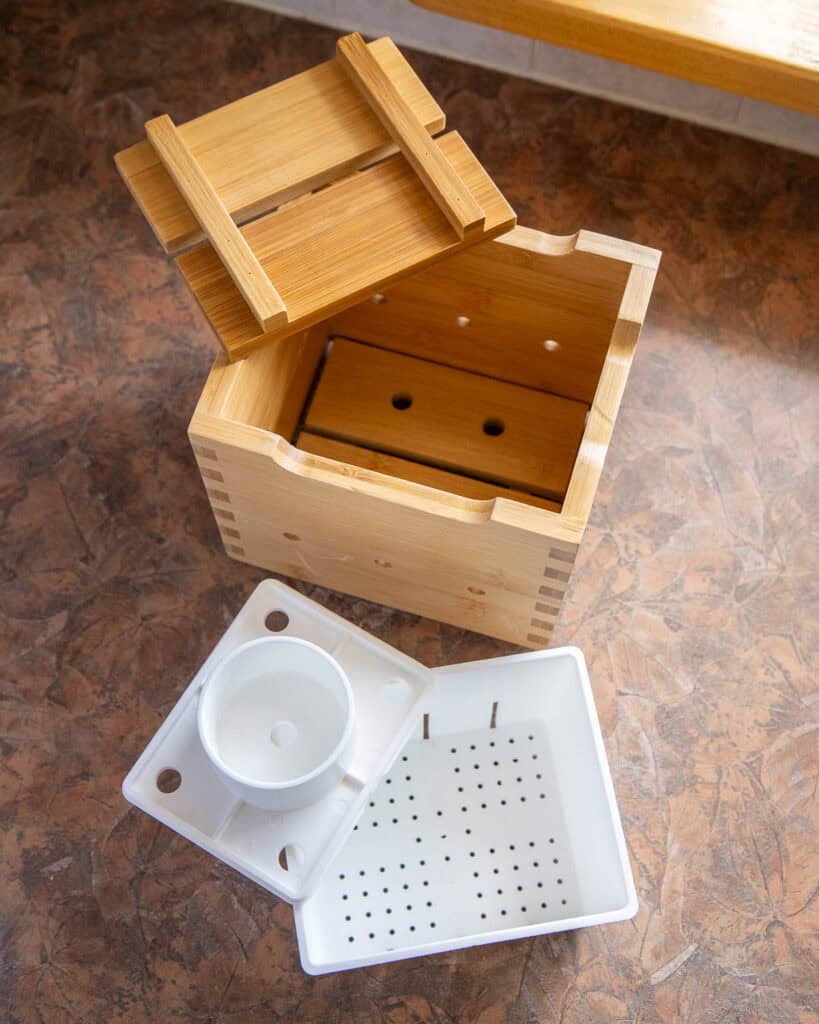
- Tofu mold. Bamboo mold.
Homemade Tofu: An Overview of the Procedure
The procedure for making homemade tofu from scratch is a bit time-consuming, but it’s not too complicated. Here’s a brief overview to simplify the process in your mind. The see the next section for a more detailed, step-by-step guide with images.
- Soak the dried soy beans overnight.
- Turn the soaked soybeans into milk by blending, cooking, and straining. The strained milk will then be simmered for an extra 10-15 minutes.
- Add a coagulant to curdle the soy milk.
- Transfer the soybean curds into a tofu mold and apply pressure to form your block of tofu.
- Firm up the tofu in cool water, then it’s ready to enjoy!
How to Make Homemade Soy Milk for Tofu
If you’ve ever made soy milk from scratch, this is exactly the first step to making homemade tofu! For this purpose, I use a ratio of 1 cup (dried) soybeans to 8 cups total of water.
Step 1 — Rinse the soybeans and add them to a bowl with enough fresh water to cover them by several inches. Cover and allow them to soak for 8+ hours or overnight. You want them to be tender enough to split in half when gently squeezed.


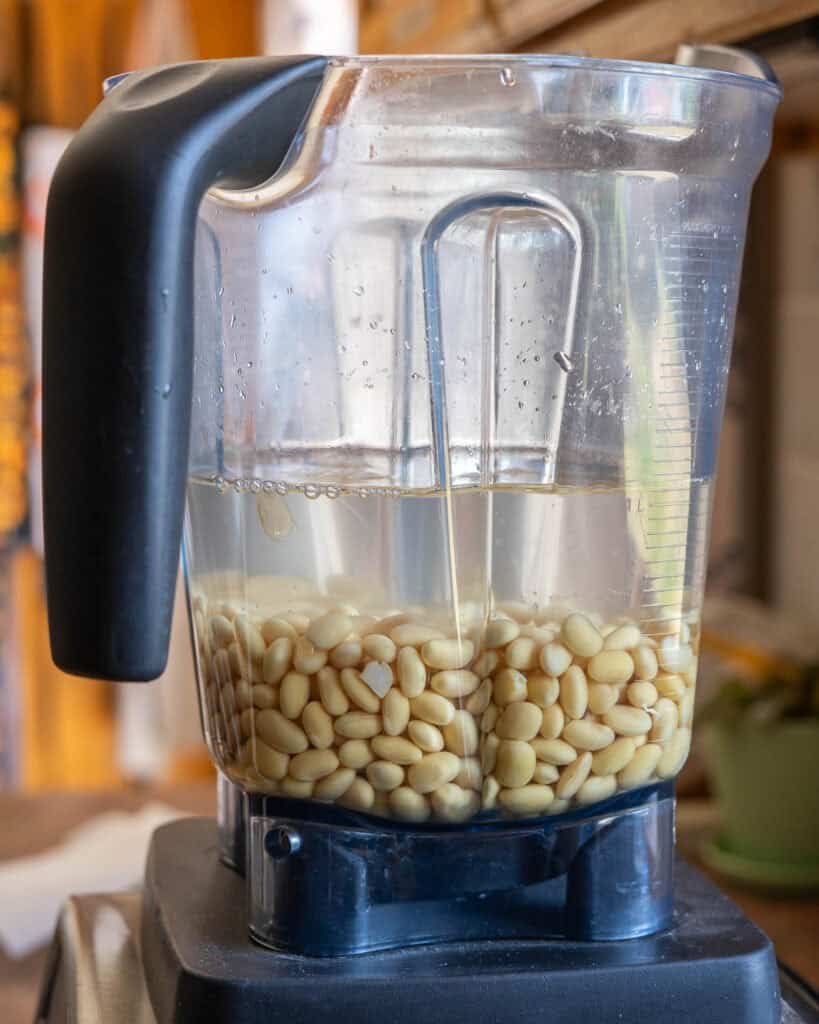
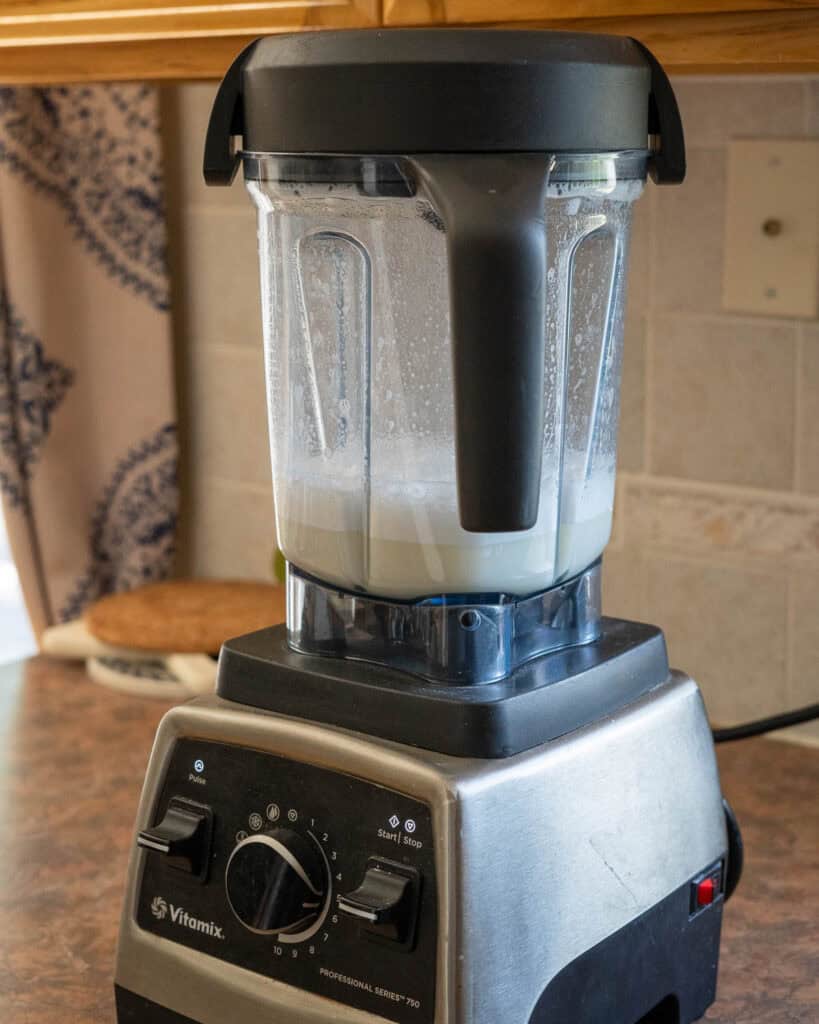
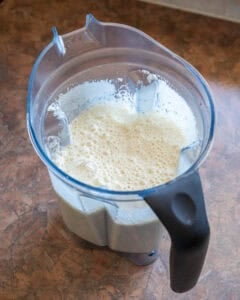
Step 2 — Drain the soaked beans and give them another rinse. Then add them to a high powered blender with 3 cups fresh water and blend until completely smooth.
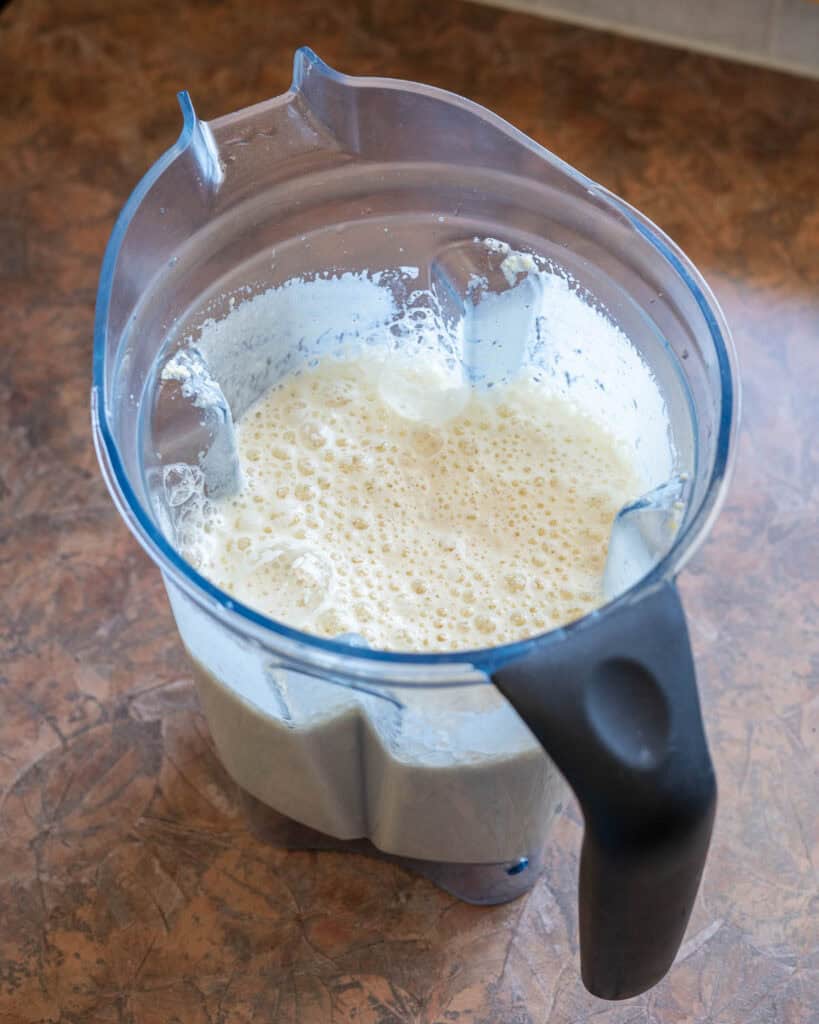
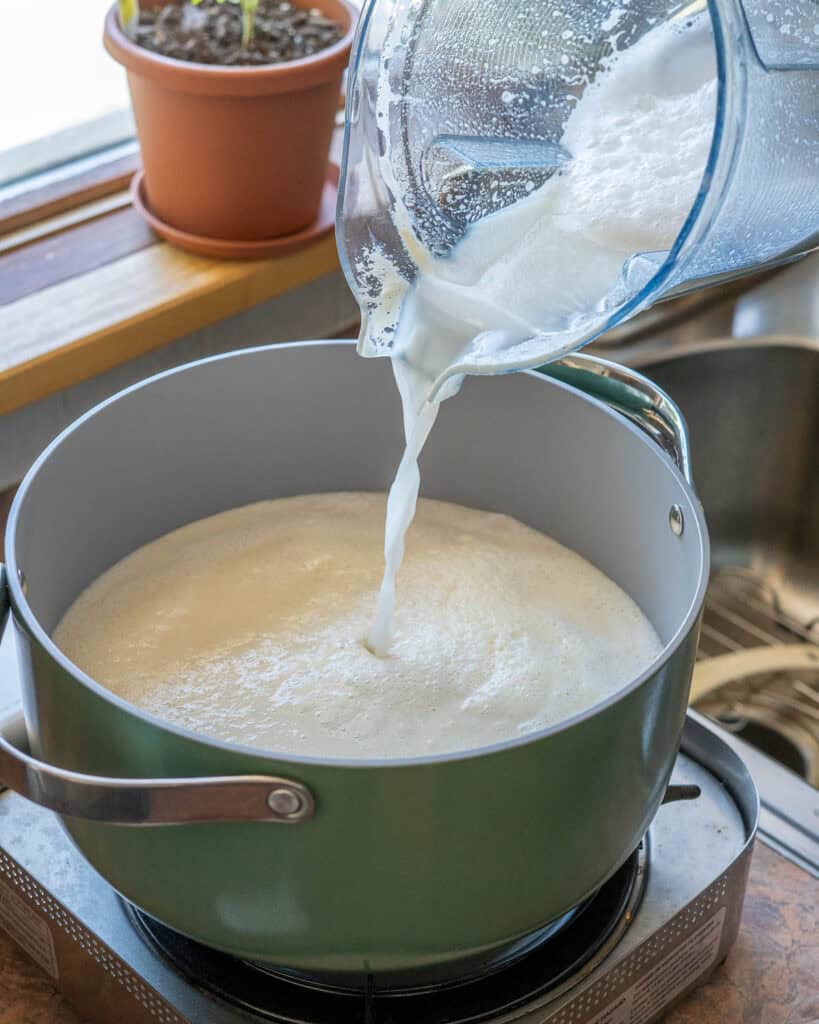
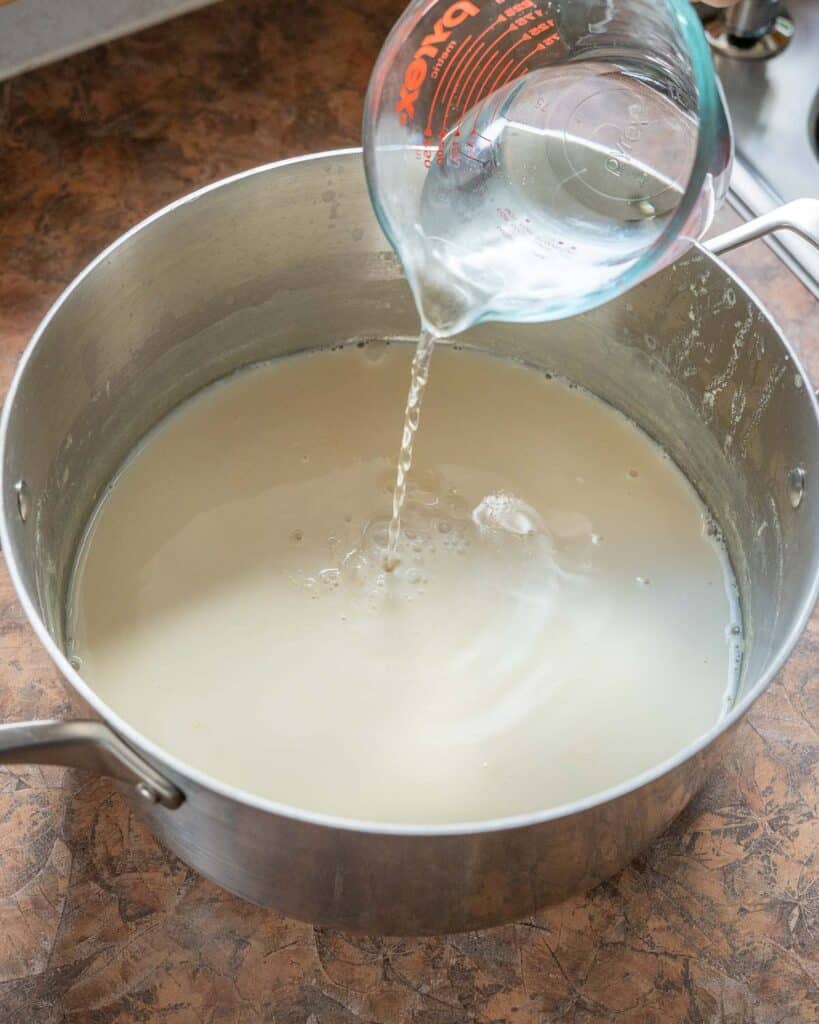
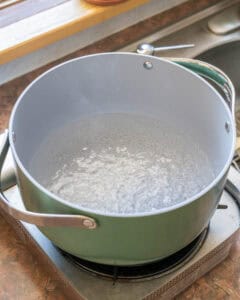
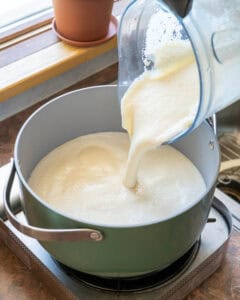
Step 3 — You will pour the puréed soybeans into a large stock pot or Dutch oven which already has 4 additional cups water at a gentle boil. Getting a head start heating the remaining liquid will speed up the process of cooking the soybeans (which, to be honest, is the most annoying part of this whole recipe — you’ll see why shortly).


Step 4 — Rinse out the blender with an additional 1 cup water to get every last bit of soybeany goodness into the pot.
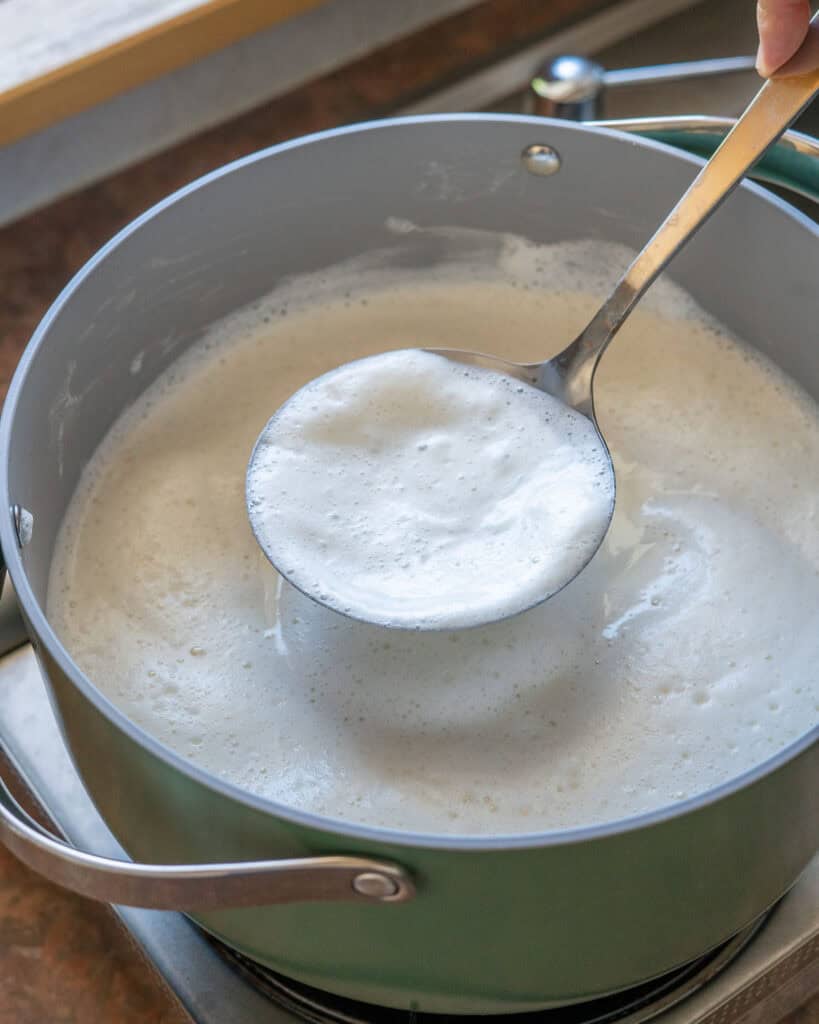
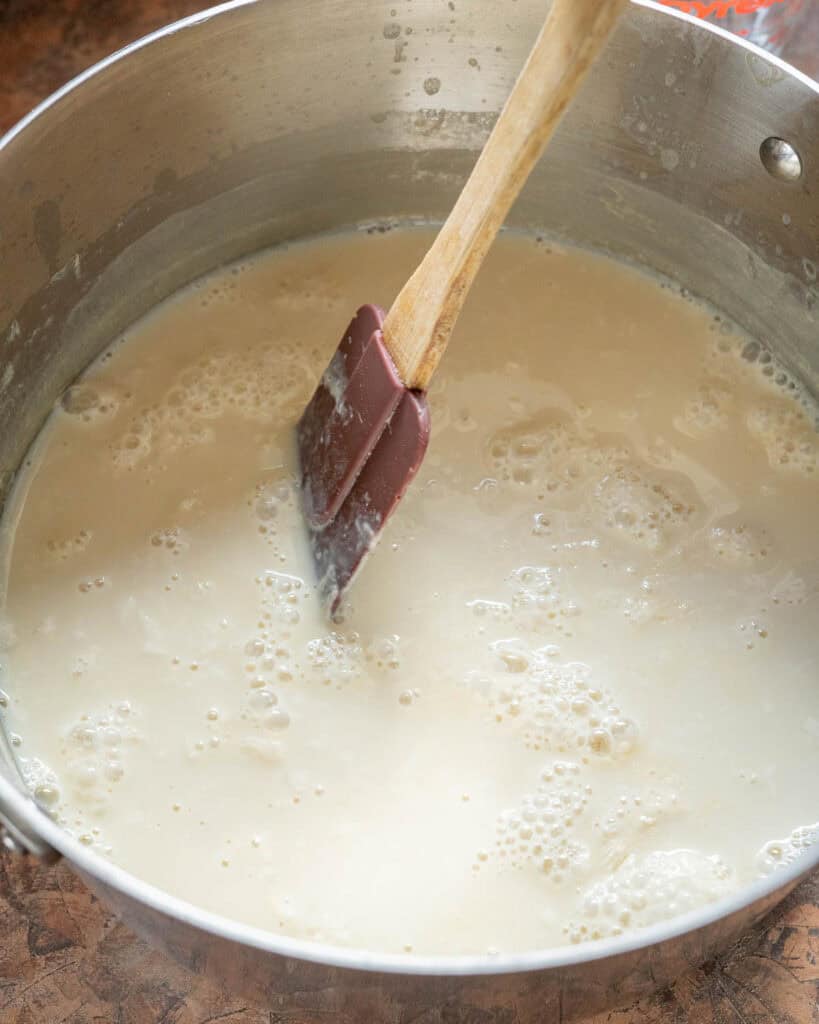
Step 5 — Skim the foam off the top of the soy milk with a slotted spoon or sieve. Keep a careful watch over the soy milk as you heat it over medium-high. Stir along the bottom of the pot with a wooden spoon or rubber spatula to keep it from sticking.
**Very important!** The fresh soy milk produces a lot of foam which will start to very rapidly expand as the soy milk approaches boiling. *Do not* leave it unattended or it will boil over (it’s happened to me on more than one occasion when I got sidetracked looking at my phone or doing another task in the kitchen).
AS SOON as the mixture starts to foam and expand, remove it from the heat. Allow the foam to shrink.

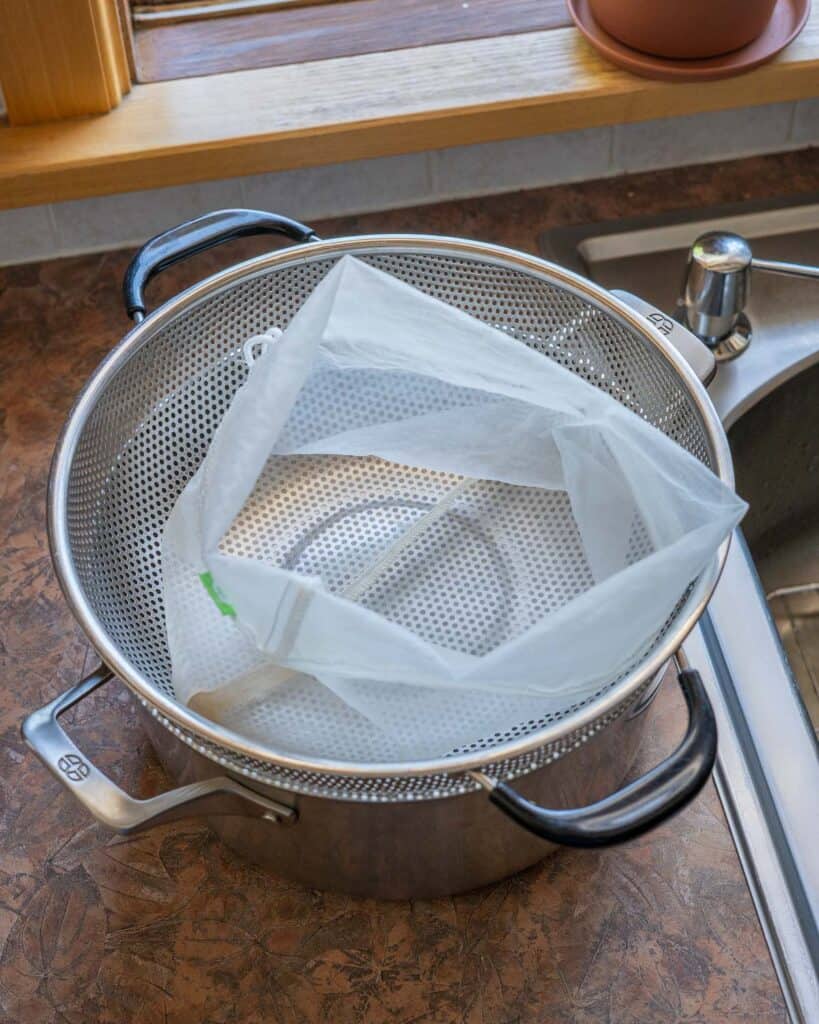
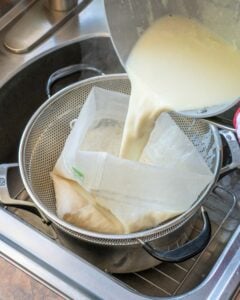
Step 6 — You will need to prepare a second stockpot, or something to strain the cooked soy milk into. Place a colander or sieve over the stockpot and line with cheesecloth or a nut milk bag.

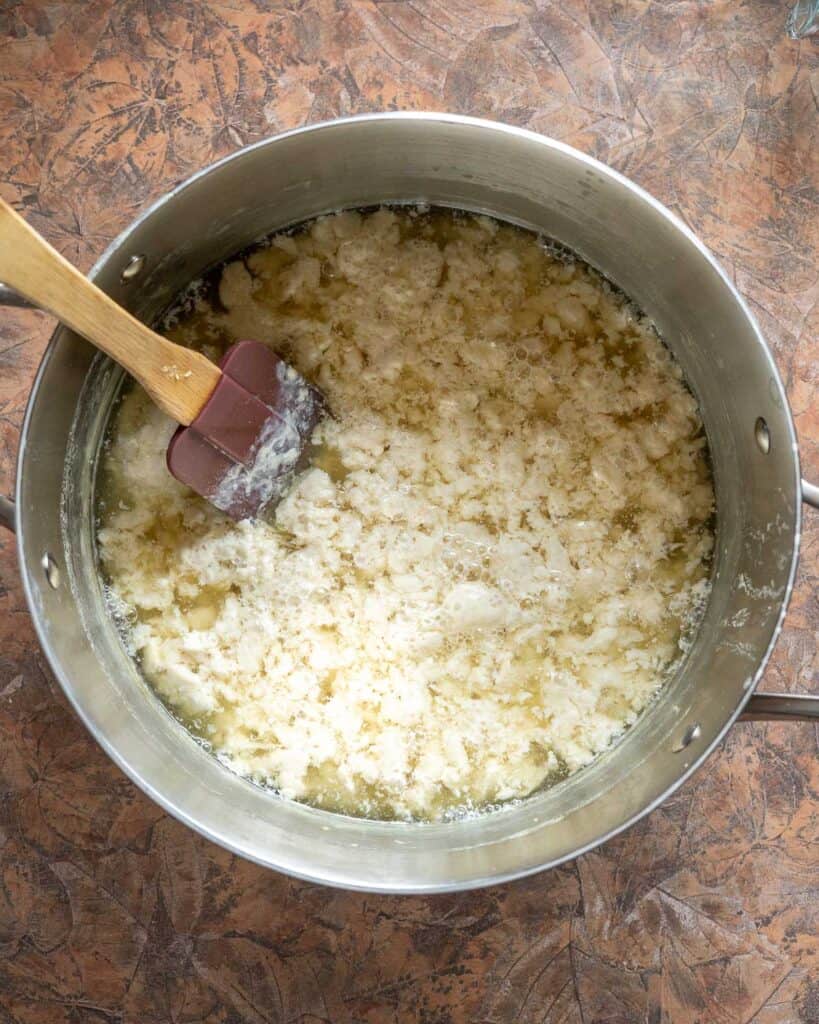
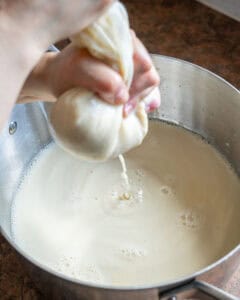
Step 7 — Pour the soy milk into the lined sieve. Allow it to cool for several minutes. As soon as the mixture is cool enough for you to handle, wring out the soybean pulp as much as possible. The remaining pulp, known as okara, can be saved and used in recipes.


How to Turn Homemade Soy Milk into Tofu
Step 1 — When the soy milk cools just slightly to roughly 180°F, add the 1/3 of the nigari mixture in and gently stir.
Step 2 — Add another 1/3 of the nigari, stir gently, and cover. Allow the mixture to sit for about 2 minutes to allow the coagulant to work.
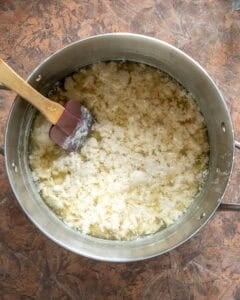
Step 3 — Add the remaining nigari and stir stir back and forth in a “Z” formation — we are trying to gently coax the soy milk curds together. Avoid over-mixing and breaking up the curds too much.
Step 4 — With the curds separated, we want to ladle off as much of the extra liquid as we can. This will make it easier to pour the mixture into the mold without overflowing. Using a fine mesh sieve to separate the extra liquid makes it easier to ladle off the top.

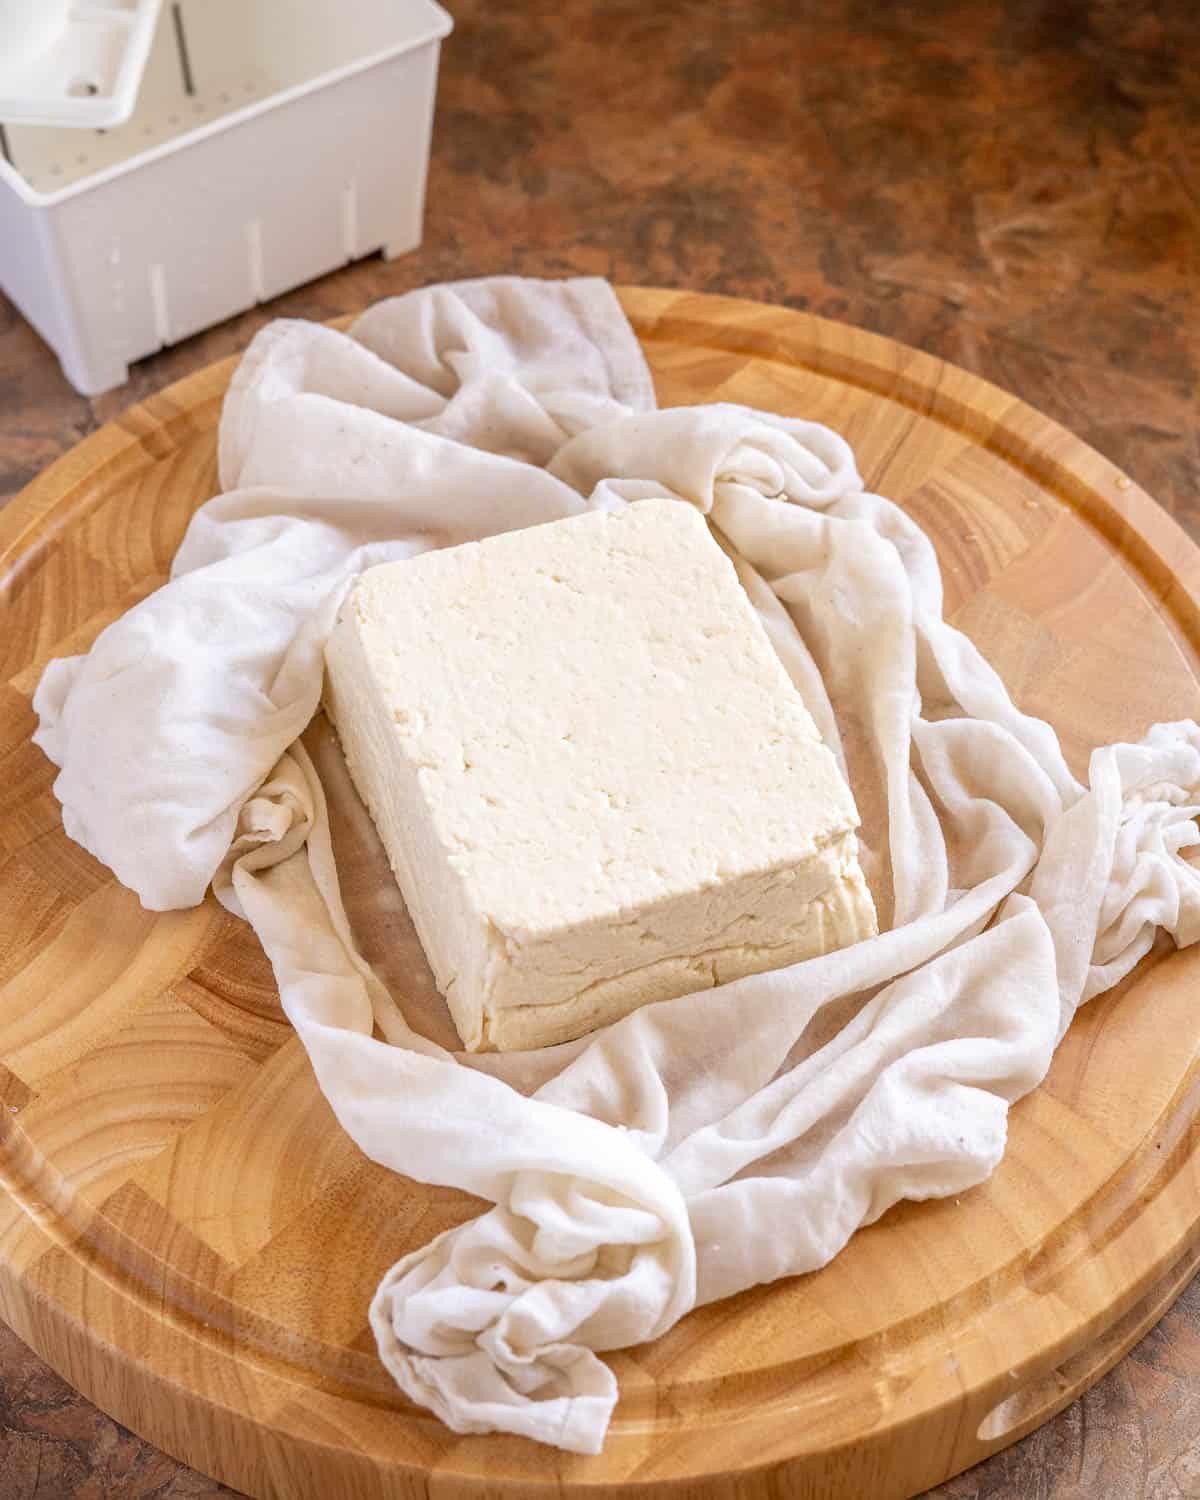
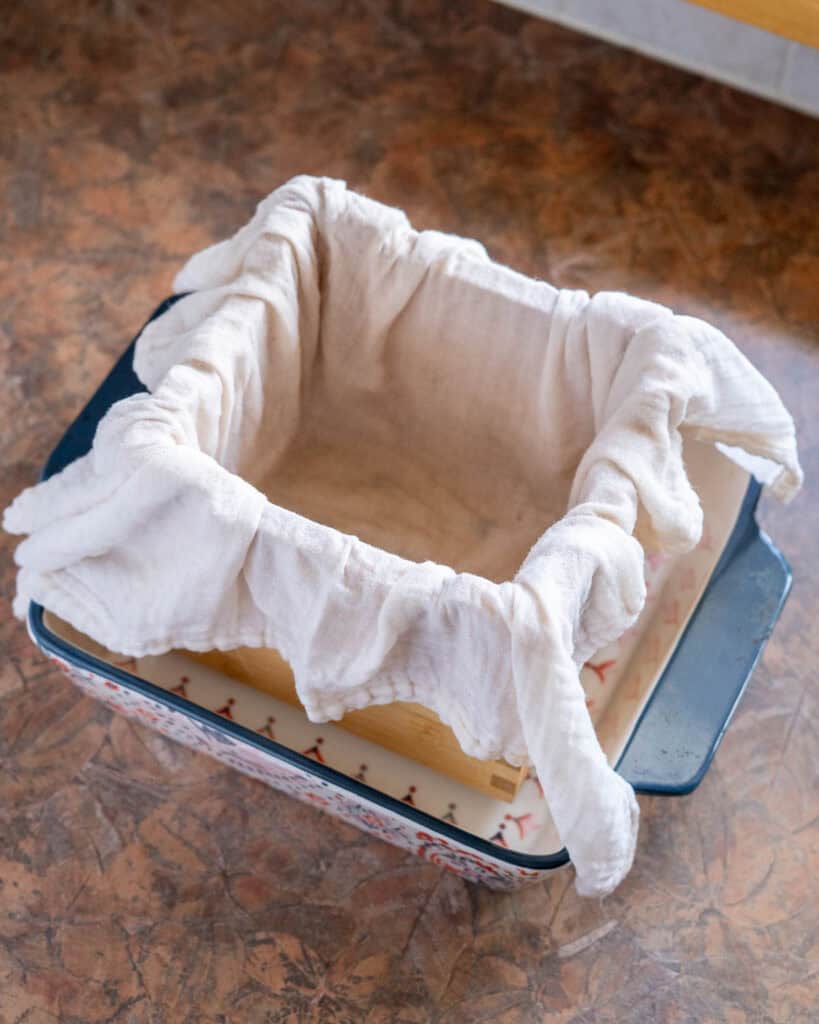
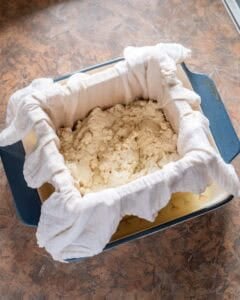
Step 5 — Prepare your tofu mold. I like to line mine with a reusable cheesecloth. I wet the cheesecloth and wring out the extra water before placing it in the mold.
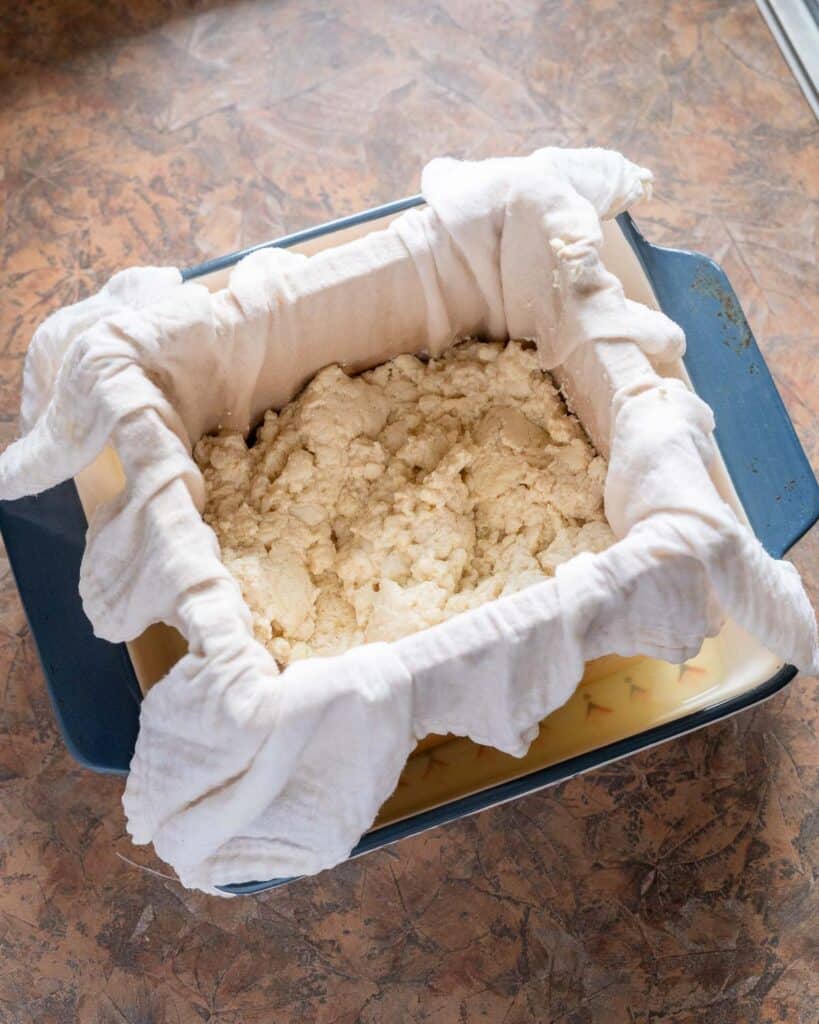
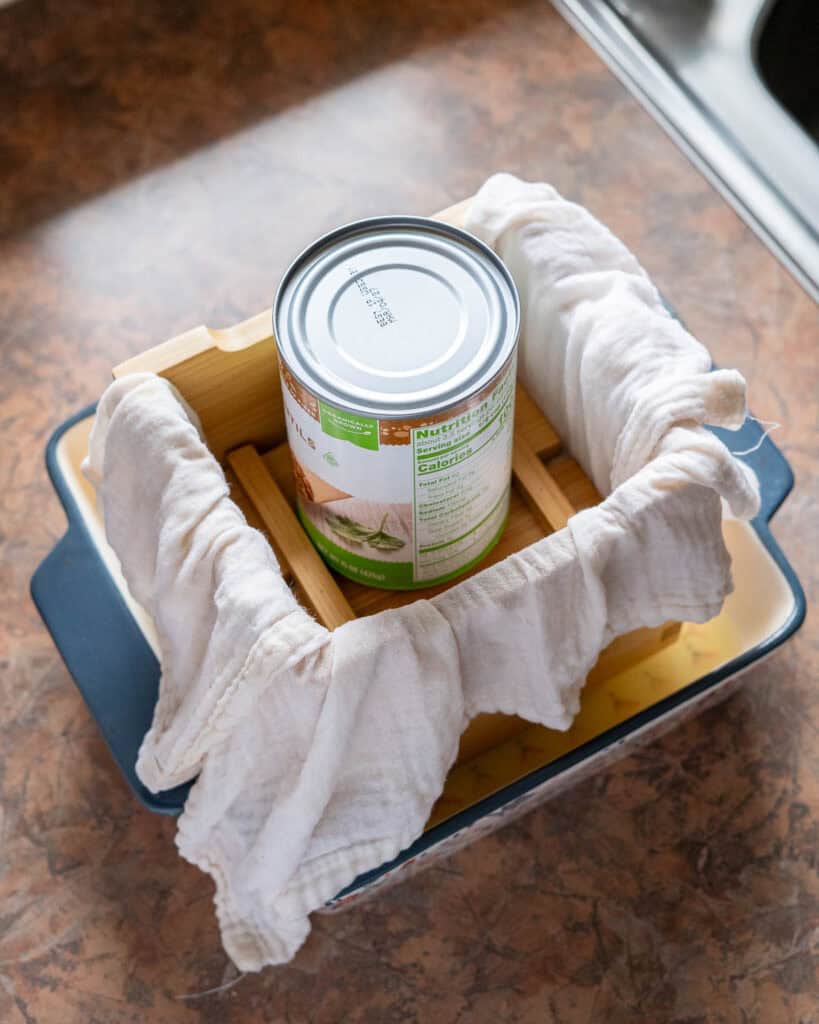
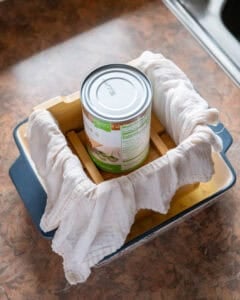
Step 6 — Pour the curds into the prepared tofu mold. Weigh it down with something heavy, like a can.
Recipe FAQ – How to Make Tofu
Can I use store-bought soy milk to make homemade tofu?
It is technically possible, but the results vary a lot brand-to-brand since store-bought soy milk tends to contain a lot of different additives like thickeners and gums which interfere with coagulation. If you want to try to make homemade tofu with store-bought milk, I recommend seeking out a brand that has the fewest ingredients possible — ideally just water and soybeans. WESTLIFE Organic Unsweetened Plain Soymilk comes to mind (though I have not personally tried it myself).
What is Nigari?
Also known as “bittern,” nigari (にがり) is a byproduct of the salt-making process which contains magnesium chloride and other minerals. The name comes from the Japanse word “nigai,” meaning “bitter.” It has a bitter taste which brings out the natural umami in soybeans.
Nigari is one of a few options to use as a coagulant when making tofu. Added into soy milk, it reacts with the proteins and causes the milk to curdle over a certain temperature. The soybean curds can then be separated from the liquid and pressed into tofu. This is very similar to the process by which cheese is made from dairy milk!
I use crystallized nigari; simply dissolve it in plain water before adding it to my soy milk. You can also find it in liquid form. You can occasionally find it in Asian markets, but I have had the best luck buying it online.
There are a few other options when it comes to coagulants (detailed in a later section), but nigari is my personal preference both flavor- and texture-wise.
Can I strain the soy milk prior to boiling, instead?
I have tried making homemade soy milk with several different recipes, all using slightly different methods. In my experience, I have the best results when following the procedure as-written, where the soybean pulp is strained out of the milk after first cooking.
One would think it would be easiest to strain the pulp out right after blending, before cooking at all. However, when I have tried to do this, I’ve found it very difficult to actually get the liquid to pass through the nut milk bag or cheesecloth. I’m not sure about the actual science behind this, but it required a good 10 minutes and a lot of elbow grease to actually “milk” the soybean pulp this way.
For whatever reason, after the first round of cooking the soy milk, the texture changes and it passes very easily through the mesh. All you have to do is wring the pulp for an extra minute or so to get every last bit.
Another plus of doing things in this order is that the resulting soybean pulp (okara) is cooked rather than raw, so it can more easily be added to recipes like stir fries or veggie patties.
Can I use something other than nigari as a coagulant?
Yes, there are a few different options for coagulants. The one you choose will affect the flavor and texture of your finished product. Nigari is my personal preference when making medium-firm to firm styles of tofu.
Gypsum (calcium sulfate) is another option which tends to be a bit less expensive than nigari. It has a slightly sweeter flavor but it will result in a tofu that is not as firm. I like to use gypsum when making homemade soft or silken tofu.
In a pinch, you can also use 2 tablespoons lemon juice mixed with 1/3 cup water.
What to Make With Your Homemade Tofu
Now that you’ve made your fresh, from-scratch tofu, you’re going to need some recipes to use it in! Luckily, we’ve got you covered.
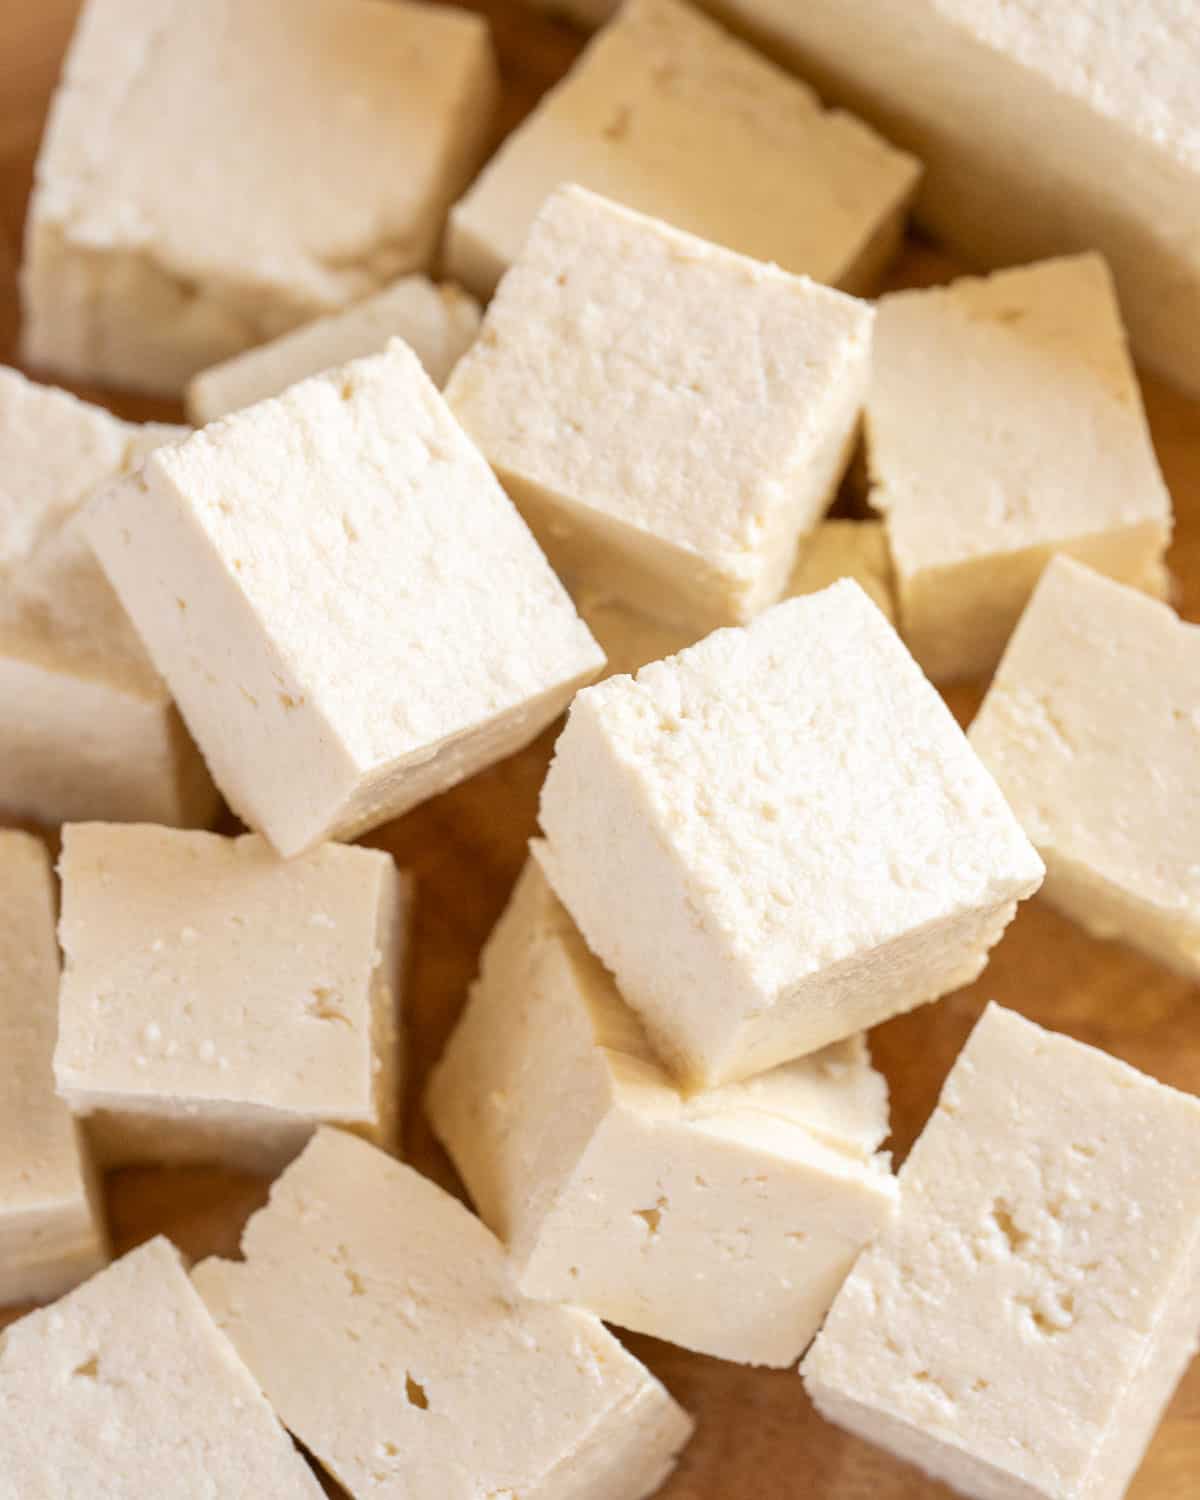
If you’d like to use your homemade tofu just like the extra-firm tofu you get at the store, you can pop it in a tofu press like you normally would. (You can also use the old school kitchen towel or paper towels and some heavy objects method.) Then you’ll be ready to make any of these incredible tofu recipes!
- Spicy Gochujang Tofu (Korean Inspired) – One of our favorite sauces to toss tofu in!
- Crispy Tofu Katsu – Fried or baked, this recipe is super nostalgic for me.
- Vegan Egg Salad (Tofu Egg Salad) – A classic tofu recipe that never gets old.
- Tofu Lettuce Wraps (Better Than PF Chang’s) – Restaurant-style tofu wraps that are easy enough to make any night of the week.

Homemade Tofu (How to Make Tofu)
Video
Equipment
- large bowl for soaking
- 2 large stock pots or Dutch ovens
- high powered blender
- fine mesh sieve or colander
- nut milk bag or cheesecloth
- wooden spoon
Ingredients
Homemade Soy Milk
- 1 cup dried soybeans
- 8 cups water divided
Homemade Tofu
- 1/2 cup water
- 1 1/2 teaspoons nigari
Instructions
Soak & Blend Soybeans
- Add dried soybeans to a fine mesh sieve and thoroughly rinse.
- Transfer soybeans to a large bowl and add enough cool water to cover by at least 2-3 inches. Cover and allow to soak at room temperature for 8+ hours, or overnight. The beans should be soft enough to split in half when gently squeezed.

- Drain the beans, give them a good rinse, and add them to a high-powered blender. Add in 3 cups of fresh water and blend until completely smooth.
- In the meantime, bring 4 additional cups of water to a gentle boil in a very large, heavy-bottomed stockpot or Dutch oven.
Cook the Soy Milk
- Pour the blended soybeans into the water that's already begun boiling. Add another 1 cup fresh water into the blender and blend to pick up any soybean remnants. Then pour this into the pot. (You should now have used all 8 cups of water total.)
- Use a slotted spoon or sieve to skim the foam off the top of the mixture. Heat the raw soy milk over medium-high heat. Keep a very careful watch and stir regularly with a wooden spoon or rubber spatula. Stir and scrape along the bottom of the pot as soy milk has a tendency to form a film there which can scorch.
- **IMPORTANT** As it approaches boiling, soy milk will start to foam and expand very rapidly. To avoid it bubbling over, make sure you are using a pot with plenty of extra room, and be ready to turn off the heat and/or remove the pot from the burner IMMEDIATELY once it starts to expand. It's at this point that we're ready to move to the next step.
- Take a second stockpot and use either a colander or fine mesh sieve lined with cheesecloth, muslin, or a nut milk bag to strain the soy milk into it. Allow the mixture to cool for several minutes.
- When the mixture is cool enough for you to handle, wring out the soybean pulp to extract as much soy milk as possible. The pulp (also known as okara) can be saved and utilized in a variety of dishes.
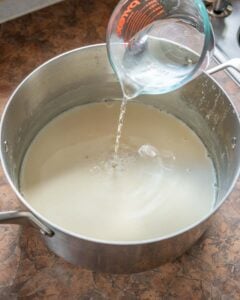
- Bring the soy milk back up to a boil, then reduce the heat and simmer for about 10-15 minutes. (Longer removes more of the beany flavor.) The soy milk is now cooked.

Make the Tofu
- Turn the heat off and allow the soy milk to cool for about 5 minutes. (If you have a thermometer, we want it to cool to around 180°F.)
- During this time, prepare your nigari solution. Whisk 1 1/2 teaspoons powdered nigari into water until dissolved.
- Now is also the time to prepare your tofu mold. See the blog post for more details if needed. I like to line a wooden mold with reusable cheesecloth, which I have wet and thoroughly wrung out first.
- Pour 1/3 of the nigari solution into the soy milk and gently stir 3-4 times. The mixture should begin to curdle slightly.
- Pour another 1/3 of the nigari on top, gently stir again, and then cover the mixture and set a timer for 2 minutes to let it coagulate.
- Pour the remaining nigari solution on top of the soy milk and gently stir again. You should clearly see the tofu curds separating from the liquid. Avoid over-stirring and breaking up the curds. If it isn't curdling, reheat the mixture over low and after a few minutes you should see the separation occurring.

Shape the Tofu
- Once the curds have formed, we will transfer them to our prepared mold for shaping. It's very helpful to remove some of the excess liquid first. I like to use a fine mesh sieve for this. Use it to press down the soy curds and isolate some of the liquid, which can then be ladled out and discarded. (You can see the images in the blog post or watch the video to see what I mean.)
- After you've removed a few cups of the extra liquid, you can now ladle or pour the soybean curds into your prepared tofu mold. Level out the top gently with a spatula or a spoon, then fold the overhanging cheesecloth neatly over the top and place the top on the mold.
- Next you will weigh the tofu down with a heavy object. I like to use a can of beans or tomatoes for about 30 minutes to yield a medium-firm block of tofu. You can add more weight and time for a firmer tofu, or less for a softer tofu.
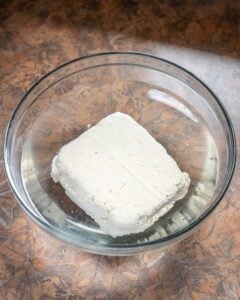
- Once the tofu is done pressing, unwrap it from the cheesecloth and transfer it to a bowl of cold water. This will help it to firm up and will also remove any residual bitterness or sourness from the coagulant.

If using liquid Nigari, would you use the same amount…1 1/2 tsp? Thank you! Can’t wait to try this!
How many grams of tofu does this recipe yield?
Would love to know this – followed the recipe exactly and got a block of tofu that is half as tall as a commercial block of tofu. One thing was that my curds did not look as big as in the photo.
Same thing happened to me the first time since my tofu mold is pretty big. I just doubled the recipe to yield a higher amount and it worked well. Now my result gives a slightly taller but wide tofu, so when I cut it in half, it looks like 2 commercial tofu blocks. I have not weighted it to check out how many grams it is.
Can’t wait to give this a try, I need to buy a mold and cheesecloth then I’m ready to start making tofu!
Third time ive made tofu with different recipes and I like this one the most. Really good instructions. I could not find nigari where I am so I substituted with Epsom salts.
I found Nigari on Amazon
eager, but unprepared, I tried to make tofu with cheese clothe, my food processor, straight citric acid and a take-out box with some holes in it. Needless to say, fully equipped with a nut bag, ninja blender, nigari, tofu mold, and these instructions, my product is much better.
Pingback: Tofu-The Bean That Binds | Karen's Blog
Where can I find a good quality Tofu mold ? Do they come in different sizes ?
If doubling the recipe, it calls for 2 cups of soy beans and 16 cups water, but only 8 cups of water are accounted for in the steps. I increased the amount but would like clearer directions regarding this..
after soaking overnight my soy beans are still hard? I rinsed and will soak overnight again… any other thoughts?
Mine were still hard too (i.e. didn’t break when pinched), but they still blended fine and it all worked out. 🙂
Hey my soy milk isn’t curdling into big chunks more smaller bits. I could only get liquid nigari does that matter?
I used liquid nigari and it turned out just as well. Used the same amount. Just make sure it’s at the right temperature (180F), or just reheat the pot a bit after pouring it in. That does the trick!
I tried the recipe that came with my kit; and it didn’t work; I tried yours using lemon juice and again nothing happened; I don’t know if it is the soybeans I bought from a sprouting company or the lemon juice I used. I wasted a bag of soybeans; I want to make my tofu but want to use West Soy milk instead of making it. I will buy the Nigari if needed to make my tofu extra firm. Will this help me. I have soy pulp everywhere and now a big pan that won’t curdle big chunks. Help please.
Late response I know but for others maybe…you can add another tsp of lemon juice & simmer 5 more minutes. Just a soft quick stir after adding the lemon juice. Sometimes that fixes it.
Tofu is disgusting and soy is very bad for men, and makes women very fat.
Mark, you are very uneducated. Asian culture are one of the healthiest on the planet and consume soy and tofu regularly.
Between steps 4 and 5, there should be something about simmering the milk for 10 or 15 minutes
Never mind. I missed it my first, second, & third reading!
Finally tofu that came out firm. I accidentally made the soymilk but used the nut bag before heating it up as the first time it was foamy but this time it wasn’t. Well I made sure the reheating to remove the bean taste was exactly 180 degrees. Did the Nigari and the timer of 2 minute part. I almost screamed out loud! the mixture was small but it was PERFECT. As soon as I pressed it for about 2 hours I gently put into a cold bath for about 15 minutes. OMG thank you. I am so thrilled. Just had to rebuy a smaller maker when I am only want it for a small recipe.
I’m glad I found this recipe. Thank you for posting it. I used to make tofu years ago but I forgot how I made it. Lately, I was using another recipe but it didn’t seem quite right. This post was an excellent refresher.
where to buy nigari
I bought the Vancouver Island liquid nigari through Amazon and it worked great. Same amount.
Mam can you please tell me which mixer grinder you used for grinding soaked soybean into paste, i am replacing my current grinder mixer and i need to buy one so i just wanna know how much watt is your mixer grinder, so i can get the best tofu, thankyou.
Hey how long does it last in the fridge? How much can i make? And were can i find such kit to place it in to shape?
It’s very delicious food and simple cook
Worked perfectly the first time. Clear instructions and easy to follow. The images were helpful too. Thanks very much for posting 🙏
Making this recipe at high altitude (6800 feet in my case) means the soy milk won’t foam up (step 3 of cooking the soy milk) without a little help. I found by putting a lid on my stockpot helped the soy milk to foam.
No matter what I do, my tofu is not coagulting.
I’ve reheated, added more nigari, let set for a long time & nothing. I made it before, but have a Soyabella. It came out perfect. But this manual method is not working. What could possibly be wrong.
First, I didn’t boil it for 10 minutes. It looked like whey after straining. So back in the pot and boiled for 10 minutes. I never got any foam. This time it was a little thicker, but still not coagulating. I then tried with lemon juice. Still not coagulating. Is it now a lost cause? Or should I mix it all back together and try again.
Hiya Sarah
Just wondering if you have ever tried to make a fermented version of this – we buy something called “feto” in the UK which is made my a company called Taifun. It tastes sooooo good, especially when marinated. I have tried to ferment store bought tofu but without success! So I was wondering if you had any experience with this.
Many thanks!
I have leftover beans, what can I do with the beans?
Hi how long can you store the tofu in the fridge