This post may contain affiliate links. See our affiliate disclosure.
I first shared a tutorial for homemade vegan croissants in a YouTube video in early 2017. It’s one of my most popular recipes, and over the years so many people have followed it with great success!
However, I also field a fair number of messages asking for help troubleshooting the recipe. This is totally understandable, since croissants are time-consuming and sometimes a bit finicky to make.

I created this step-by-step guide to give you the best chance at success with this classic French pastry made vegan. I’ve spared no detail and I’ve included plenty of images so that you can follow along if this is your first foray into homemade vegan croissants.
These croissants may be vegan, but they are so fluffy, flaky, buttery and delicious! They taste amazing lightly toasted and spread with fruit preserves, but I have to admit my favorite way to eat them is to make breakfast sandwiches with Just Egg, vegan sausage and cheddar.
Please don’t be intimidated. The recipe is a bit time-consuming but when broken down into steps, it’s completely manageable. I promise the time and effort will be well worth it when your entire house smells like a bakery.
Table of Contents
Timeline for Making Vegan Croissants
It’s easy to feel overwhelmed when you see all the instructions in a recipe for croissants, but don’t worry. It’s actually quite straightforward, and most of the time is spent waiting for the dough to rise or chill.
This recipe is actually very flexible — you can split the process over 2 or 3 days. Here is a super simplified timeline for each option.
Vegan Croissants (2-Day Timeline)
Day 1:
- Mix croissant dough.
- Rise until doubled at room temperature. (About 1 hour.)
- Transfer to fridge to rest. (2 hours.)
- Prepare butter slab.
- Laminate the dough by encasing the butter slab and performing TWO sets of folds: one single and one double fold. The dough will rest for 1 hour in the fridge after each fold.
- Rest the laminated dough overnight.
Day 2:
- Roll out the dough, cut and shape into croissants.
- Allow the shaped croissants to rise one final time.
- Bake and enjoy.
Vegan Croissants (3-Day Timeline)
Day 1:
- Mix croissant dough.
- Rise until doubled at room temperature.
- Transfer to fridge overnight.
Day 2:
- Prepare butter slab.
- Laminate the dough by encasing the butter slab and performing TWO sets of folds: one single and one double fold. The dough will rest for 1 hour in the fridge after each fold.
- Rest the laminated dough overnight.
Day 3:
- Roll out the dough, cut and shape into croissants.
- Allow the shaped croissants to rise one final time.
- Bake and enjoy.

Ingredients for Vegan Croissants
Bread Flour vs. All-Purpose Flour
The recipe as I’ve written it calls for bread flour, which has a higher gluten content than all-purpose flour. This provides more strength, elasticity and structure to the dough, contributing to a better rise and better oven spring. Most regular grocery stores stock bread flour, so I’d recommend using it if at all possible.
If you have all-purpose flour and vital wheat gluten in your pantry, you can also make your own high-protein flour that works great in bread recipes. Add 1 1/2 teaspoons vital wheat gluten per every cup of flour. Whisk together and use like bread flour.
If you absolutely have to use all-purpose flour, you will probably need to add extra to achieve the right texture for the dough. You can reference the video or instructional photos below to see what that is. Add the extra flour one tablespoon at a time and incorporate fully before adding more.
Vegan Butter — Important Notes!
When I originally shared this recipe in 2017, pickings were slim in the realm of dairy-free butter. Luckily there are a few more options on the market now. I’ve found they all will lend slightly different results. My favorites are the Country Crock Plant Butter with Avocado Oil (which many popular grocery chains stock) and the Trader Joe’s Vegan Butter (get the one that comes in a block, not the one in the tub).
Personally I no longer recommend Earth Balance for these vegan croissants. In my opinion, Earth Balance does not taste like real butter! It has synthetic notes that really come through when there is this much butter in a recipe. (But everyone has different tastes — so if you know that you like the flavor, feel free to use it.)
You can also use the cultured vegan butter by Miyoko’s Creamery (which is a bit pricey more but tastes absolutely fantastic in this recipe).
In all cases, get the sticks of vegan butter or margarine whenever possible. The spreads that come in a tub usually contain extra water to make them more easily spreadable, which can throw off the consistency of the croissants!
Active Dry vs. Instant Yeast
The recipe as I’ve written it calls for active dry yeast, which is slightly less potent than instant yeast. Either variety can be used in this recipe as long as you adjust the measurement accordingly: every 1 teaspoon of instant yeast is roughly equivalent to 1 and 1/4 teaspoons active dry yeast.


How to Make Vegan Croissants (with Photos)
Mixing & Kneading the Dough
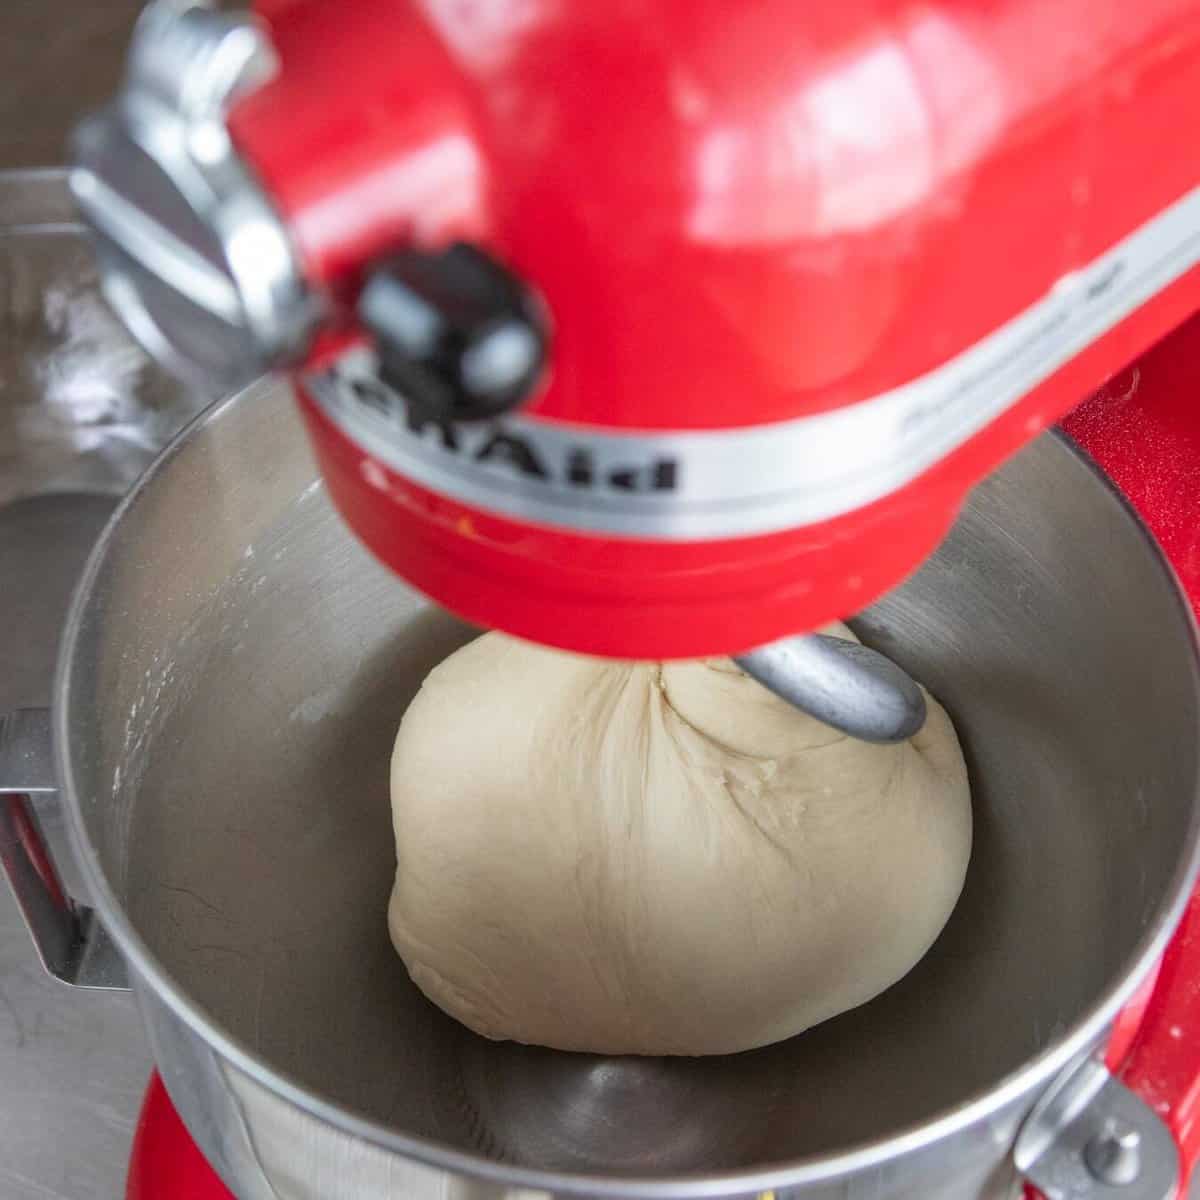
I make all my bread recipes, including croissants, using a stand mixer. They can be made by hand as well; you’ll just need to apply a little extra elbow grease during the kneading process.
After proofing the yeast and combining all the ingredients, I like to mix with the paddle attachment until everything comes together (this takes under a minute). At this point, I switch to the dough hook and allow it to knead the dough for between 6-8 minutes. The dough starts out shaggy and becomes a smooth, elastic ball.

Rising and Cold Fermentation
Vegan croissants are not difficult to make, but they do require some planning ahead, since the recipe involves a lot of wait time. This allows the dough to develop strength and more complex flavor.
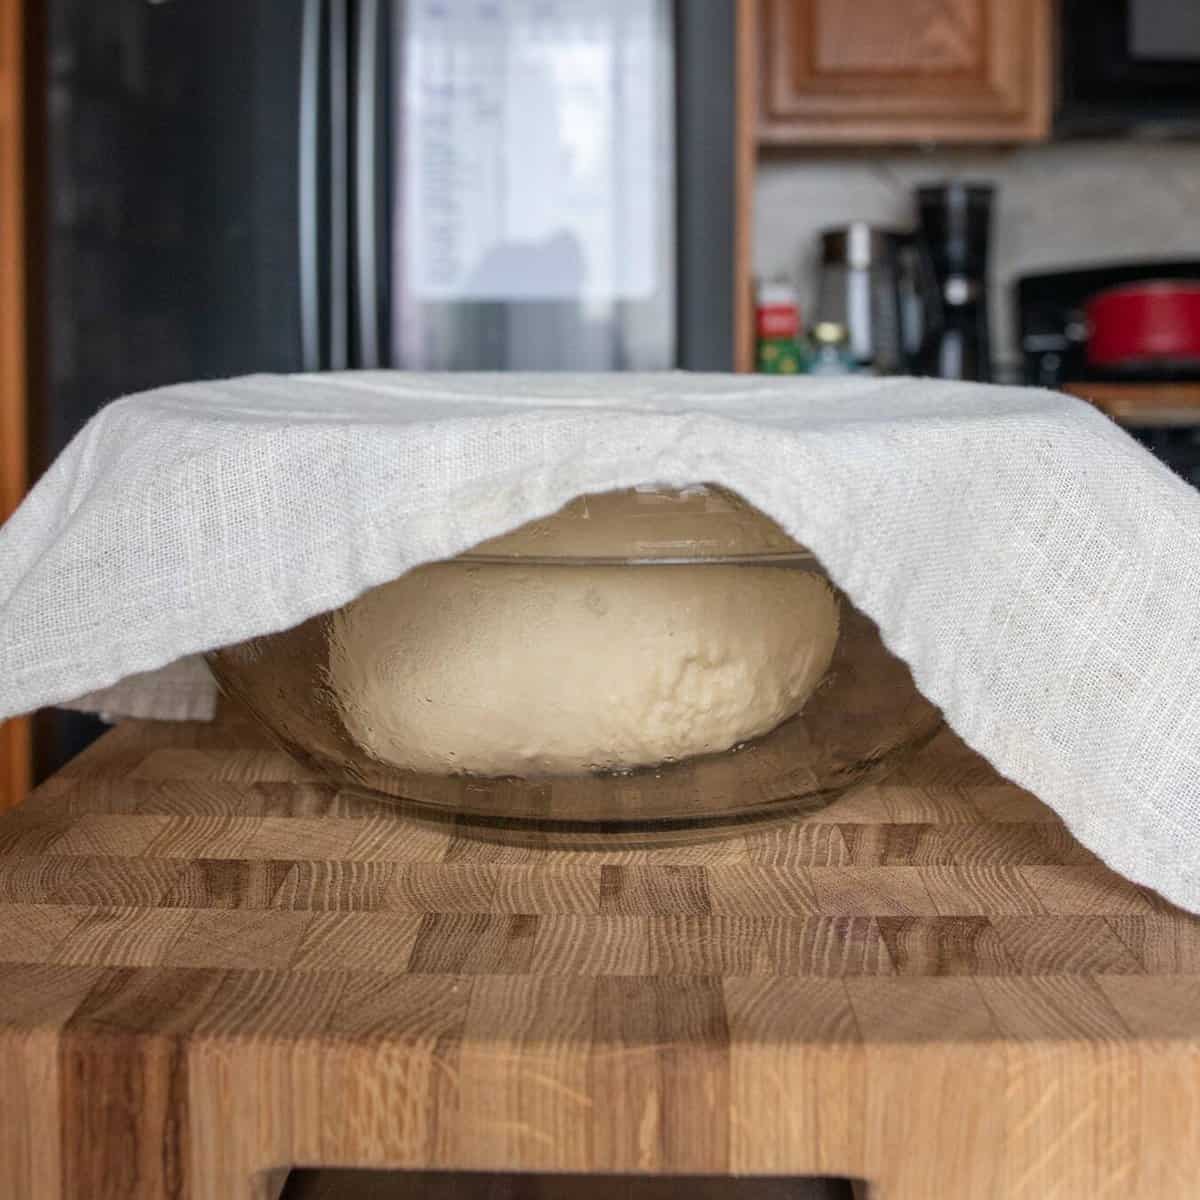
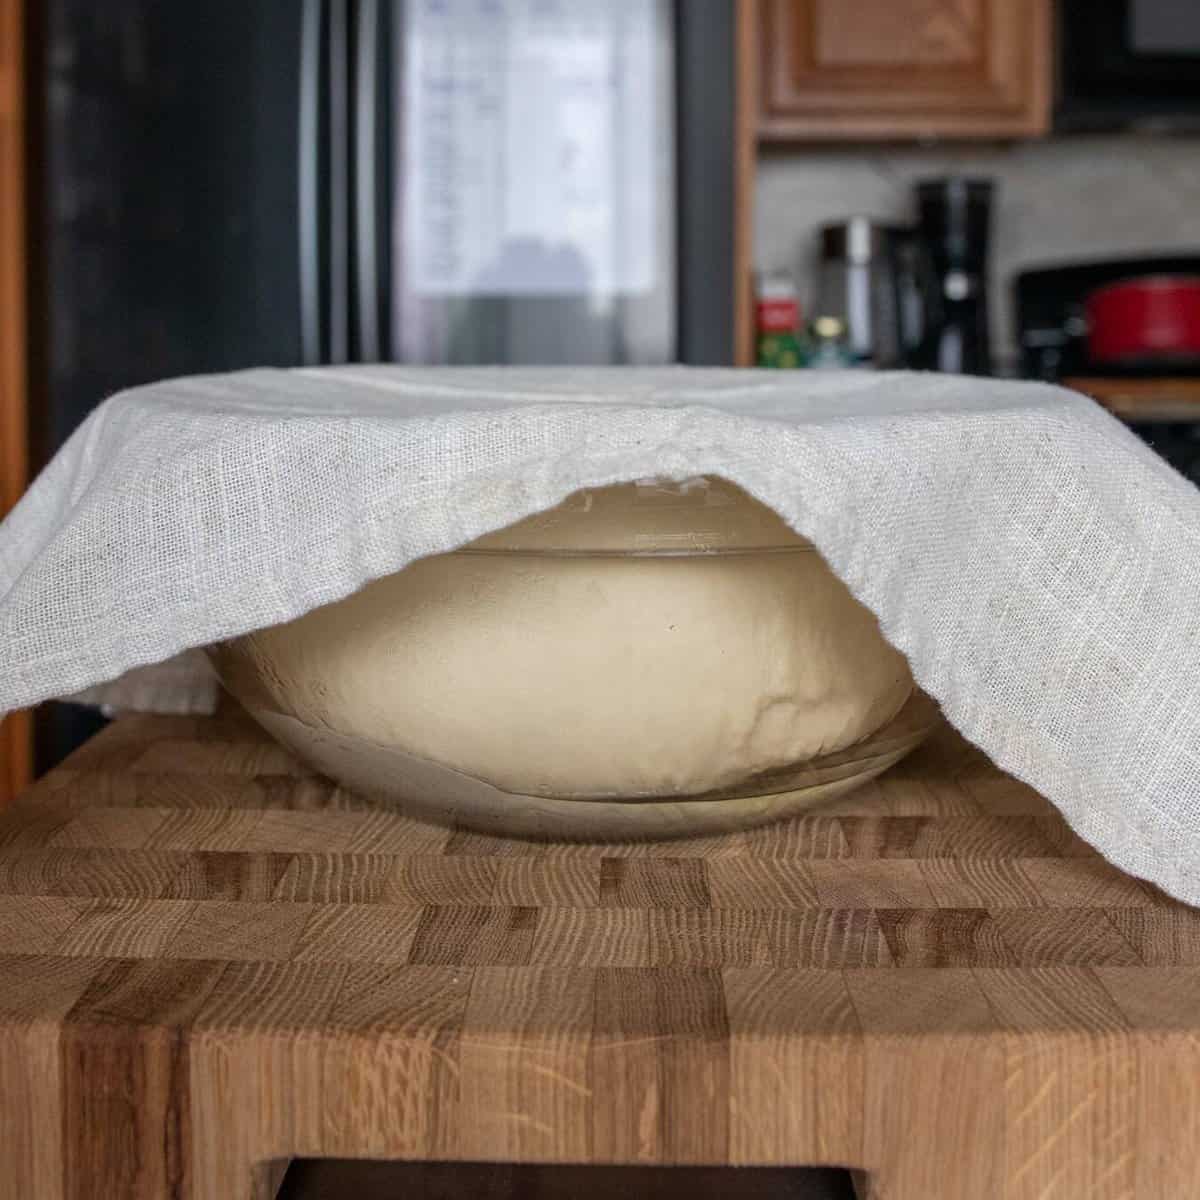
After mixing and kneading your dough, transfer it to an oiled bowl and let it rise on the counter until at least doubled in size. This will usually take about 1 hour, depending on the temperature in your kitchen. Tip: If you’re working in an especially chilly kitchen, you can create a warm proofing environment for your dough by preheating your oven on the lowest setting for one minute, then turning it off. Place your dough inside to rise.
Once the dough has risen, you’ll punch it down and fold it into a rectangle (to make it easier to roll out tomorrow). Transfer it to the refrigerator for at least 2 hours OR overnight. The cold fermentation delays the action of the yeast, resulting in a more complex flavor. It also allows more time for the development of the gluten structure and the full hydration of the flour.
Laminating the Dough for Flaky Layers
Lamination is the process of folding butter into dough several times to result in many thin alternating layers of dough and butter. This process is what gives the croissants their characteristic flaky, airy texture.
This is the point at which some people struggle, because the butter has to be at the right temperature and consistency. It has to be pliable enough that it can be rolled into thin layers and folded with the dough, but if it’s too soft it might melt into the other ingredients or ooze through dough and make a mess. (This has happened to me on a few occasions on particularly warm days.)
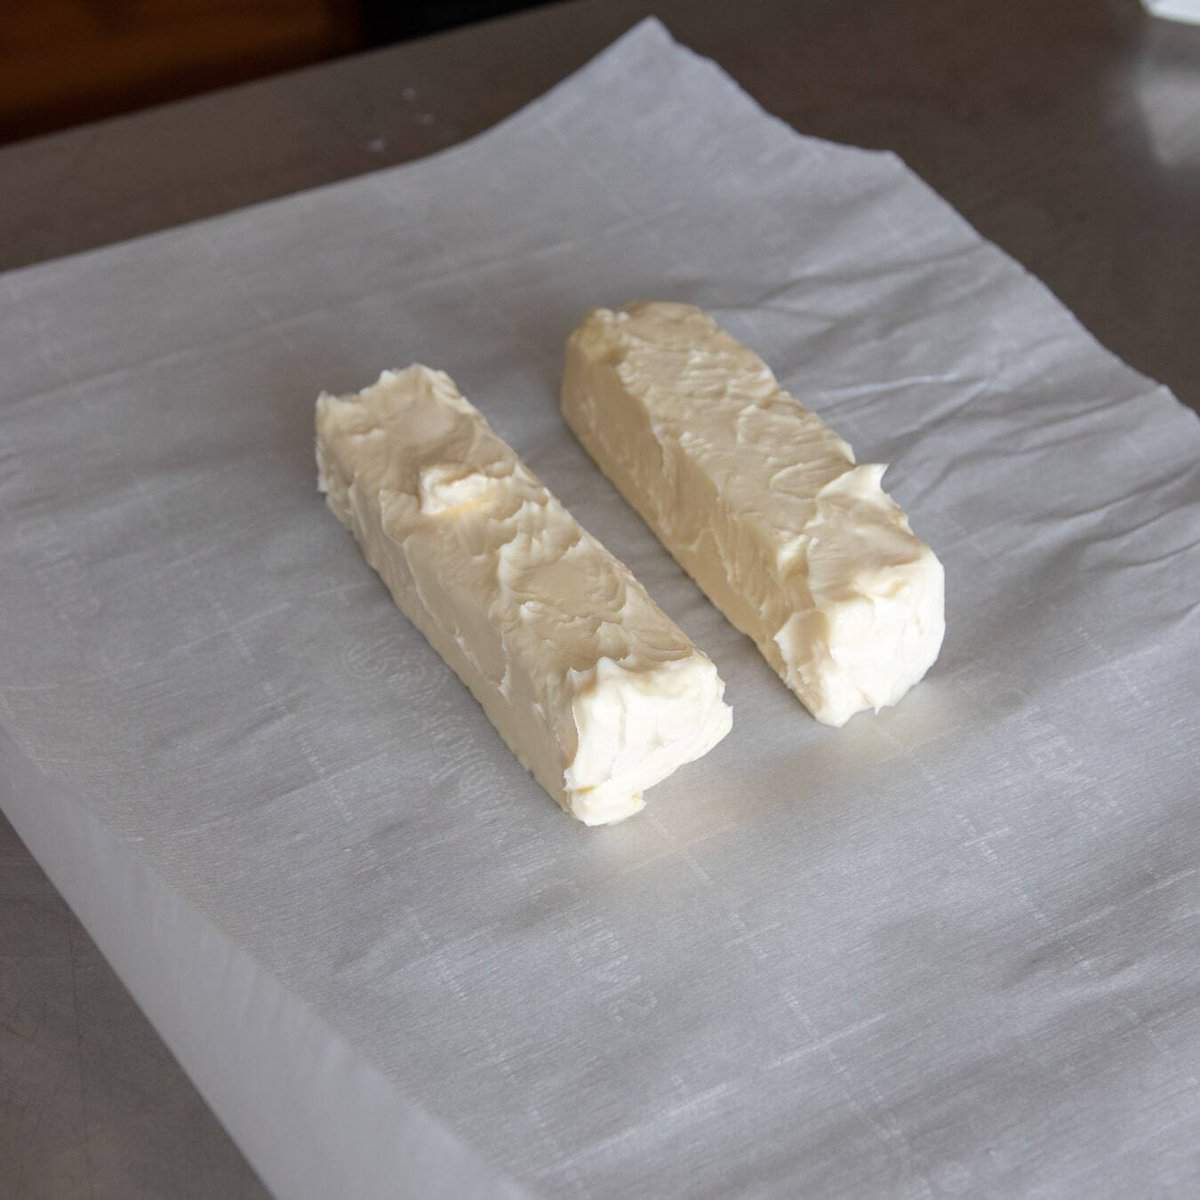
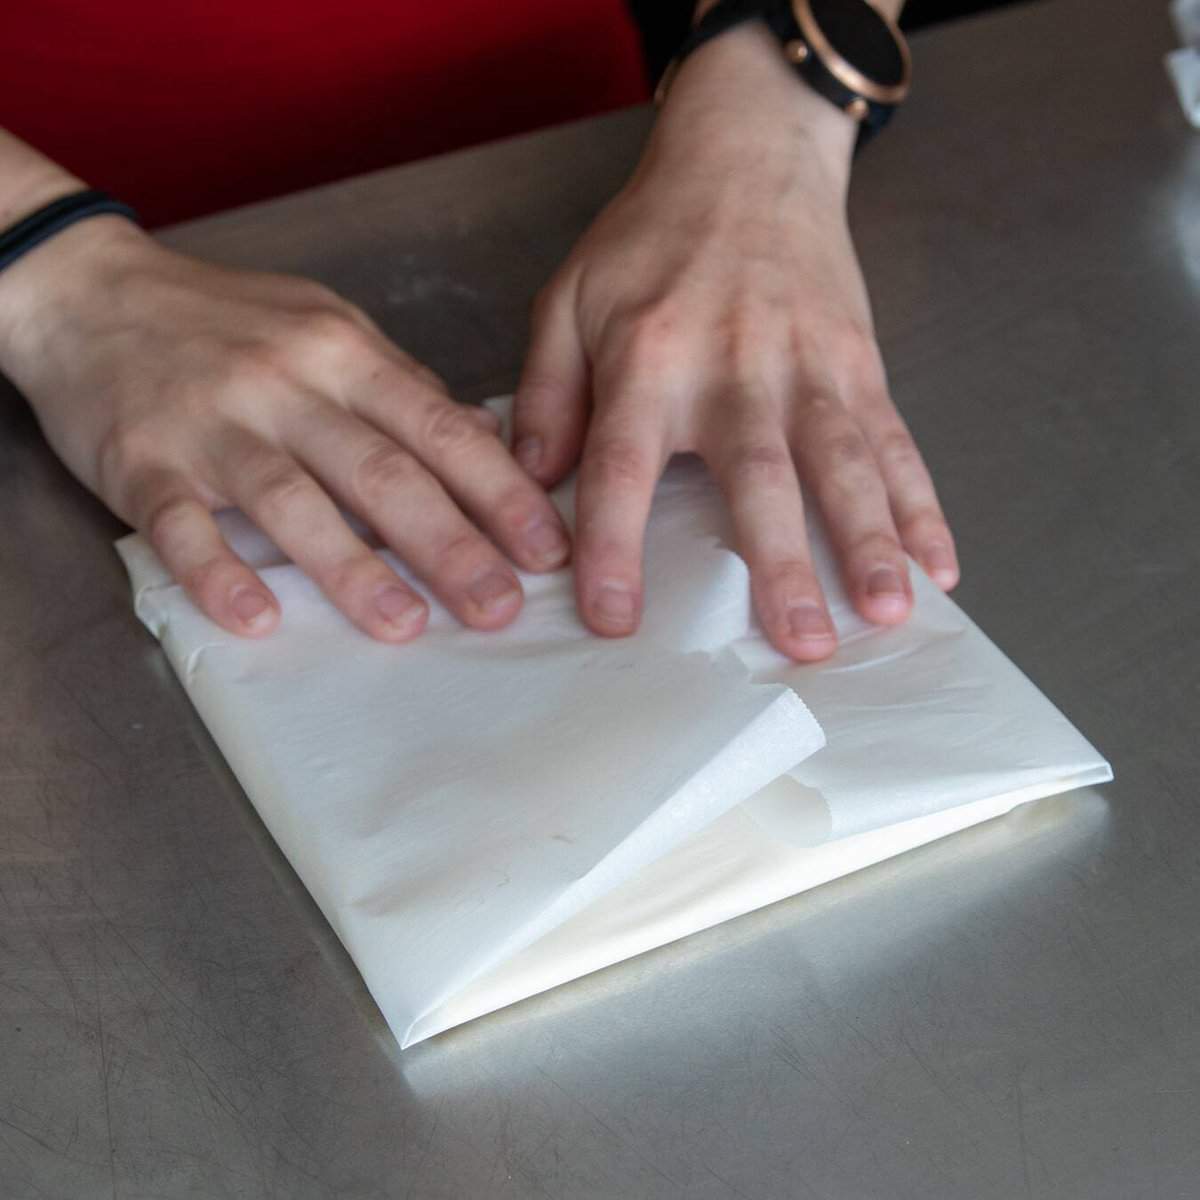
Take a large piece of parchment paper and fold it into a 6×6″ square. Place your butter inside the parchment square and fold the edges over to enclose it. Now you can use a rolling pin to pound and roll out the butter until it fills out the entire square. Keep rolling over it until you have a flat, even slab of vegan butter.
Place the butter slab in the fridge to chill.
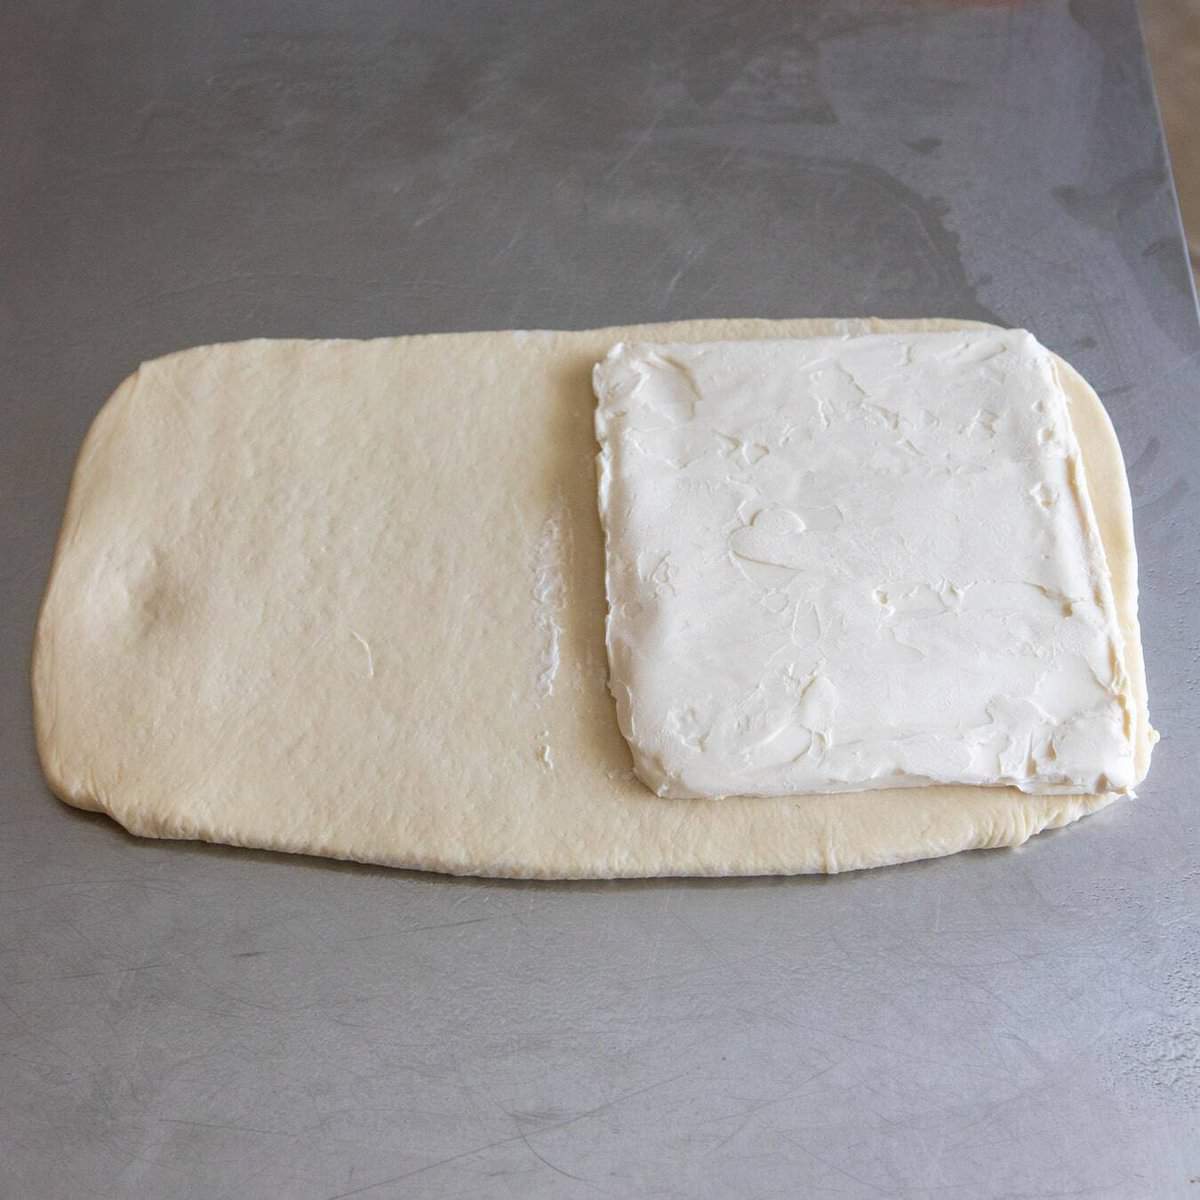
After the dough has chilled for 2 hours or overnight, you will encase your butter slab in the dough. Roll the dough out to just slightly larger than twice the length of the slab, fold it over, and pinch the edges to seal thoroughly.
Now you will perform two sets of “turns,” or “folds,” in order to create many layers of butter in the dough.
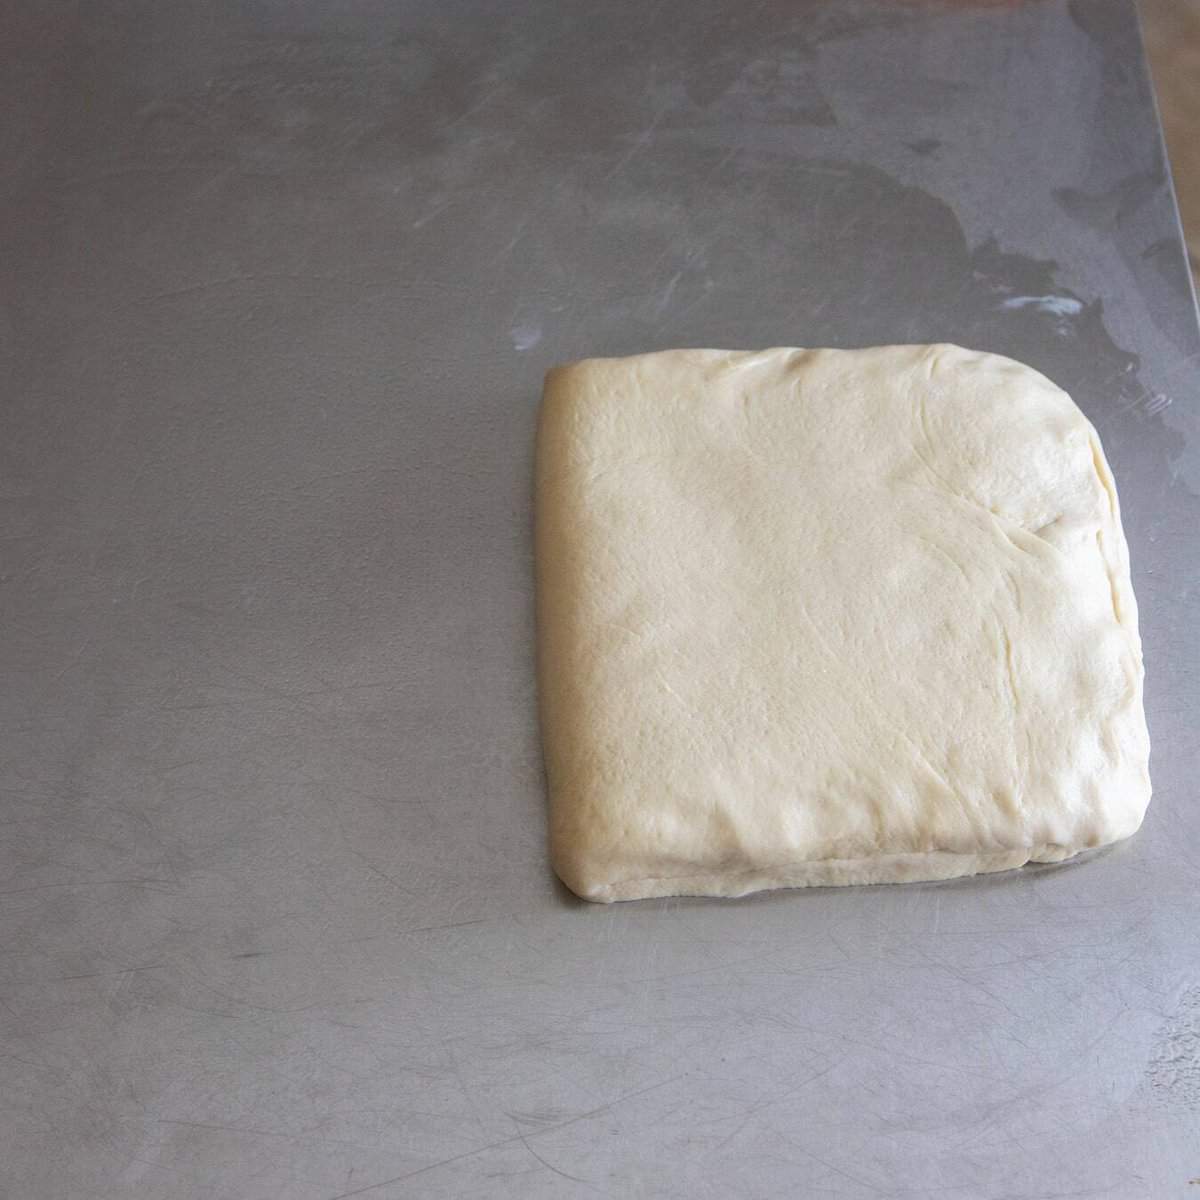
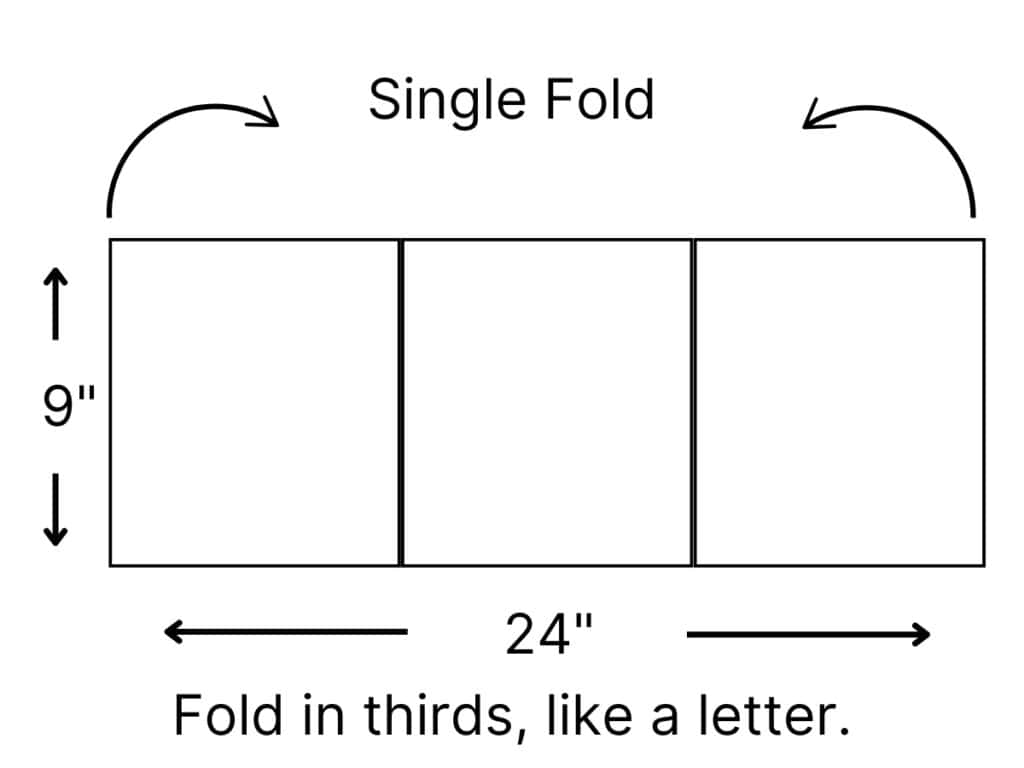
First you will perform a single turn: Roll the dough out into a long rectangle, then fold in 3rds (like a letter). Rest the dough for 1 hour in the fridge. This will give the dough a chance to “relax,” so it will not resist being rolled out again. It will also keep the butter from becoming too soft.
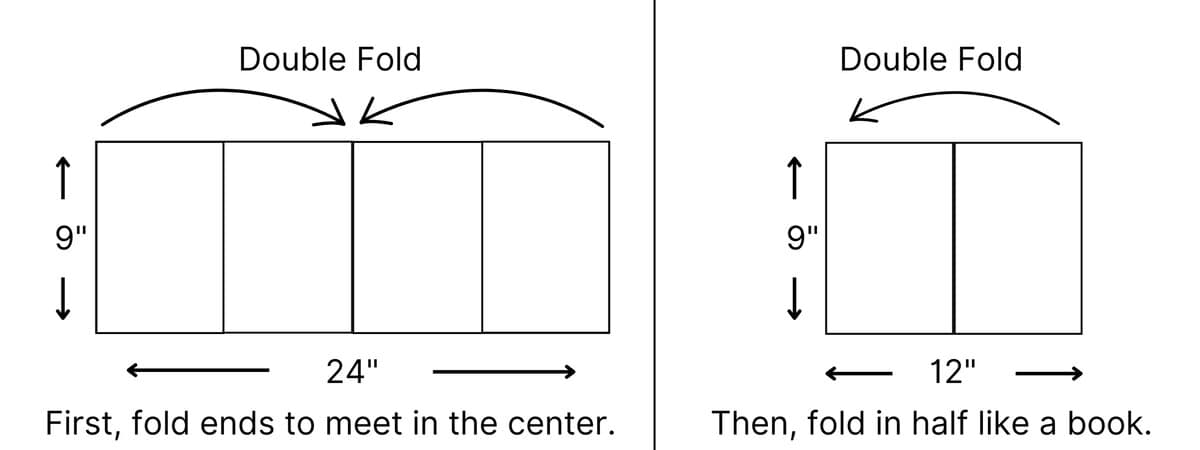
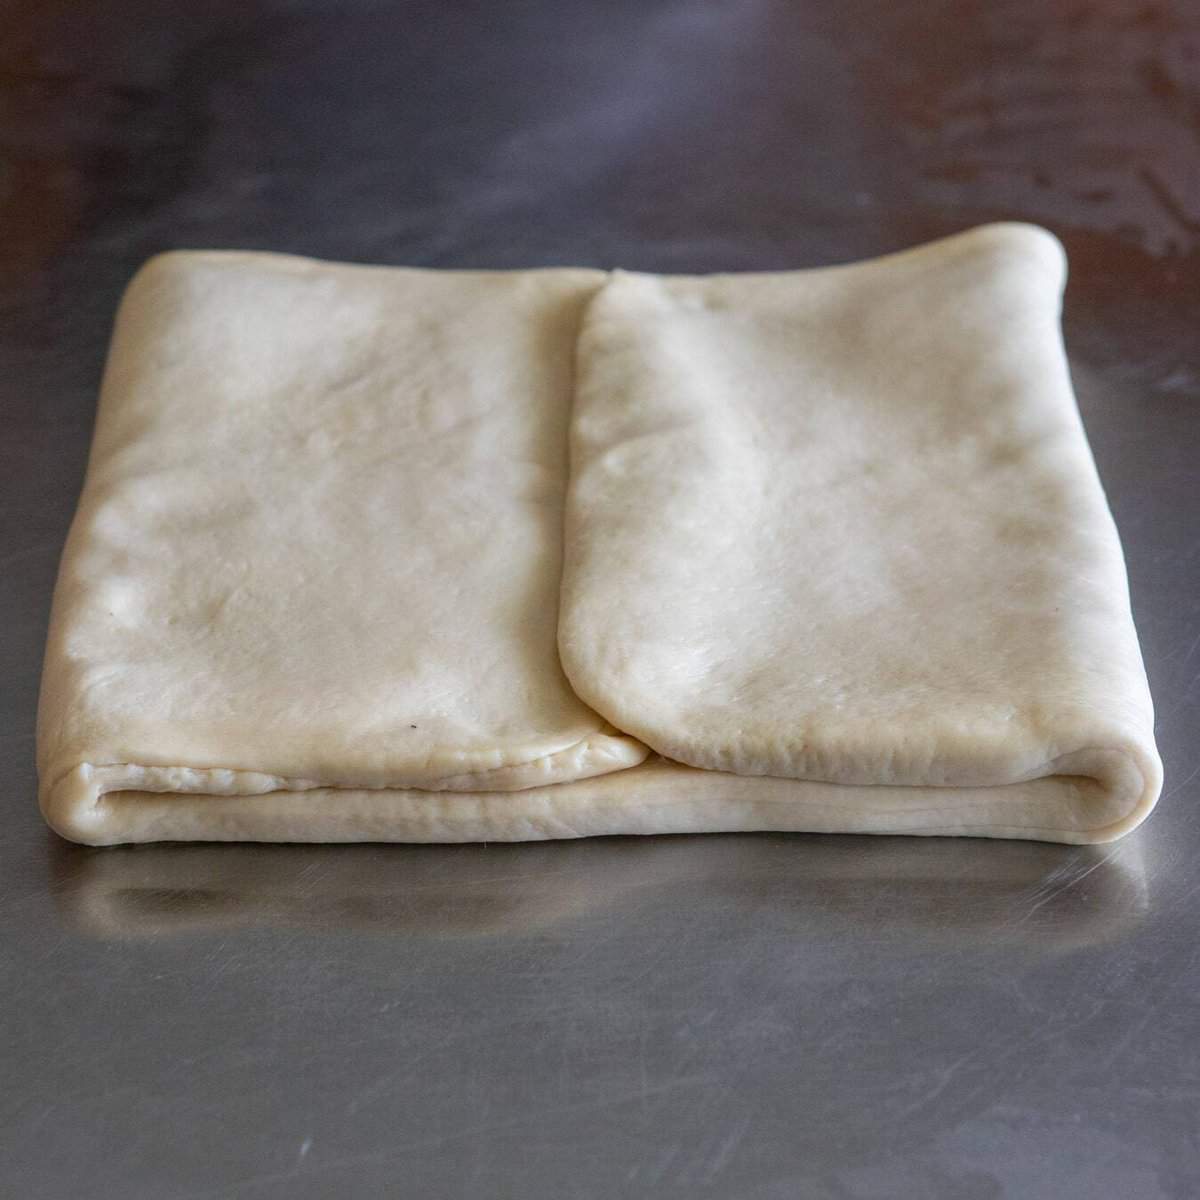
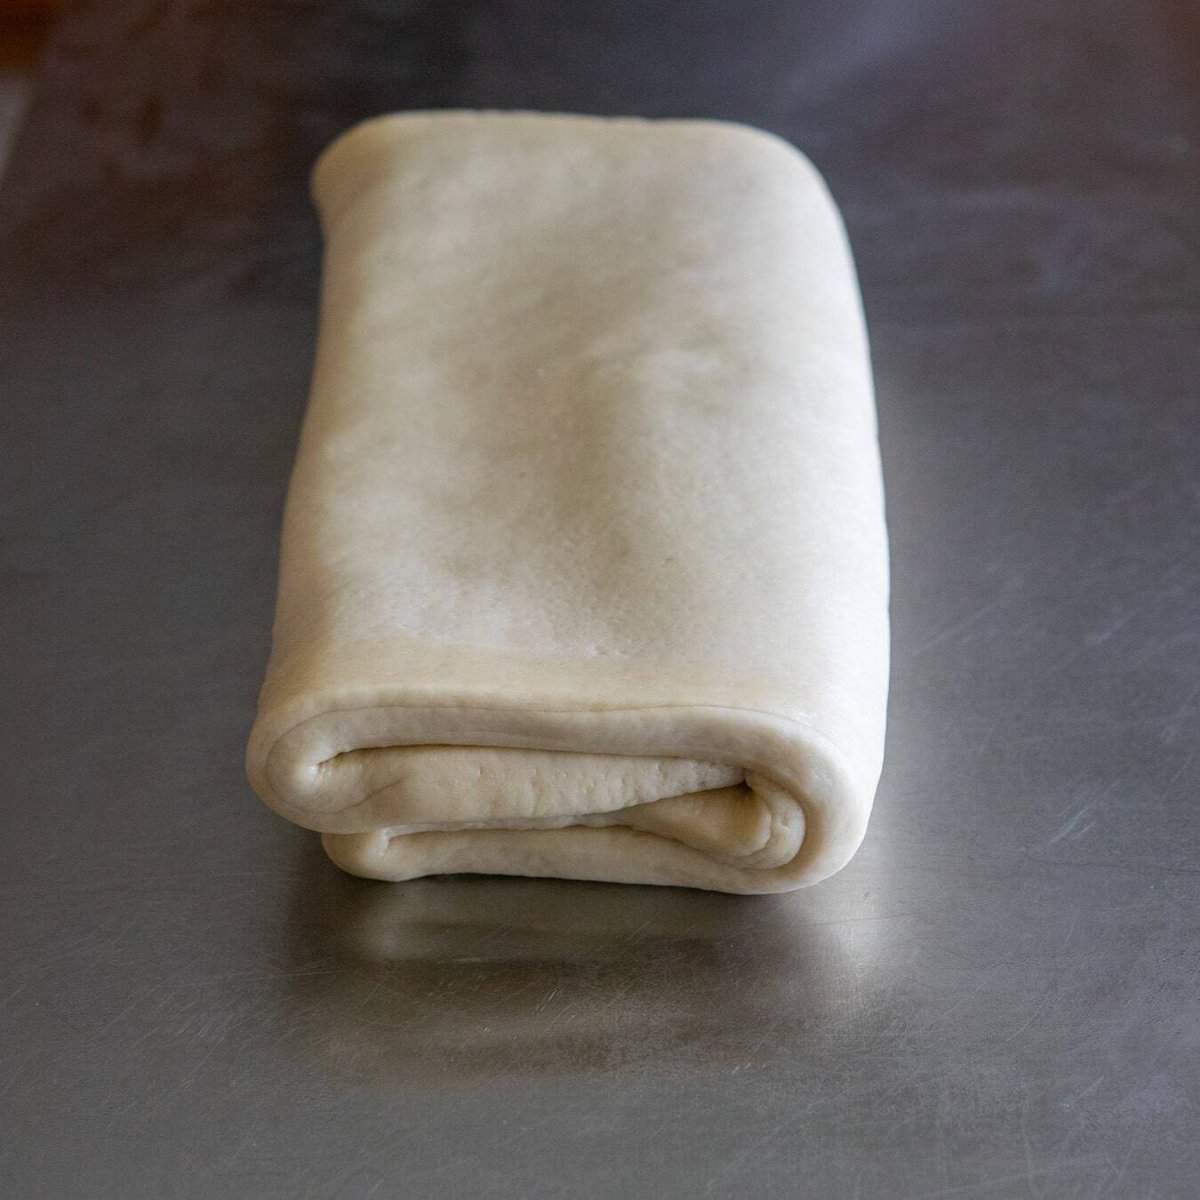
Next comes a double turn: you will fold the edges of the dough into the center (like two doors), and then once more along the center (like a book). Now rest the dough in the fridge for another hour (or overnight, if you prefer).
Shaping Your Vegan Croissants
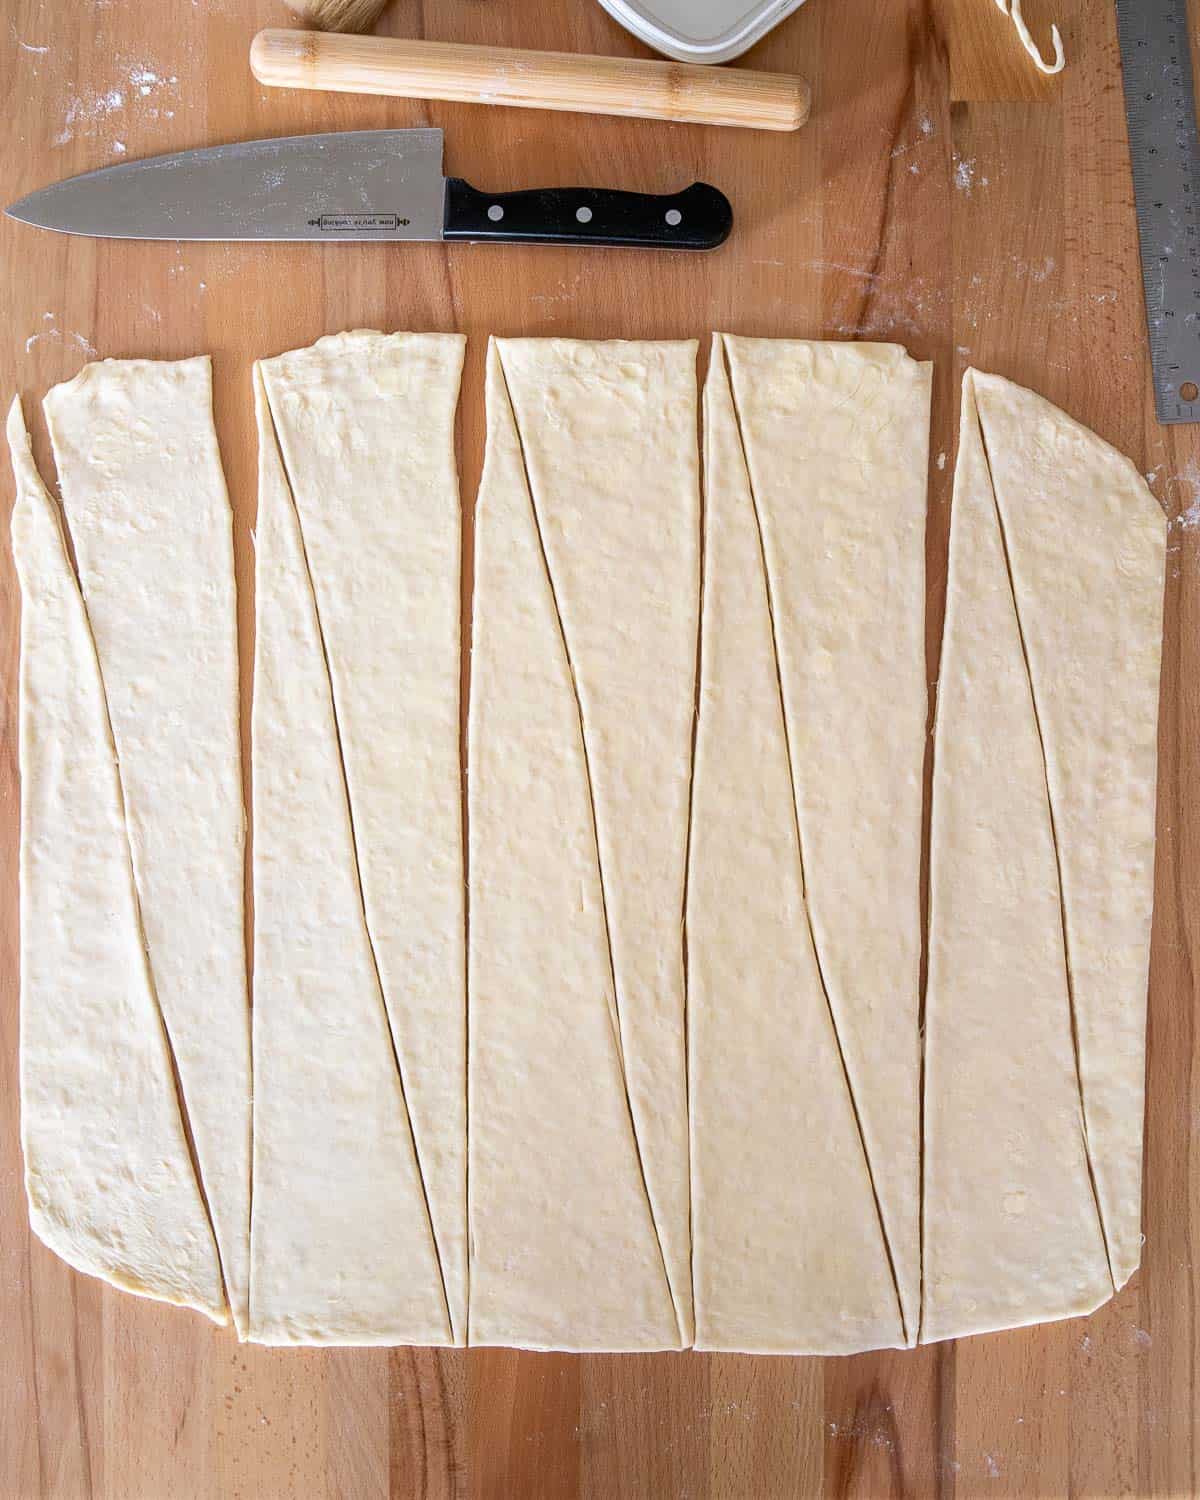
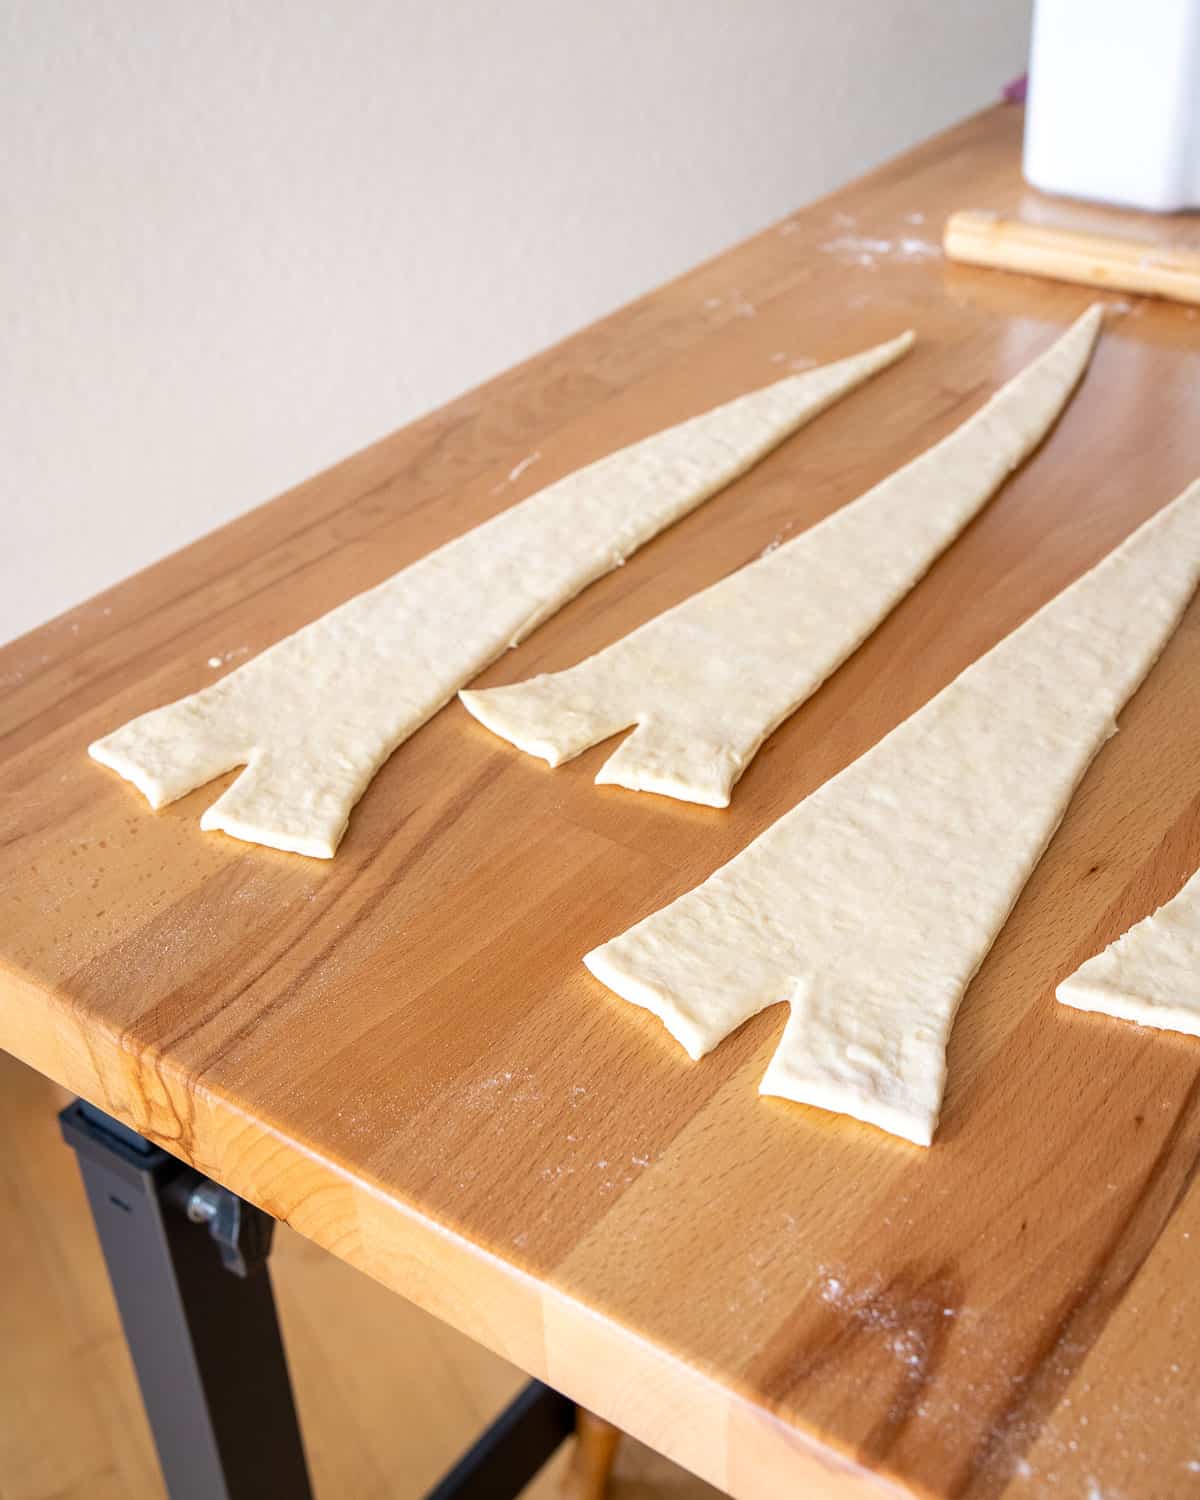
Working with half the dough, roll it out to just slightly longer than 20″ wide and 18″ tall (as pictured above). Working with a very sharp knife, trim the left and right edges. (It’s important to work with a sharp knife if you want those beautiful flaky layers to be visible on the outside of the croissant. A dull knife tends to squish the layers together.)
Then you will cut the dough into 5 long rectangles, about 4″ wide each.
Next, cut each rectangle diagonally from corner to corner, forming 10 triangles. Each of these triangles will become one croissant!
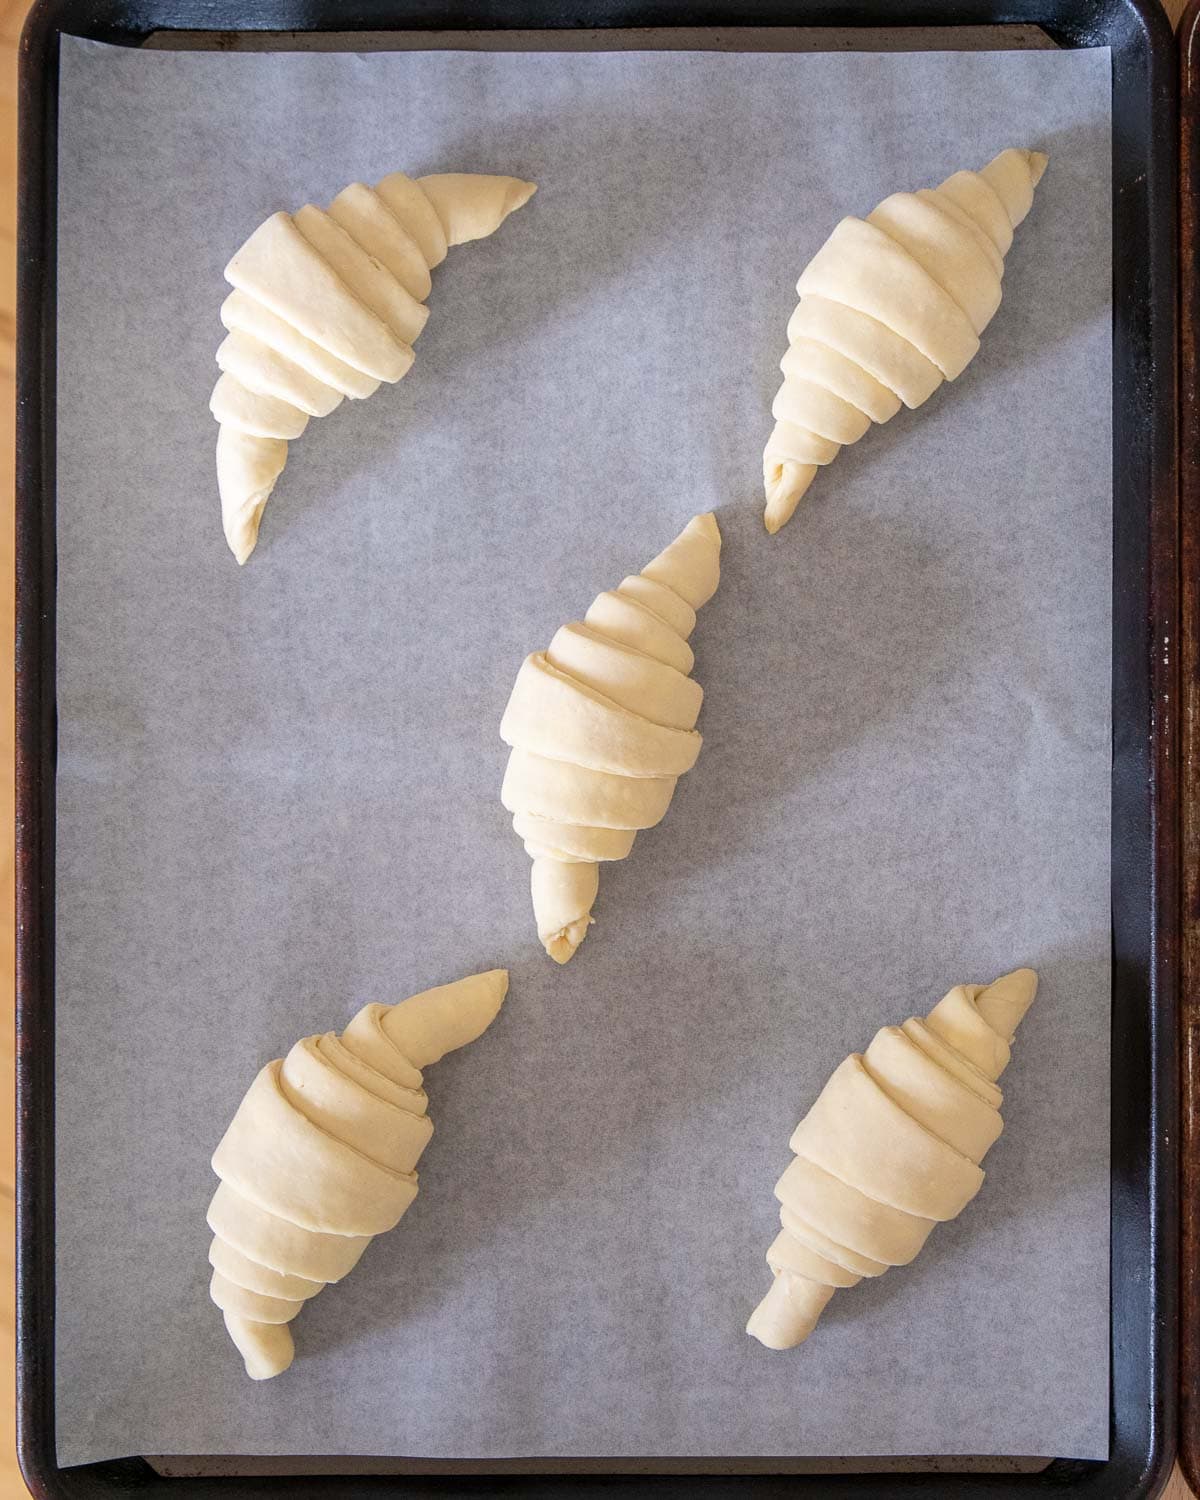
Make sure to use a pastry brush to dust the extra flour off the dough. Then cut a small slit at the base of each triangle, and roll into a croissant shape. Transfer them to a lined baking tray, with the seam side down.
Because the croissants will expand considerably after the final rising and baking, I like to divide them between two large baking sheets to give them plenty of room.
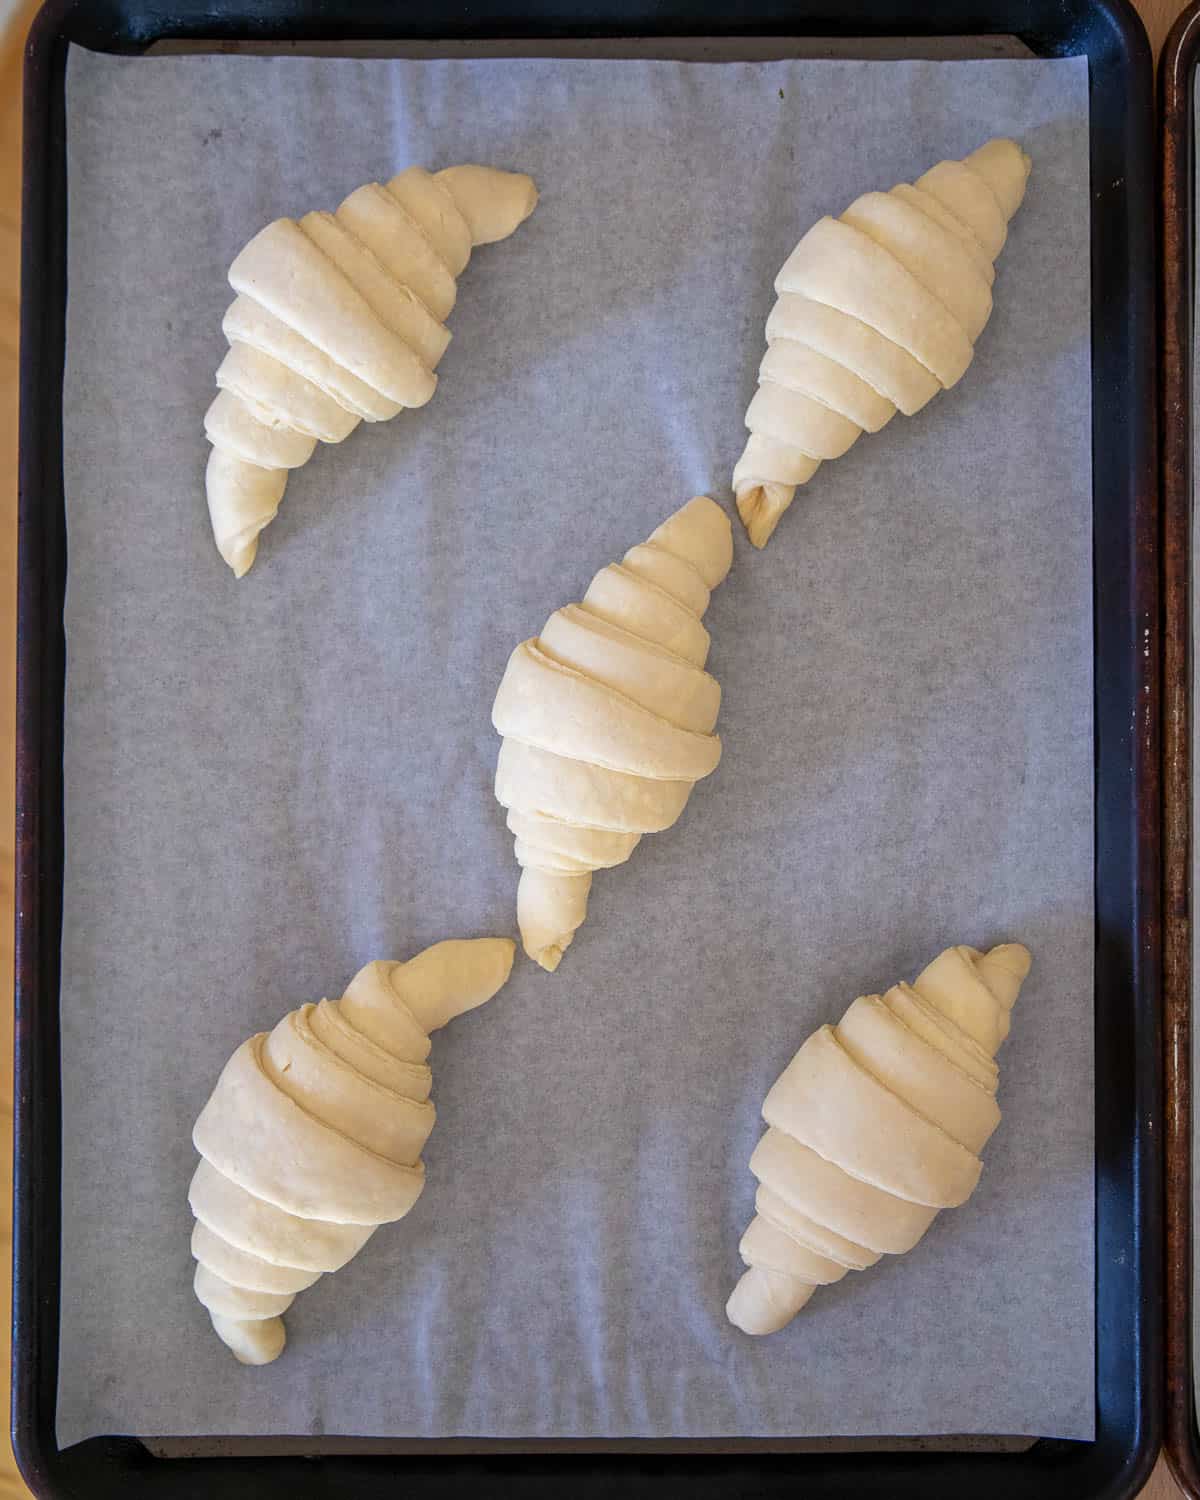
The croissants must rise one final time until just about doubled in volume. I like to cover them with lightly damp, lint-free kitchen towels, but you can also use a sheet of plastic wrap. We just want to keep them from drying out on the surface.
Baking Your Croissants
If you want to achieve the glossy finish you’d see in a bakery, you can brush your vegan croissants with a mixture of agave nectar and soy milk, although this is optional.
I like to bake vegan croissants in two phases. As with pie crust or many hearth breads, we start at a higher temperature for the best oven spring. The high heat causes the butter layers in the dough to rapidly melt and produce steam, which in turn expands and creates the signature flaky texture and big air bubbles we love to see in croissants. We then lower the temperature to ensure that the croissants cook fully without burning or browning excessively.
I hope this guide will help you make your first batch of vegan croissants, or to troubleshoot any issues if you’ve attempted to make them before. Stay tuned for separate posts about different croissant varieties: pains au chocolat, almond croissants (my absolute favorite), and vegan ham and cheese croissants!
If you make these, I’d love nothing more than to see how they turn out for you! Upload a picture to Instagram and tag me, and I will do my best to re-share on my stories! Happy baking!

Frequently Asked Questions
No, sorry! Coconut oil doesn’t have the same consistency as butter so it will be difficult to work with the dough when performing the turns.
Unfortunately not. The gluten structure is very important in this recipe.
Yes, technically, though you would probably want to get started as early as possible in the day. The fastest this recipe can come together is probably no fewer than 5-6 hours.
Starting time: Mix dough and set out to rise at room temperature for 1 hour or until doubled. Prepare butter slab and refrigerate.
About 1 hour later: Punch down dough, roll out and fold into a rectangle. Chill for 2 hours.
About 2 hours later: Roll out chilled dough and encase butter slab. Perform a single turn. Cover and chill for 1 hour.
About 1 hour later: Perform a single turn. Cover and chill for another 1 hour.
About 1 hour later: Roll and cut dough into triangles. Shape into croissants. Allow them to rise until doubled (1-2 hours depending on ambient temperature.)
About 1 hour later: Bake croissants.
These are just estimated times. It really depends on how quickly you work. That said, you’ll get the tastiest and most consistent results if you do plan ahead and allow the overnight cold fermentation!
More Vegan Baking Recipes!
- Vegan Milk Bread – The fluffiest homemade white bread you’ve ever had. Perfect for sandwiches and French toast.
- Garlic Herb Pull-Apart Bread – A fun take on garlic bread. Rip it apart and dip in your favorite marinara.
- Cinnamon Rolls – Fluffy dough, a sweet cinnamon filling, and a cream cheese frosting. Does it get any better?
Vegan Croissants Recipe
Video
Equipment
- stand mixer with paddle and dough hook attachment
- mixing bowl and mixing spoon if you don't have a stand mixer
- Rolling Pin
- 2 large baking trays
- parchment or silicone baking mat
- pastry brush to brush off extra flour
Ingredients
For the Dough
- 2 (0.25 oz) packets active dry yeast (4 1/2 teaspoons)
- 1 cup lukewarm water about 110°F
- 3 1/2 cups (420g) bread flour
- 1/4 cup (50g) granulated sugar
- 2 teaspoons (11g) salt
- 6 tablespoons vegan butter softened
- all-purpose flour to dust work surface
For the Butter Slab
- 1 cup (2 sticks) vegan butter slightly softened
Vegan Egg Wash
- 2 tablespoons nondairy milk
- 1 tablespoon maple syrup or agave
Instructions
Preparing the Dough
- Add the lukewarm water to the bowl of a stand mixer. Whisk in the yeast and allow to proof until foamy (about 5 minutes).
- Add in the granulated sugar, bread flour, salt, and the softened vegan butter. Mix with the paddle attachment on medium speed until dough comes together in one large mass. At this point it will look very rough and shaggy.
- Switch to the dough hook attachment and knead on medium speed for 6-8 minutes until dough is smooth and elastic. It should clear the sides of the bowl. Dough should bounce back when poked gently. If the dough seems overly wet or sticky, gradually knead in extra flour 1 tablespoon at a time until the right consistency is achieved.
First Rise
- Lightly oil a bowl and place the dough inside. Cover the bowl (you can use plastic, a large plate, or a lightly damp kitchen towel). Allow to rise until doubled (about 1 hour). If it's chilly in your kitchen, it might take a bit longer.
- Punch down the dough to remove any large air bubbles. Transfer to a clean surface. Gently stretch the dough out with your hands and fold it into a square shape. (This is just to make it easier to roll it out into a rectangular shape later.)
- Transfer the dough to a sealable container. It will continue to rise, so make sure there is a little extra space for it to expand. I like to to use an 8×8” baking dish with a lid — this will help to keep it in a square shape. You can also tightly wrap it in plastic wrap.
- Place the dough in the fridge and allow to rise for at least 2 hours, OR overnight.
Make the Butter Slab
- Next we will want to shape 1 cup of butter into a flat, square slab. I like to do this by taking a large piece of parchment and folding it into a 6×6" square shape. Place the butter inside the square and fold the edges of the parchment over to enclose it. Then use a rolling pin to pound and roll the butter to fill the parchment square. Roll over it to form it into a nice flat, even slab.
- Place the butter slab in the fridge to chill.
Laminating the Dough
- Once the dough has chilled for 2 hours OR overnight, it is ready to laminate. First bring your butter slab out of the fridge and place it on the counter so it has a few minutes to soften just *slightly.* Our aim is to have the butter slightly pliable but not soft — similar in texture to the chilled dough.
- Turn dough out onto a lightly floured surface and roll it out into a large rectangle, roughly 8"x16". (It needs to be slightly larger than twice the length of the butter slab.) Use a pastry brush to dust off any excess flour from the surface of the dough. Place the butter slab on one side, leaving a border, then fold the dough over to envelop the butter. Pinch around the edges to seal in the butter tightly.
- Note: While laminating the dough, use as much all-purpose flour as needed to keep your dough from sticking to the work surface and to your rolling pin. We will use a pastry brush between steps to brush off any excess flour.
- Roll the dough out to roughly 24×9". Use a pastry brush to dust off excess flour. Perform one single turn: Fold the dough in 3rds like a letter.

- Place the dough back in the sealed container (or wrap it tightly with parchment/plastic). Place in the fridge and chill for at least 1 hour before proceeding. This is necessary to keep the butter from softening too much, and it will allow the gluten to relax so the dough will not resist being rolled out again.
- Once the dough has chilled, roll it out again to 24×9". Again, use your pastry brush to dust off excess flour. Now perform a double turn: Fold both ends of the dough to meet in the center, then fold in half again like a book. Cover dough and refrigerate for 1 hour OR overnight to allow the gluten to fully relax.


Shaping the Croissants
- Lightly dust your work surface with flour and roll dough out to just over 20" wide and 18" tall. Use a very sharp knife to trim the left and right edges just slightly, so they are straight and crisp.
- Now cut the dough into 5 long rectangles, each about 4 inches wide. Then cut each rectangle diagonally from corner to corner, creating 10 long triangles. Each triangle will be one croissant.
- Working one at a time, use your pastry brush to dust excess flour off the dough. Cut a small slit at the base of each triangle, then gently pull to elongate the piece of dough even more. Now gently roll your dough into a crescent shape.
- Place on a baking tray (lined with parchment or a silicone baking mat) with the point or seam of the croissant on the bottom. Repeat with the remaining croissants. The croissants will expand, so I prefer to divide them between two large baking sheets to give them plenty of space.
- Lightly cover the croissants with plastic or a slightly damp tea towel. Allow croissants to rise at room temperature for 1-2 hours, until doubled in size. They should look noticeably puffy and should jiggle slightly if you shake the baking tray.

Baking
- Preheat oven to 400°F toward the end of the rising time.
- Optionally, you can whisk together 1 tablespoon agave or maple syrup with 2 tablespoons plant milk to make a vegan egg wash substitute. Lightly brush the croissants with this mixture to help them achieve a glossy finish. (Make sure it's only a very light wash, or the sugars can cause the croissants to brown too quickly.)
- If you have also divided your croissants between 2 baking trays, we will bake them one at a time. You can place the other tray in the fridge or in a cool spot in your house while the first tray bakes.
- Bake croissants for the first 5 minutes at 400°F, then lower the temperature to 350°F and bake for another 20-25 minutes, until deep golden brown. If they appear to be getting too dark, you can loosely tent them with foil until they are done baking.
- Please note that every oven is a little different in terms of how it distributes heat, so you may need to make some adjustments in case yours has any hot spots.Some ovens tend to overly brown the bottoms of baked goods — if this happens to you, you might want to cook the croissants on a higher rack, OR place an extra (empty) baking sheet on the bottom rack beneath your croissants to help shield them from the heat, so the bottoms of the croissants don't get too dark.If your oven tends to be a lot hotter towards the back than the front, then I recommend rotating your baking tray midway through the cook time so the croissants bake evenly.
- Allow the croissants to cool on the baking tray for about 5 minutes before transferring to a wire cooling rack.
- These are best served warm, whether fresh from the oven or reheated slightly in a microwave or toaster oven. Store in an airtight container for up to 5 days at room temperature. These also freeze and defrost well.
What should I do if my butter start coming out of the folds?
It sounds like your butter was melting. Try putting it in the fridge for a few minutes to reharden before continuing with the layering. Hope that helps.
bathroom remodeling Charlotte NC
Hi Erica! I agree with Maria’s comment. You can try letting it chill for another 10-15 minutes before continuing, especially if it’s particularly warm in your kitchen! It also helps to lightly dust your work surface and rolling pin with all-purpose flour to ensure nothing sticks and the dough is rolling out easily.
This is a lovely recipe, and one I would definitely try. This particular combination sounds delicious. Thanks for sharing!
Thanks so much!
What a recipe, these are worth the time! Thank you for all the in-depth guidance and extra tips on ingredients. It really helped when making my croissants, they were incredible and I will use this method again. I have frozen half of them (shaped) to pull out the freezer when the cravings strike. Sending good vibes from Scotland!
So glad that you enjoyed the recipe and found the guide helpful!
I didn’t do the 2 day method and instead followed the 1 day version that you had in the post- this was my first time making these and they were amazing! It’s a long process but I found it quite soothing & relaxing. Next time I will do the 2 days though because I think my dough could have had more air in it. Thank you for a great recipe Sarah!
I’m so glad to know the 1 day shortcut worked out for you!
Hi Sarah, one question for the laminating part. In your video you mentioned that the second time of the laminating doesn´t require a “double turn”, just a fold like folding a book. But in the recipe it required Double Turn for both rounds of laminating. Which one is the correct way? Thanks.
Hi there. Sorry I am just now seeing this question! Either one will work; I am now accustomed to doing double turns both times, just for extra layers. As you can see in the video, it will still turn out layered and fluffy if you don’t, however.
How long is ‘overnight’ (context: step 5 of preparing the dough – “… Wrap the dough in plastic, or place it in a sealed container and refrigerate OVERNIGHT to cold ferment.”
Hi Julianne. Sorry to just be seeing this now. I recommend at least 8 hours, but it could be longer. The fermentation process slows substantially in the fridge. You have some leeway in terms of when you’d like to resume the process. Generally if you prepare the dough one day and refrigerate it, you can take it out and resume the process at any time the following day.
Great recipe!
I’ve made this recipe a few times with differing success. Some tips that helped me:
I don’t have bread flour so i replace 7 grams of AP flour with wheat gluten (1,5 teaspoons). This seems to be the sweet spot for soft croissants.
Don’t roll the dough out too thin when doing the final shape.
And wait a few minutes before rolling the dough out after chilling. In the same vein take the butter slab out of the fridge 10 minutes in advance, i found my butter breaking through the dough when I didn’t do this.
hi Sarah, was wo during can I use a home made vegan butter for this recipe?
Hi Sarah, I attempted this using Earth Balance soy-free buttery sticks (for a friend who cannot eat dairy or soy), and found that:
(a) Although initially smooth after the overnight fermentation, the dough became a bit sticky and greasy, and developed an uneven surface as I was laminating and rolling it out. Is that because the butter was melting (I was doing this at room temperature), or because the dough wasn’t kneaded enough, or some other issue?
(b) After I shaped the croissants, I left them at room temperature for a couple of hours, but they didn’t noticeably expand. What might have caused that, and what can I do to correct for it?
Thank you so much for this recipe!
I tried this recipe for the first time and was pleased with the results. They had a great taste and chew, but could have been lighter. I used instant yeast because that’s what I had on hand, adjusting the amount as mentioned in the recipe, bread flour and Miyoko’s sticks. I had to knead the dough about ten minutes in my stand mixer to get a “bounce back”. Any suggestions as to how to create a lighter croissant? Thanks for sharing your recipes!
A longer proving period?
Pingback: 40 Fantastic Vegan Breakfast Recipes - Rainbow Plant Life
would have been better whith butter
This is a vegan recipe, so butter would not make sense here, but you are welcome to try it on your own instead of making a baseless claim. (:
Pingback: 40 Fantastic Vegan Breakfast Recipes | My Love Link - Health
Worked very well using solid coconut fat…turned out almost as good as those we used to buy in Limoges.
Pingback: Vegan Croissant Sage Stuffing with Apples - Two Market Girls
Pingback: Is French Bread Vegan? Can Vegans Eat French Bread? - CanVegansEat.com
Amazing!!!! Faced one of my biggest cooking (baking) fears and made the best croissants I’ve ever tasted! The instructions make it so easy to understand the process and made it seem effortless.
Pingback: 20 Easy Vegan Breakfast Ideas You Have to Try - Jhánneu
Pingback: Vegan Baking Roundup: My Top 6 Vegan Baking Recipes
Pingback: French Croissants // VEGAN - Happy Apples Recipes
Pingback: Can you freeze croissants? How to freeze properly - FOODANDKITCHENAPPLIANCES
Hi Sarah. I’ve made this recipe multiple times and it always turns out great. My only issue is that my dough is consistently much softer than what’s in your video and it makes it a bit hard to handle. Do you think that’s because of the flour that I’m using (Robin Hood bread flour)?
I had the same issue, however I found that adding a teaspoon of vital wheat gluten at a time to the dough while kneading helped it reach the desired consistency a lot more easily. I guess not all bread flours are built equal.
How long before laminating do I take out of the fridge?
Thank you
We were super excited to try this recipe! It looked so great and it seemed to work for a lot of people.
We weren’t exactly sure what happened with our approach, but it didn’t seem to work out the way the recipe showed. We tried this recipe twice. The first time we tried, we kneaded the dough (with a Kitchenaid mixer) for 10 minutes and let it rise for 1 hour before putting it in the fridge overnight. Our dough didn’t look as supple as it appears in the recipe, but we kind of hoped for the best. The second time, we tried kneading the dough a bit longer (probably around 15-20 minutes) and let it rise for a while longer until it rose to 2X its size (this ended up being 4.5 hours), which ended up making the dough easier to work with. While the dough looked better, the rolling out process was still quite messy and we weren’t able to roll it out thin enough. As a result, our croissants ended up being quite thick and large, and we had to bake for about 5 minutes longer than the recipe called for in order to bake them through. All in all, they ended up tasting really good, but the texture was off because we weren’t able to roll the dough out thin enough.
We are pretty confused as to what we did wrong. The dough in the recipe looks quite a bit thinner than our dough, so maybe we need to add more water than the recipe calls for? Curious if anyone else had this experience, and if there’s anything we can do to make the dough easier to work with.
Thanks in advance!
Perfect recipe
I made it today and it’s turned amazing
Thank you very much Sarah for sharing this perfect recipe
Hi! Wondering how this recipe would work with margarine?
I have made this recipe 3 times this week. With a variety of different vegan butters! They were all delicious.
I was able to use tub butter for the dough for one batch, which turned out absolutely lovely.
I don’t have bread flour, but I made mine with VWG as directed in recipe notes.
I found that it has taken my dough slightly longer to rise than the recipe recommendations. I’m considering getting a warming mat made for baking so I can control the rise.
Thank you!
Loved this recipe, Sarah! Fun to make. Aaand holy heck, they are so freaking delicious. 🙂
Thank you so much for this in-depth, step by step recipe and tutorial for vegan croissants! I’ve always wanted to make croissants but thought I would just fail. However, after thoroughly reading through this guide and watching the video, I felt that I could at least attempt it. I am so glad I did because they turned out beautifully and my house smells unbelievable!
I even made a few mistakes and the final product still ended up great!! For example, I accidentally dumped in around 65g of sugar, which made the final product sweeter than I would prefer but still delicious. I also made some mistakes in lamination, which made some of the baked croissants a bit greasy (as butter likely leaked through the dough). However, I’ll just be sure to be more careful with laminating next time (longer rest times, getting a better feel for when the butter and dough is right to work with). I wish I could post a picture because they turned out so beautiful.
Thanks again and I look forward to making these for family and friends!
Made this twice already and had perfect croissants from it! Thanks!
Only one question please 🙏 if I want to have more layers, can I fold it once or twice more than the recipe says?
Thanks again!
Thank you SO MUCH for posting this detailed recipe with your video! I just finished making these (half plain and half chocolate; used Miyokos vegan butter) and they turned out *beautifully*! I’ve tried unsuccessfully a few times from other recipes, so THANK YOU for your coaching so I can finally make a great vegan croissant! YAY!!!
Delicious! I used 2/3 whole red wheat bread flour and 1/3 all purpose. I used Miyoko’s butter sticks. They were delicious and with the whole wheat flour, slightly more healthy so I can rationalize eating multiples a day : )
I found the higher oven temperature to start not necessary for my oven. I baked the second tray at 350 for 25 minutes and they came out perfect.
Thanks for the detailed instructions.
Hi Sarah,
Thanks for this recipe. I had a lot of fun making it, the only issue is that my croissants came out more like scones than croissants. They weren’t light and flaky, they were pretty dense although I could still see layers inside. Any idea what I might have done wrong?
Hi Sarah, do you use the fan setting in your oven or not?
I have been making this recipe for almost 2 years now! It’s incredible.
My only comment is for the website technically- when you click the x2 for double recipe yeast and butter for the slab don’t increase. But if you catch that, double correctly- the recipe is flawless!
Pingback: “VIRGINIA” : – TRIPLE MOON GODDESS
I have no idea what I’m doing wrong, but every time i try this it doesn’t work. The inside doesn’t cook, my pastry doesn’t rise and the outside of my croissants turns out tough and chewy. Unless it works for you first time, I would not recommend.
Can I use fresh yeast and if so, how much? Thanks.
So, I doubled the recipe to make 20 crossaints. I don’t think that the measurements are correct. In the doubled recipe it says the butter slab should be made with 2 cups (2 sticks) of butter. Didn’t realize until after the fact, my bad I should have been paying more attention. But, wondering if the measurements in the laminating the dough section should have changed throughout to adjust for the extra dough. For example, should I be cold fermenting it in a dish bigger than the 8 x8 that it says for the one batch, etc.
Hi Greer. This seems like an issue with the way our recipe card plugin “doubles” recipes. It will only double the actual measurements in the ingredients section and not anything else. For example, 2 cups of butter is 4 sticks, but the plugin can’t do that math, unfortunately. Same goes for the 8″ x 8″ pan situation.
I’ve just used this recipe to make croissants for the first time, and it’s fantastic! All the tips and tricks for conversions and planning made this so easy to follow.
I can’t wait to make more 😊
In the blog post at the shaping step it says “working with half the dough,” but in the step-by-step instructions at the bottom I’m not seeing that instruction repeated. Since both sections indicate this should create a 20″x18″ rectangle, I just wanted to verify if that’s for the full recipe or just half. Thank you in advance!
I have been wanting to try making croissants for ages and finally got round to it this weekend, and these were just perfect – will definitely make them again, thank you so much for this fantastic recipe!!!
You’re welcome! Thank you for the lovely review!
This recipe is so easy to follow and the croissants turned out better than I could’ve imagined! I tried it with chocolate, almond, and vegan ham and cheese fillings and they were all amazing.
Fabulous recipe, great step by step instructions and made it all feel pretty simple! I’ve done a lot of baking but not attempted croissants before as I was nervous to try but would definitely make these again. They are light and airy and flaky and exactly as a good croissant should be! I don’t have access to good vegan butter so I used Crisco and it worked great (albeit doesn’t have quite the same buttery flavour). We live in the Pacific and can’t get many vegan goodies here including croissants, which are one of my faves. Now we can make them at home! ❤️❤️❤️
Hi! Love the recipe – you made it so manageable. From first try they turned out so delicious- don’t think I’m gonna search for vegan croissant anymore! However, I’m unsure about the steps when doubling the portion. Do you roll out the portion double the size? And are the folding process still the same? 🙂